March 2015

Sustainable Research Literature Management with Docear part I

docear.png

This is part I of a two-part post in which I will walk you through some key parts of a technically-savvy user’s long-term literature review and maintenance strategy. In part I you will learn how to use Docear to:

  • take notes while reading that won’t get lost or damaged by your software,
  • organise notes and annotations so you won’t forget why you took them,

In part II, should you choose to get geeky and read that bit too, you will learn to:

  • maintain associated bibliographical records,
  • use Docear in a way that will keep your literature reviewing current for years to come.

Warning: long post, so here’s a table of contents:

Contents

Introduction

What this guide is for

There are many software systems that purport to be helpful in managing academic literature, and everyone swears by their own. My belief about software is that it’s usually a nightmare, and your choice should be driven by considerations of damage limitation. With that in mind, I am using Docear to limit the damage that software can do to my literature reviewing and thesis preparation process.

This guide will outline some ways to use this software with long-term sustainability in mind. If you don’t know what Docear is, you could spend 6 minutes watching this video.

If you’re starting a PhD or a research process, and thinking about how to keep up with the literature long-term, you might want to think about using Docear in the ways described here. To get started with that, first download and install Docear, read Docear’s own very good user guide to understand the basics, then come back and read this1.

Why Docear works for a long-term research strategy

There are lots of good reasons listed on the Docear website that compare Docear’s features to Zotero, Mendeley or other reference management systems.

My choices are driven by issues of long-term software sustainability, and focus on cross-compatibility, reliability and stability. Docear fits my criteria because:

  • It’s Open Source software using well adopted, documented and supported file formats.
  • Docear’s plain text-based file formats for are searchable and editable.
  • Text-based files enable version control and collaboration (including with your future self).
  • Docear, JabRef and FreePlane all work together or separably on most platforms.

In general, Docear conforms with the tenets of Unix Philosophy i.e.: Docear is designed to be modular, clear, simple, transparent, robust, and extensible for users and developers.

What all this means for academics is that

  • You are probably always going to be able to edit and view these files on any platform.
  • If you just want to change a bibliographic reference, you can just use the bibliography manager (or a text editor) to do it on any computing platform without even firing up Docear.
  • If you just want to view your Docear file on Android, i0S, or using any mind-map viewer, you can open it (albeit with limited features) in FreePlane, FreeMind, Xmind or the many associated pieces of software that can read these files.
  • If you want to search your entire archive of papers, you can do it using grep on a command line or with any text-search and indexing system that can read your file system (I use Recoll).
  • It doesn’t mess with your files or do complex or potentially destructive things, use fancy databases etc. You can move away from Docear at any time – you’ll still have your annotations, your PDFs, your BibTeX reference files.

No vendor lock-in, no dodgy or dangerous games with your data. That’s a lot of damage-limitation right there, and this isn’t even mentioning a compelling and unusual combination of features that Docear itself documents very well – so I won’t go over those, but nonetheless, here is my list of:

Killer features of Docear

  • Import annotations from PDFs, and cross-sync them (change the annotation in your PDF – it gets changed in Docear, change it in Docear, it gets synced in your PDF).
  • Organise your annotations in multiple ways
    • Organise your annotations visually by research theme / category / heading
    • Organise your annotations visually by paper / book / author
    • Mix these up, copy and paste annotations multiple times, make further notes on annotations etc.
  • Import file/folder structures from your hard disk, so you can get an overview of your data, files and research materials alongside your literature, and make notes and connections between them.
  • Maintain the bibliographical associations of your annotations and notes, even after copy/pasting/reorganising them.

Just to re-state this: I’m not going to go through these basics in this how-to, so if you want to learn to use Docear from scratch you really should read the manual. What follows are some adaptations I’ve made to the Docear workflow that I think make it even more useful as a secure and long-term bet for research literature management.

How to take notes that won’t get lost or corrupted

PDFs, however flawed as a document format, are a de facto standard in academia and aren’t going away soon. You can read, edit and share them relatively easily on all devices and platforms, so that’s probably how you should store your annotations and bibliographical data.

General annotation strategy

Many pieces of literature review / bibliography management / annotation software keep notes and bibliographical records scattered about in proprietary databases or separate annotation files, so following Docear’s excellent advice on the issue I use ezPDF Reader on Android, and PDF-XChange Viewer on Linux (via wine) to make my annotations in my PDFs themselves.

Docear allows you to manage these annotations effectively without sacrificing the simplicity and security of having it all in one, cross-platform, easily accessible file.

Synchronisation and backup across clients/computers

The benefits of this are clear: you can easily back up your PDFs.

I use Dropsync to synchronise my main_literature_repository folder with a folder on my Android tablet, so when I’m on the go I can take notes and have them appear automatically in my literature review mind map when I start up Docear.

I tried using Dropbox’s own android client, I found that it would sync too frequently, and sometimes randomly deletes its temporary files. For this reason I recommend syncing your entire PDF repository to your mobile devices, editing the PDF locally (on the android device’s file system), then synchronising with Dropbox or whatever local/cloud/repo/backup service you prefer.

How to remember why you took your notes in the first place

Use action-related tags for each annotation

I have most of my research ideas while reading, but they’re not all just ‘notes’, they are really different in response to different ideas about what I plan to do with that idea. So I find it useful to distinguish between the kinds of notes I take on documents. When I take an annotation, I track that difference by starting the annotation with one of 10 or so labels:

  • todo: The most important label – this reminds me to do something (look up a paper, change something in my manuscript etc.)
  • idea: I’m inspired with a new idea, somehow based on this paper, but it’s my own thing.
  • ref: This is a reference, or contains a reference that I want to use for something.
  • question: or just q: I have a question about this, maybe to ask the author or myself in relation to my data / research.
  • quote: I want to quote this, or it contains a useful quote
  • note: Not a specific use in mind for this, but it’s worth remembering next time I pick up this paper.
  • term: A new term or word I’m not familiar with: I look it up or define it in the annotation.
  • crit: I have a criticism of this bit of the paper.

There are a few others I use occasionally, but these are the most common. You probably can think of your own based on how you would categorise the kinds of thoughts that come to you while reading research papers.

Use keywords for each research project/idea

I have 3 or 4 project constantly on the go, and lots of ideas for new projects and papers. I want to capture my responses to what I’m reading in relation to those projects in a reliable way.

So, I have short, unique keywords for each of my projects:

  • camedia: a CA project about how people talk about the recording devices they’re using
  • cadance: a CA project about partner dance
  • thesis: my thesis
  • thesis_noticings: my chapter on noticings
  • thesis_introduction: get it?

So if I’m reading a paper and it says something like:

“Something I really disagree with and want to comment on or respond to in my next article on dance”

I’ll highlight, copy and paste that into a new annotation, and add a few keywords on the top:

    quote: cadance: "Something I really disagree with and want to comment on or respond to in my next article on dance"

This means when I search for all my annotations to do with ‘cadance’ project, I’ll find this one, and I’ll know I wanted to use this as a quote.

Similarly, I may have multiple projects:

    quote: cadance: thesis_noticings: "Something I really disagree with and want to comment on or respond to in my next article on dance"

If I want to quote something, but also want to write a note about it, I’ll make two separate annotations on the PDF, one that says:

    quote: cadance: thesis_noticings: "Something I really disagree with and want to comment on or respond to in my next article on dance"

The other that says:

    note: cadance: thesis_noticings: "Something I really disagree with and want to comment on or respond to in my next article on dance": I really disagree with this for reason, reason and reason.

These will show up in my literature review map as two separate annotations, with different actions attached to them.

Use auto-completion software to make this less painful

I use Switfkey for all my annotation on my Android tablet (where I do most of it). This greatly reduces the time required to type in repetitive tags or keywords that I use all the time to enhance my annotations (see the next section). It also offers auto-complete suggestions so I can remember more complex project keywords / tags easily.

That’s the general advice bit. Geeky advice follows in part II.

So far, this guide has given you some pretty generic advice about note taking, you could use it in any piece of software. The Docear-specific pay-off for this process comes when you import your PDFs into Docear. However, that bit gets pretty geeky. You’ll need to be comfortable with scripting, modifying workflows of existing software packages, and generally be unperturbed by geeky terminology.

If this isn’t your thing, you can just use Docear with the above strategies – or use them more generally in your literature reviewing.

If you are geekily inclined, or just curious, check out part II of this post.

Notes

  1. ^ One little gotcha: if you’re using a Mac (esp. Yosemite (10.9.X or newer)), you’ll have to do some terminal diddling to make sure you’ve enabled software from unsigned sources to run on your machine or you’ll get an unhelpful error message. Thanks Apple!

Sustainable Research Literature Management with Docear part I Read More »

Pandoc + Markdown for Conversation Analytic Transcripts

markdown.png

A while back I wrote a blog post detailing why I chose Pandoc and Markdown to write papers including Jeffersonian Conversation Analytic transcripts. It wasn’t very detailed though, because a full explanation of how to set up a compatible text-based writing workflow was an onerous task – one happily now completed beautifully by Dennis Tenen and Grant Wythoff’s guide to Sustainable Authorship in Plain Text using Pandoc and Markdown.

So, I decided to update this how-to for anyone using Pandoc and Markdown to start including CA style transcriptions quickly and easily.

To go along with this how-to, there is also a set of demo files you can download to try out this approach. However, before you do that you probably want to get a pandoc + markdown setup installed.

The Problem

There are great software tools out there for CA-style transcription, my favourite is CLAN for a number of reasons. However, I can’t find any resources online about how to publish CA-style transcriptions without being forced through some eye-bleeding LaTeX diddling every time.

Of course I could just use a WYSIWYG text editor like LibreOffice – but now I’ve experienced the power of LaTeX for document preparation and publication, I really can’t see myself going back.

When doing CA it seems particularly important to have transcriptions legibly in the body of the paper and visible during the writing process, because many of the analytical observations come, or get significantly modified at the point of writing about them, double and triple checking assumptions, and cross-referencing with the CA literature while tweaking citations.

The Simplest Solution: Markdown + Pandoc

Markdown is my favourite lightweight markup language, a highly readable format with which you can write a visually pleasing text file, which you can then convert into almost any other format – HTML, OpenOffice, LaTeX, RTF, etc. using Pandoc. There are many similar systems, notably reStructuredText and Textile, all of which you can use to write your text file, and other conversion tools/toolsets, but in my experience, Markdown and Pandoc are the most useful combination in an academic context 1.

There are lots of great things about markdown:

  • Just edit simple text files – no weird file formats to get corrupted or mangled.
  • Less verbose and complicated-looking than LaTeX.
  • Small files are easy to share/collaborate on with others (everyone gets to use their favourite editor).
  • There are some great pandoc plugins for my favourite text editor vim.

However, the best thing is that, used along with the XeTeX typesetting engine, it solves the problem with CA transcriptions being unreadable in LaTeX/pdflatex.

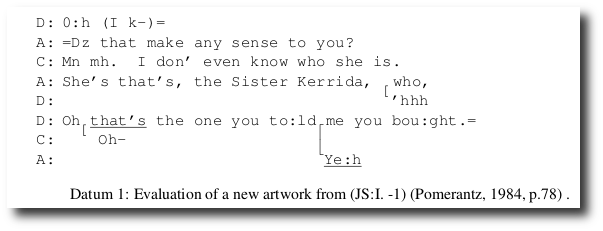
For example, in my first CA-laced paper, my transcriptions looked like this in my LaTeX source:

\begin{table*}[!ht]
\hfill{}
\texttt{
  \begin{tabular}{@{}p{2mm}p{2mm}p{150mm}@{}}
 & D: &  0:h (I k-)= \\
 & A: &  =Dz  that  make any sense  to  you?  \\
 & C: &  Mn mh. I don' even know who she is.  \\
 & A: &  She's that's, the Sister Kerrida, \hspace{.3mm} who, \\
 & D: &  \hspace{76mm}\raisebox{0pt}[0pt][0pt]{ \raisebox{2.5mm}{[}}'hhh  \\
 & D: &  Oh \underline{that's} the one you to:ld me you bou:ght.= \\
 & C: &  \hspace{2mm}\raisebox{0pt}[0pt][0pt]{ \raisebox{2.5mm}{[}} Oh-- \hspace{42mm}\raisebox{0pt}[0pt][0pt]{             \raisebox{2mm}{\lceil}} \\
 & A: &  \hspace{60.2mm}\raisebox{0pt}[0pt][0pt]{ \raisebox{3.1mm}{\lfloor}}\underline{Ye:h} \\
  \end{tabular}
\hfill{}
}
\caption{ Evaluation of a new artwork from (JS:I. -1) \cite[p.78]{Pomerantz1984} .}
\label{ohprefix}
\end{table*}

which renders this:

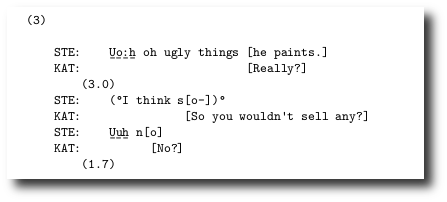
A simpler way to do this in Markdown (with none of the fancy stuff) is to use Markdown’s ‘verbatim’ environment – you do this by putting four spaces or one tab before each line in your transcript (including blank lines). Here’s the messy LaTeX above re-done in simple Markdown.

(3)

STE:        U̲o̲:̲h̲ oh ugly things [he paints.] 
KAT:                            [Really?] 
        (3.0) 
STE:        (°I think s[o-])°
KAT:                   [So you wouldn't sell any?] 
STE:        U̲u̲h̲ n[o] 
KAT:              [No?] 
        (1.7)

which renders like this:

ugly_things.png

Overall, I think the Markdown version represents a significant improvement in legibility while writing. I think it might be possible to do the same in LaTeX using the {verbatim} environment, but the fact that Markdown also lets me concentrate on writing without throwing errors or refusing to compile lets me spend longer on the writing than on endless text-fiddling procrastination.

When it comes to rendering, I feed my markdown file to pandoc:

$ pandoc --latex-engine xelatex --bibliography library.bib --csl default.csl -N -o  paper_title.pdf paper_title.markdown

If you want to use the nicely stretched ceiling characters for overlap marking, or the raised full stop / bullet operator for inbreaths, you can do so, but you’ll need to run Pandoc (see below) referencing a font that has those characters. For example, you could use CAfont and add:

--variable monofont=CAfont

to the pandoc command above.

The default.csl file is a citation style language file to customise how bibliographical references are rendered.

If you’re only adding a few examples to your document, this will probably work fine. If you are writing a thesis or a longer document – read on.

For Longer Texts: Markdown + Pandoc + LaTeX

The above approach may work for writing a short paper with one or two examples, for a thesis or a longer piece where you may have many examples, you’re going to have to take this a step further and use some LaTeX within your Markdown document. The bad news, you will have to use LaTeX, templates and some code to deal with:

  1. Example Layout: you probably want your examples to be graphically separated from your text in a consistent way.
  2. Document layout: you may need to make some stylistic tweaks to how your document prints out.
  3. Referencing: you will want to use labels for your examples so you can cross-reference them automatically within the text and not have to re-label them every time you make a change.
  4. Audio/video links: you may want to include links to audio/video examples in your files.

The good news: your CA transcript examples will still be easy to read/edit, and actually this is all pretty straight forward once you’ve got it set up.

What you will need

First, you need a working Pandoc + Markdown setup installed. You also need a nice monospaced font installed – I use CAfont by the amazing CHILDES project.

I’ve made a downloadable archive of the three files I use every time I create a new document. Download those. There is also a working demo (README.md) and some image files that you can use to edit/test things, or modify them to create your own.

Along with these examples inside the camarkdown_files folder you will find:

  • template.txt: a LaTeX template that Pandoc uses when it renders PDFs – with macros etc.
  • apa.csl: a citation style language file describing how I want my APA citations rendered.
  • margins.sty: a little margins file I canuse to tweak the overall page layout separately (US Letter vs. A4 etc.)

Whenever you start a new document, these three files into the same folder.

A little explanation

Without getting too geeky about it, here’s a little explanation of how I use this setup:

Whenever I convert my Mardown to PDF using Pandoc, I add:

--template template.txt

to the pandoc command to make sure it uses this template. The template is based on the default LaTeX template Pandoc always uses to convert Markdown to PDF via LaTeX, but I’ve added a macro: caextract.

Basically the caextract environment sets the default monospaced font, and (optionally) creates a to an online media file referenced in the Markdown file (see working example below), it also formats the paragraph containing the example as a framed float to divide it from the body of the text, and changes the listings name to ‘Extract’, so references list it as ‘Extract 1’ rather than ‘Figure 1’.

Here’s the relevant bits from the header section of template.txt

    \newcommand{\medialink}[2] { \begin{flushright} \href{#1}{#2}\\ \end{flushright} 
    } 
    $if(highlighting-macros)$
    $highlighting-macros$
    $endif$
    $if(verbatim-in-note)$
    \usepackage{fancyvrb}
    $endif$
    \usepackage{listings}
    \lstnewenvironment{extract}[1][]{
        \renewcommand*{\lstlistingname}{Extract}
        \lstset{frame=single,basicstyle=\small\ttfamily,keepspaces=true,#1}
    }{}

And this bit goes into the main section of the template:

    \usepackage{float}
    \floatstyle{ruled}
    \newfloat{caextract}{htp}{lop}
    \floatname{caextract}{Extract}

A working example

Here is a full example from a paper I’m writing at the moment that you can tweak and play with. It’s all done in simple markdown, using a little bit of LaTeX embedded within the Markdown file to call the macro.

So where I want my extract to appear in my Markdown file, I add:

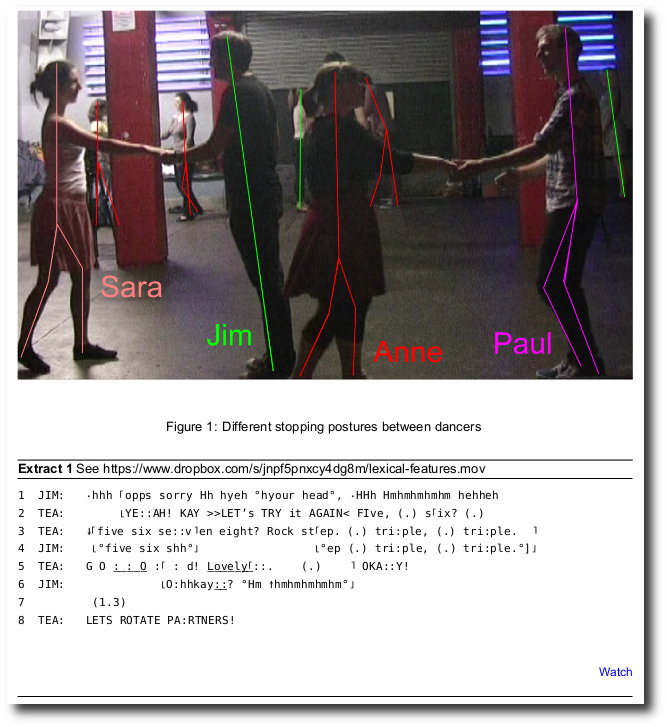
![Different stopping postures between dancers \label{stopping-postures}](images/stopping-postures.png)

\begin{caextract}[H]
\caption{See https://www.dropbox.com/s/jnpf5pnxcy4dg8m/lexical-features.mov}
\label{lexical-features}
\begin{small}
\begin{verbatim}

1  JIM:   ∙hhh ⌈opps sorry Hh hyeh °hyour head°, ∙HHh Hmhmhmhmhm hehheh
2  TEA:        ⌊YE::AH! KAY >>LET's TRY it AGAIN< FIve, (.) s⌈ix? (.)
3  TEA:   ↓⌈five six se::v⌉en eight? Rock st⌈ep. (.) tri:ple, (.) tri:ple.  ⌉
4  JIM:    ⌊°five six shh°⌋                 ⌊°ep (.) tri:ple, (.) tri:ple.°]⌋
5  TEA:   G O :̲ ̲:̲ ̲O̲ :⌈ : d! L̲o̲v̲e̲l̲y̲⌈̲::.    (.)    ⌉ OKA::Y!
6  JIM:              ⌊O:hhkay:̲:̲? °Hm ↑hmhmhmhmhm°⌋
7          (1.3)
8  TEA:   LETS ROTATE PA:RTNERS!

\end{verbatim}
\medialink{https://www.dropbox.com/s/e960eu94ji7ncn3/lexical-features.mov}{Watch}

\end{small}
\end{caextract}

That should render something like this:

A later paragraph refers to the figure like so:

By contrast, Sara, Paul and Anne - marked in red in figure 
\ref{stopping-postures} - step back, split their weight and 
stop dancing together with the onset of Teacher's 
"\verb|G O :̲ ̲:̲ ̲O̲ : : d!|". Without having space to analyse 
this method, it is worth noting in closing that the regularity 
of these methods and their interactional contingencies are 
shown in the [slow-motion sections of the video](https://www.dropbox.com/s/jnpf5pnxcy4dg8m/lexical-features.mov) 
by how dancers who stop like Jim are all pulled off balance 
by dancers who stop like Paul, Sara and Anne.

It should look something like this:

A few notes on how this works:

  • The main reason for the macro is to enable cross-referencing. In the Markdown file, within each caextract I use \label{my-label} to label my examples. Then I can reference them anywhere in my Markdown file with something like “See extract \ref{my-label}”.
  • If you don’t have any media, just leave out the \medialink line.
  • You can put anything in the \caption section – your example name if you have a set naming schema for your corpus.
  • Note the neat Markdown trick in the paragraph above: I use “\verb|This comes out verbatim|” for a short inline bit of monospaced text.

Rendering your CA extracts using Pandoc

Finally, making sure you have your csl file (apa.csl), your images, your template.txt file and your margins.sty file all in the same folder with your example (I find that convenient), and making sure you have a nice monospaced font to use (CAfont is great) in place, run something like this:

pandoc --latex-engine xelatex --csl apa.csl --variable monofont=CAfont --variable mainfont=Arial --variable fontsize=12pt -H margins.sty --template template.txt --bibliography /path/to/library.bib -o README.pdf README.md

You can, of course, run this command from the terminal – swapping out the relevant variables as needed, but I use vim-pandoc’s PandocRegisterExecutor function to run this whenever I type the local leader character twice (,,) followed by pdf. See https://github.com/vim-pandoc/vim-pandoc for documentation of that kind of thing.

I’m happy to answer any questions here or on @saul.

Notes:

  1. Not all of these systems support bibliographical references with BibTeX – Markdown + Pandoc does this quite elegantly

Pandoc + Markdown for Conversation Analytic Transcripts Read More »