I’ve been teaching EM/CA at Berklee School of Music which has been a delight, and the students are often transcribing situations that involve music, dance, performance, composition and other settings where it’s equally important to transcribe talk and bodily action. What I’ve tried to show them is how to do transcripts that allow them to shift between turn-by-turn action and simultaneous, multi-activity interactions. Lorenza Mondada’s presentation on the differences between types of transcription software has a great explanation of the two basic transcription paradigms (partition-based, horizontally scrolling editors and turn-by-turn, vertically scrolling editors) and what they are most useful for.
I wanted to teach my students to use both paradigms and to be able to switch between them so I made this little how-to video. To follow along with this tutorial you’ll need two files: a small clip from “Game Night”(many thanks to Prof. Cecelia Ford for letting me use her often-cited CA data for this tutorial), and Game_Night.cha – the accompanying CLAN transcription file. They’re both zipped up together in this downloadable folder. You only get a tiny clip of the whole Game_Night.mov video file here. The idea of this tutorial is that you can use this as a starting point and then replace the video with your own data.
Here’s the youtube video. It was recorded for my Berklee students, so not all parts of it (especially where I refer to the data you’ll have available to you) are relevant to this blog tutorial.
My PhD viva in November 2016 involved a challenging, rich and rigorous two hour conversation with Professors Christian Heath and Lorenza Mondada. I wasn’t nervous going in and was lucky enough to really enjoy it, probably because during the 6 months between submission and viva I tried to answer at least one of the generic viva questions on the list I’m posting here every day.
It was comforting to know I’d tried to cover lots of bases, and it gave me a way to get my head out of the intense detail of the thesis and make sure I had stepped back to consider the angles I imagined might come up. The answers I wrote were also really useful later because free-writing narrative responses to generic questions daily (and often quite repetitively) helped me think through how to explain my work to non-specialists (although you couldn’t find two people more expert in my area than my two examiners).
Thanks to Drs. Jo Cordy and Steve Hutchinson (via Jo Cordy) and Trafford & Leshem (2002) who came up with some of these questions – assembled from multiple sources. If you’re here because you have your PhD viva coming up – good luck! I hope you enjoy yours as much as I did mine.
Pre-viva preparation checks:
Read the relevant literature in your specific niche published since submission.
Read any relevant and recent work by each examiner.
Think of their specific concerns and intellectual bugbears.
Ask yourself: have I referenced anything that I can’t really remember anymore?
What do I rely on in terms of those references? Can I defend them? Can I summarize each source and what I take from it?
108 Questions to prepare
10 most common questions
Value-added and originality
What are the most original (or value-added) parts of your thesis?
Which propositions or findings would you say are distinctively your own?
How do you think your work takes forward or develops the literature in this field?
What are the ‘bottom line’ conclusions of your research? How innovative or valuable are they? What does your work tell us that we did not know before?
Origins and the scope of the research
Can you explain how you came to choose this topic for your doctorate What was it that first interested you about it? How did the research focus change over time?
Why have you defined the final topic in the way you did? What were some of the difficulties you encountered and how did they influence how the topic was framed? What main problems or issues did you have in deciding what was in-scope and out-of-scope?
Methods
What are the core methods used in this thesis? Why did you choose this approach? In an ideal world, are there different techniques or other forms of data and evidence that you’d have liked to use?
Data or information
What are the main sources or kinds of evidence? Are they strong enough in terms of their quantity and quality to sustain the conclusions that you draw? Do the data or information you consider appropriately measure or relate to the theoretical concepts, or underlying social or physical phenomena, that you are interested in?
Findings
How do your findings fit with or contradict the rest of the literature in this field? How do you explain the differences of findings, or estimation, or interpretation between your work and that of other authors?
What next?
What are the main implications or lessons of your research for the future development of work in this specific sub-field? Are there any wider implications for other parts of the discipline? Do you have ‘next step’ or follow-on research projects in mind?
Most common general questions
What is it about
What’s the original aspect of the thesis
What are the weaknesses?
What would you do different next time?
General practice questions
Briefly, what have you most enjoyed about research so far?
Briefly, how did you get interested in your area of study?
Briefly, which part of your work are you most pleased with?
How did your research question arise?
What inspired you to tackle this research problem?
Provide us with a brief ‘abstract’ of your thesis in 9 sections:
big picture problem / widely debated (1-2 sentences)
brief sketch of literature (2-3 sentences)
gap in approaches to date (without criticism) (1 sentence)
how my project fills the gap (1-2 sentences)
specific matereials examined in the diss (1-2 sentences)
theoretical orientation employed (one sentence)
summary of chapters (2-3 sentences per chapter)
original conclusion / argument (1-2 sentences)
brief concluding paragraph on significance (2-3 sentences).
If you had to summarise the main findings of your work to a non-specialist, what would you say?
In one sentence, what is your thesis?
Why is the problem you have tackled worth tackling?
What is original about your work?
What is the key contribution of your thesis to increased knowledge?
What have you done that merits a PhD?
Aside from your supervisor who are the main academic influences on your work, and how does your work compare to theirs?
How would you describe your methodology and why did you decide to use it?
What methodologies / approaches did you also consider and why did you reject them?
What are the strongest and weakest points of your work?
Generally, which sections of the thesis are the most publishable and in which journals do you intend to publish them?
What did you find most technically or theoretically difficult about your work?
What literature searching strategy did you adopt, and how can you be sure you haven’t missed anything significant?
What are the ethical implications of your work?
What do you see as being the societal or economic impacts of your work (may be potential impacts only at this stage)?
If you could start again, what would you change?
How have you developed as a researcher?
What training have you done while a researcher and how did it help you?
What skills and competencies do you still need to develop in order to be a ‘complete’ researcher?
How has your supervisory relationship changed over time and what has this taught you about academia?
How would you supervise a PhD student?
What is your publishing strategy?
Given the rate of development in your research area, for how long will your contribution be relevant?
How could your work be improved?
From your experience, what have you learned about research?
What aspect of the work did you find most frustrating?
How did the thesis compare with what you set out to do?
Did you achieve your initial goals?
Given the recent advances in your subject what would you change in respect of your methodology?
What new approaches would help you take this work further?
If you had five years full funding money and twenty researchers, what would you do?
Where will this research area be in 10 years?
Do you see yourself in research in 5-10 years’ time and in what position?
Question clusters
Opening Questions
Why did you choose this topic for your doctoral study?’
Conceptualisation
What led you to select these models of …..?
What are the theoretical components of your framework?
How did you decide upon the variables to include in your conceptual framework?
How did concepts assist you to visualise and explain what you intended to investigate?
How did you use your conceptual framework to design your research and analyse your findings?
How did you arrive at your conceptual framework?’
Research Design
What other forms of research did you consider?
How would you explain you research approach?
Why did you select this particular design for your research?
What is the link between your conceptual framework and your choice of methodology
and how would you defend that methodology?
Can you explain where the data can be found and why your design is the most appropriate way of accessing that data?
How did you arrive at your research design?’
Research Methodology
Please explain your methodology to us.
Why did you present this in the form of a case study?
What choices of research approach did you consider as you planned your research?
Can you tell us about the ‘quasi-experimental’ research that you used?
I did not watch your video until after reading your thesis. I wish that I had viewed it earlier ~ it was very good. Why did you decide to include a video in your thesis? What was its role?
How would you justify your choice of methodology?’
Research Methods
How do your methods relate to your conceptual framework?
Why did you choose to use those methods of data collection?
What other methods did you consider and why were they rejected?
How did you handle the data that came from open-ended questions?
Tell us how you managed to achieve a 100% response rate from your respondents ~ who, as adolescents in schools, are not known for complying with such requests!
Why did you decide to use XYZ as your main instrument(s)?’
Sampling
How did you decide upon your research boundaries?
What was the Universe from which your sample was selected and how did you define it?
What is the relationship between your respondents, the research design and the conceptual framework?
Why did you choose these respondents rather than other respondents ~ how do you justify that choice?
How did you select your respondents/materials/area?’
Conceptual conclusions
What are your conceptual conclusions?
Were you disappointed with your conclusions?
How do your conclusions relate to your conceptual framework?
How did you distinguish between your factual and conceptual conclusions?
How did you arrive at your conceptual conclusions?’
Fundamentals
How did you triangulate your data?
Were you objective or subjective in your role as a researcher?
How did you relate the various stages of your research one to another?
How did you analyse your data, and how did you arrive at meanings from that analysis?
How generalisable are your findings~ and why?’
Contribution
How important are your findings ~ and to whom?
How do your major conclusions link to the work of Dr. X?
The absence of evidence is not support for what you were investigating, neither is it
confirmation of the opposite view. So how do you explain your research outcomes?
What is your contribution to knowledge?’
How else might you have undertaken your research?
What are the strengths and weaknesses of your research?
What would you do differently if you repeated your research?
We would like you to critique your thesis for us.’
Returning to the Beginning
So why did you really want to undertake doctoral study?
How is gaining your doctorate going to help your career?
What are you going to publish from your thesis?
What are you going to do after you gain your doctorate?’
Is there anything else that you would like to tell us about your thesis which you have not had the opportunity to tell us during the viva?’
In 2015 I wrote a quick introduction to CA for people who study the psychology of interaction and discourse (still in press). I’ve used that as the basis of this longish post for people who need some starting points in #EM/CA. Also check the EMCA wiki for new references (there are more all the time – it’s a flourishing field).
Conversation Analysis (CA) is an interdisciplinary, inductive approach to studying talk and interaction ‘in the wild’ and in situations where the formal parameters, theories and models for interaction are unknown, premature, or where theories are currently undergoing revision.
Conversation Analysis (CA) is a method of gathering data involving naturalistic conversational interaction, analysing it systematically, and reporting on features of its structural organisation. CA is distinctive because it is not only a method for analysis, it also constitutes an active sub-discipline within many research areas that involve the empirical study of human interaction. CA has its own standards of evidence, some unusual collaborative research practices, and a rich literature spanning sociology, linguistics, anthropology, psychology, and communications. The outline of CA provided here should be used as a guide to contextualise the kinds of claims, arguments, and evidence readers may encounter in the CA literature. Because CA has not developed from a ‘home discipline’ as such, it is widely dispersed and consequently likely that any researcher interested in spoken discourse will find a wealth of CA research within their area of specialism. The intention here is to encourage researchers to draw on core CA findings in their work, to find the CA research and researchers in their own field, and to learn to work with interaction data using these methods
So what is CA useful for? What kinds of questions can one ask with it? And what kinds of answers can be gleaned at different points in the research cycle? CA is especially useful for empirical research on interaction in naturalistic settings where established theories may be lacking or under revision. This is because CA looks for detailed qualitative evidence of how participants work to organise their interactions sequentially in each specific situation. CA relies on a recorded event, utterance or gesture as analytic evidence only when the participants demonstrably use that event to organise their subsequent actions. On the one hand, this forces analysts to limit the generality of the questions they can ask and the claims they can make. For example, studies of interaction in doctor’s offices, courtrooms, or at dinner parties tend to ask questions about how a specific action or utterance is produced in a particular social situation by specific participants. On the other hand, CA’s evidential constraints have led to a methodologically coherent field. By focusing analysis on the methods and events demonstrably used by participants to make sense of their own interactions, CA studies tend to be readily comparable with one another. Although individual studies are situationally specific, analysts can develop and test general findings cumulatively working in diverse settings and fields. Over the last 40 years the most robust and broadly tested finding on which much latter CA research has been based is the turn-taking system described by Sacks, Schegloff, and Jefferson (1974). Without the extended discussion these warrant, the rules of the turn-taking system can be summarised briefly to explain what kind of answers CA can offer.
For any turn at talk, at the first possible completion,
current speaker may select next,
next speaker may self-select,
current speaker may continue.
If 1c occurs, the rules are re-applied at the next possible completion.
This describes the normative patterns observed in natural conversational turn-taking across contexts in the first decade of CA research. As a finding it provides a framework for further exploratory work in CA, and a strong empirical basis for theory formation for experimentation. As a research outcome, this exemplifies how CA can produce detailed, systematic descriptions from cumulative observations.
Alongside these longer-term results, the CA research cycle involves structured observation throughout the process of data gathering, presentation, and collaborative analysis of data within the scope of a single study. Current best practice for CA data gathering involves video of an interactional situation from multiple angles where all participants’ gaze direction, gestures, body orientation, and talk are – ideally – available for analysis. Within relevant practical, social, and ethical constraints, it is useful to record whatever participants evidently pay attention to within the setting including objects, tools, documents, computer, phone, and screen captures. Interaction mediated via text, audio, and video also constitutes viable data, however for a sequential analysis, participants and CA researchers should be able to access the same evidential and temporal contingencies and constraints. For example, phone calls provide ideal data for CA studies because participants and researchers alike can analyse the same audio events in the same order. Because a CA study may focus on very intricate details, a few seconds of a recording can yield data for a ‘single case analysis’, contributing to or questioning cumulative findings. Researchers also re-analyse data from previous studies, use examples from audiovisual corpora and data fragments from the CA literature, often as a foil for discussion.
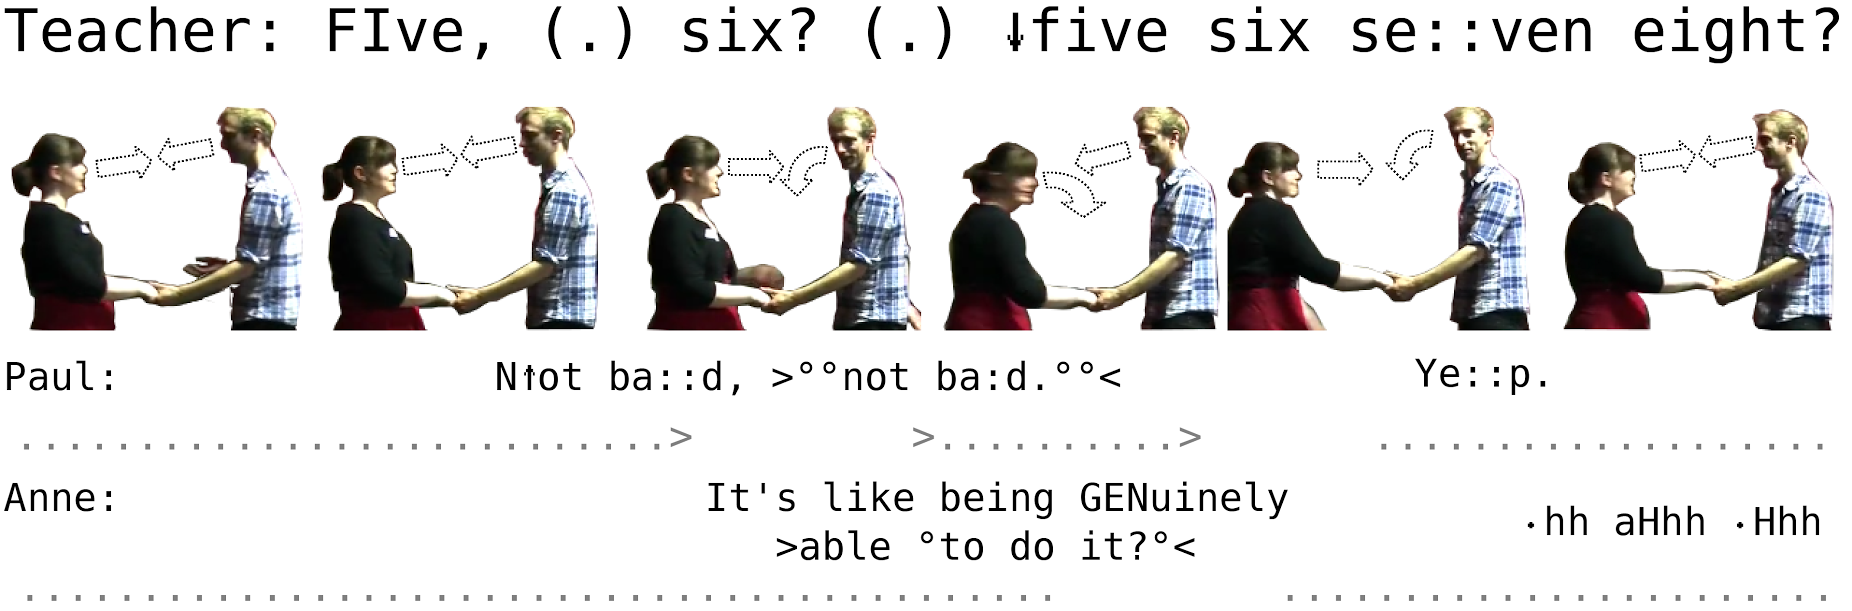
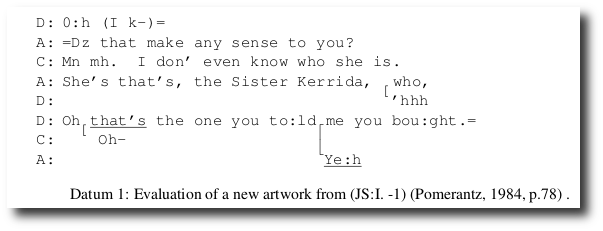
Transcription is central to CA research as it involves repeatedly reviewing the data to build up an initial description that can be checked by others from an early stage. Variations on Gail Jefferson’s transcription conventions1 provide a level of detail that can be adjusted for the specific phenomena in question. Verbal interaction is typed out turn-by-turn, then symbols are added and arranged spatially to indicate temporal and production features of talk. For example, extract 1 depicts Paul and Anne’s talk as their teacher sings a count of eight during a partner dance class. Links to online data are also provided where possible.
Extract 1 CADANCE: eg1
 1  Paul:  N↑o⌈t b̲a̲::d, >°°not ba:d.°°<⌉

 2  Anne:     ⌊ It's like be⌈ing GENuin⌋ely >able °to do it?°<⌉

 3  Tchr:                   ⌊        F    I    v    e         ⌋, (.)

 4         s⌈ix? ( . ) ⌉ ↓five

 5  Paul:   ⌊Ye̲::⌈p.   ⌋

 6  Anne:        ⌊∙hh ⌈aHhh ∙Hhh

 7  Tchr:             ⌊six se::ven eight?
Reading while listening to the audio should show how Jefferson’s conventions are roughly intuitive : left and right braces show points of overlap, carats show talk speeding up, while colons indicate sound stretches. Because these conventions compromise between precision, detail, and readability there are also some inevitable ambiguities, for example punctuation indicates intonation rather than grammar, and turn-initial capitals mark transcriber hearings of turn-beginnings, but elsewhere they indicate loud talk. The purpose, however, is not analysis of the transcript. Rather transcripts provide a useful sketch to aid in more formal description, and a convenient way for analysts to refer to specific moments of the original video in a data session presentation.
In a data session, a researcher presents new data and transcripts for repeated viewings and extended analytical discussion amongst a small group of colleagues. Since CA relies on the linguistic and interactional aptitude of the analyst as an heuristic instrument, regular data sessions provide an essential opportunity to revise transcripts and candidate analyses amongst peers. Details of the present data are discussed in relation to cumulative findings, and the implications of or alternatives to each analysis are proposed and challenged. Ideally, data sessions are both pedagogical and deliberative, where experienced and student analysts refine their observations and descriptions by picking out specific fragments of data, and contextualise findings within the literature. Over time, researchers build ‘collections’ of data fragments such as extract 1: part of a collection of ‘countings’, where people count up or down to coordinate joint actions. A rough collection is a starting point for identifying a distinct social practice as a specifiable analytic phenomenon. Analysis then refines a collection in terms of how participants orient to the sequential organisation of an action, and to its lexical, grammatical, and/or embodied structural features of composition and design (Schegloff 1993, 121). For example, before the video clip of extract 1 starts, Paul and Anne have been evaluating their previous attempt at a dance move. The teacher’s count starts with a loud, stretched “”, a short pause then a rising “”, before both pitch and count re-sets to five and moves back up to a final, rising “”. At the onset of the count, Paul’s turns his head to the teachers and back to Anne, hushing his second “”. Anne also speeds up and softens her talk, turning her head towards the teachers then back to Paul as the count reaches its first “”. Paul’s minimal “” receipts Anne’s assessment just as he briefly turns his head away from her again. Her laugh closes the sequence, and they re-establish mutual gaze as the count enters its final phase.
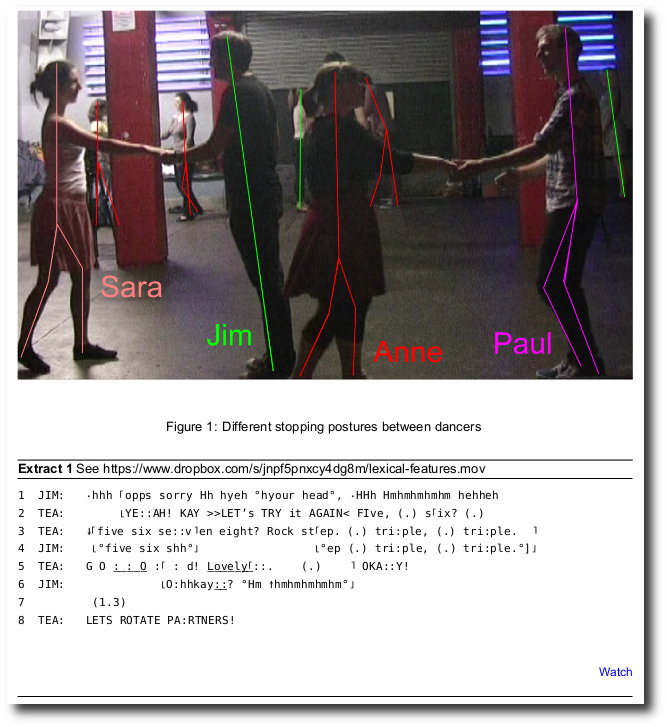
Forgoing more detailed description on the one hand, and the broader sequential context on the other, this fragment provides a simple example of how such data can be presented. The embodied turn (Nevile 2015) in the CA literature has led researchers to add more detail to transcripts of talk, using illustrations (Laurier 2014) to describe gesture and gaze direction as well as diagrammatic representations of, for example pitch tracks and phonological details. Figure illustrates the temporal structure of talk and patterns of other-directed mutual gaze just before Paul and Anne start dancing.
Figure 1: Paul and Anne’s pattern of gaze orientation in extract 1
In terms of cumulative CA findings, these details could be analysed alongside generalised CA work on how assessments implicate sequence closure in everyday conversation, and how patterns of mutual gaze work towards topic, focus, and activity shifts (Heath 1986, 128–48; Mondada 2006; Rossano 2012, 227–308). In a more applied project, the way the dancers’ turns at talk and gaze shifts match the phase structure of the teacher’s count could be analysed in relation to ongoing research into how bodily-vocal group activities are organised in dance instruction (Keevallik 2014). This fragment may be added to multiple collections including ’embodied closings’ or ‘countings’ as well as specialised sub-collections such as ‘dance closings’ and ‘count-ins’. CA findings are thus developed incrementally by documenting the detail of people’s interactional practices in specific settings while contributing to a general understanding of ‘everyday talk-in-interaction’. This super-set of copresent interactional practices provides a normative basis for researchers studying specialised settings where institutional or practical constraints may constrain interactional practices (Drew and Heritage 1992) Identifying and fully describing a new phenomenon in these terms may therefore require collection of hundreds of cases, but a single case analysis can still test, discuss, or suggest a finding by demonstrating its use in a specific context.
CA can also be used in mixed-methods research, especially in theory formation, experimental design, and evaluation processes. CA researchers may discover a systematic variation in participants’ situated action, sometimes as simple as an issue of lexical choice. For example, Heritage et al. (2007) observed that doctors vary the ways they ask about patients’ unmet concerns during consultations. Their experiment asked doctors to request whether their patients had “anything else” or “something else” to talk about, and discovered that 78% fewer unmet concerns were reported in the latter condition. In this way CA’s focus on interactional practices in natural settings provides systematic observations that can help design ecologically sound experimental variables and guide the formulation of falsifiable theories (Robinson and Heritage 2014). In conjunction with more conventional social science methods, CA is useful in similar ways when it foregrounds the participants’ interactional uses of the research setting. For example, CA studies of interviewing practices (Potter and Hepburn 2012) contribute to methodological developments that are starting to incorporate the pragmatics of talk and the practicalities of survey technologies into a broader analysis (Conrad, Schober, and Schwarz 2013). Similarly, studies of methods that use introspective self-report (Wooffitt and Holt 2011) or CA’s own practices of video recording (Hazel 2015) are opening up new opportunities to approach theoretical questions across fields as practical, observable issues based on the endogenous organisation of situated activities. CA’s early focus on everyday talk has both influenced and drawn on the interactional respecification of core questions in linguistics and pragmatics (Ochs, Schegloff, and Thompson 1996; Levinson 1983), and psychology (Edwards and Potter 2001; Tileagă and Stokoe 2015), along with a broader shift in the social sciences towards posing empirical questions in terms of practical action (Button 1991; Lynch 1997). To use CA within a broader scientific context, however, it is necessary to clarify how its findings are descriptive of normative structures in talk rather than predictive or prescriptive, and may be combined with other methods in order to develop and test formal hypotheses (Lynch 2000, 522).
Atkinson, J.M., and John Heritage. 1984. Structures of social action: Studies in conversation analysis. Edited by J. Maxwell Atkinson and John Heritage. Cambridge: Cambridge University Press.
Button, Graham. 1991. “Introduction: Ethnomethodology and the Foundational Respecification of the Human Sciences.” In Ethnomethodology and the Human Sciences, edited by Graham Button, 1–9. Cambridge: Cambridge University Press. doi:10.1017/CBO9780511611827.002.
Clift, Rebecca. 2016. Conversation Analysis: 1st ed. Cambridge Textbooks in Linguistics. Cambridge: Cambridge University Press.
Conrad, Frederick G., Michael F. Schober, and Norbert Schwarz. 2013. “Pragmatic Processes in Survey Interviewing.” Oxford Handbooks Online, December. Oxford University Press. doi:10.1093/oxfordhb/9780199838639.013.005.
Drew, Paul, and John Heritage. 1992. Talk at work: Interaction in institutional settings. Cambridge: Cambridge University Press.
Edwards, Derek, and Jonathan Potter. 2001. “Discursive Social Psychology.” In The New Handbook of Language and Social Psychology, edited by P Robinson and H Giles, 103–18. London: John Wiley & Sons Ltd.
Have, P Ten. 2007. Doing conversation analysis: A Practical Guide. 2nd ed. London: Sage Publications.
Hazel, S. 2015. “The Paradox from Within: Research Participants Doing-Being-Observed.” Qualitative Research, September. SAGE Publications. doi:10.1177/1468794115596216.
Heath, Christian. 1986. Body Movement and Speech in Medical Interaction. Cambridge: Cambridge University Press (CUP). doi:10.1017/cbo9780511628221.
Heath, Christian, Jon Hindmarsh, and Paul Luff. 2010. Video in Qualitative Research Analysing Social Interaction in Everyday Life. Introducing Qualitative Methods. London: Sage Publications.
Heritage, John, Jeffrey D. Robinson, Marc N Elliott, Megan Beckett, and Michael Wilkes. 2007. “Reducing patients’ unmet concerns in primary care: the difference one word can make.” Journal of General Internal Medicine 22 (10): 1429–33. doi:10.1007/s11606-007-0279-0.
Hutchby, Ian, and Robin Wooffitt. 2008. Conversation Analysis. 2nd Edition. Chichester, U.K.: Polity Press.
Keevallik, Leelo. 2014. “Turn Organization and Bodily-Vocal Demonstrations.” Journal of Pragmatics 65. Elsevier: 103–20. doi:10.1016/j.pragma.2014.01.008.
Laurier, Eric. 2014. “The graphic transcript: Poaching comic book grammar for inscribing the visual, spatial and temporal aspects of action.” Geography Compass 8 (4): 235–48. doi:10.1111/gec3.12123.
Levinson, Stephen C. 1983. Pragmatics. Cambridge: Cambridge University Press.
Lynch, Michael. 1997. Scientific practice and ordinary action: Ethnomethodology and social studies of science. Cambridge: Cambridge University Press.
———. 2000. “The ethnomethodological foundations of conversation analysis.” Text – Interdisciplinary Journal for the Study of Discourse 20 (4): 517–32. doi:10.1515/text.1.2000.20.4.517.
Mondada, Lorenza. 2006. “Participants’ Online Analysis and Multimodal Practices: Projecting the End of the Turn and the Closing of the Sequence.” Discourse Studies 8 (1). SAGE Publications: 117–29. doi:10.1177/1461445606059561.
Nevile, Maurice. 2015. “The Embodied Turn in Research on Language and Social Interaction.” Research on Language and Social Interaction 48 (2): 121–51. doi:10.1080/08351813.2015.1025499.
Ochs, E, Emanuel A Schegloff, and Sandra A Thompson. 1996. Interaction and grammar. Edited by Elinor Ochs, Emanuel A Schegloff, and Sandra A Thompson. 13. Cambridge: Cambridge University Press.
Potter, Jonathan, and Alexa Hepburn. 2012. “Eight Challenges for Interview Researchers.” In The SAGE Handbook of Interview Research: The Complexity of the Craft, edited by Jaber F. Gubrium, James A. Holstein, Amir B. Marvasti, and Karyn D. McKinney, 1st ed., 555–71. SAGE Publications, Inc. doi:10.4135/9781452218403.
Robinson, Jeffrey D., and John Heritage. 2014. “Intervening With Conversation Analysis: The Case of Medicine.” Research on Language and Social Interaction 47 (3): 201–18.
Rossano, Federico. 2012. “Gaze behavior in face-to-face interaction.” PhD thesis, Radboud Universitet Nijmegen.
Sacks, Harvey, Emanuel A Schegloff, and Gail Jefferson. 1974. “A simplest systematics for the organization of turn-taking for conversation.” Language 50 (4): 696–735. doi:10.2307/412243.
Schegloff, Emanuel A. 1993. “Reflections on Quantification in the Study of Conversation.” Research on Language & Social Interaction 26 (1): 99–128. doi:10.1207/s15327973rlsi2601_5.
Schegloff, Emanuel A. 2007. Sequence organization in interaction: Volume 1: A primer in conversation analysis. Cambridge: Cambridge University Press.
Sidnell, Jack. 2010. Conversation Analysis: An Introduction. Oxford: Wiley-Blackwell.
Sidnell, Jack., and Stivers, Tanya. (Eds). 2012. The Handbook of Conversation Analysis. London: Wiley-Blackwell.
Tileagă, Cristian, and Elizabeth Stokoe. 2015. Discursive Psychology: Classic and Contemporary Issues. London: Routledge.
Wooffitt, Robin, and Nicola Holt. 2011. Looking In and Speaking Out. Exeter: Imprint Academic.
Footnotes
1See the basic transcription conventions on Prof. Charles Antaki’s CA tutorial website: http://homepages.lboro.ac.uk/~ssca1/notation.htm or the comprehensive account in Atkinson & Heritage (1984, ix–xvi).
Academic reading should feel like having a great discussion amongst colleagues. But your reading habits may be making it feel more like listening to a long, uninterrupted series of lectures. This post introduces some techniques (and links to some tools and technologies) that might help make your literature reviewing feel more convivial.
A literature review process can sometimes feel like a long slog through endless academic monologuing. By the time it comes to your turn to respond (in writing) it’s often really hard to remember all the moments where, if you’d been talking to the authors, you would have nodded to show that you’d taken note, or butted in to ask a question, launch a criticism, or where you had a new idea based on an insight and felt the thrill of chasing down an idea together. Experiencing these moments are the reason we actually read academic papers: as an extension of academic discussion. However, it can be hard to remember this as you sit, pen in hand, taking notes on all the thousands of papers that may cross your desk as you read your way into some branch of the literature for a PhD or research project.
Over the course of my PhD, I developed the following set of approaches for making time to read in any situation – from sitting in the bath to talking a walk – and for making ‘actionable’ notes – based on the impulses I would have felt, at any particular moment in the text, had I been talking to the authors in person. I made sure I could access these notes conveniently later on, and in many cases, I used them as a starting point for following up next time I actually interacted with that person. These habits began to turn my academic reading into what still feels like a really useful, ongoing conversation.
These are the methods that work for me, and some specific software/hardware tools (which I link to, but won’t go into individual detail). You will probably want to adapt these for your own tools/workflows. The main point is to establish a consistent routine that you enjoy, and that can help your reading feel more like a good conversation.
1. Treat your reading list as if you’re inviting the authors over for a discussion
If you were inviting people to have a discussion, you’d be really organized about it. You’d keep track of who you’d invited, and you’d know how many people were invited and why. Also, you’d probably invite people who you suspected would have interesting things to say to each other. Take this approach with your reading list.
Here’s how I keep my ‘invitations’ organized, and make sure they’re kept up to date.
I have three ‘literature’ folders (which I keep in my Dropbox): ‘readme’, ‘papers_to_check‘ and ‘literature_repository‘.
‘readme’ contains copies of a group of papers from my ‘literature_repository’ I want to read or re-read relating to some topic or (in sub-folders) a set of topics.
‘papers_to_check’ is for new papers I’ve downloaded. They need to be named and given bibliographical information before I invite them into my ‘readme’ folder.
‘literature_repository’ contains all my PDF papers and books, each of which has complete bibliographical reference info and (if I’ve read it) annotated notes.
Every week I add three recurring items on my todo list:
process papers_to_check: look up bibliographical references, rename the PDF files (AuthornameYYYY-title.pdf), place them in the literature_repository folder.
cue up new papers into readme: ‘invite’ anything that looks immediately relevant (or older things I might need to re-read) into the ‘readme’ folder.
update the literature_repository: move read papers from readme back into the literature_repository folder. This bit is like cleaning up after the guests leave.
This procedure means I’m less likely to lose my notes, that I’m methodical about adding bibliographical information, and that I always have something relevant to read.
2. Use different tools and approaches for different kinds of reading
Read like you interact: in different ways depending on the context – from highly intensive and productive work-meetings to chatting with a jogging-buddy.
I notice myself doing three kinds of reading: reading while writing, dedicated reading, and casual reading on the move. I use different tools for different situations.
While writing, which is typically when I’m most focused on what I’m reading and how I’m going to use it, I use PDF-XChange viewer (under wine when on Linux) to read and annotate PDFs. It’s proprietary freeware, but I really like this tool. I’m not going to go into how to make PDF annotations in technical detail (I’ll assume you know how to do that). But find a tool that makes standards compliant PDF annotations. Since I’m at my desk, I’ll pull PDFs straight from my literature_repository (unless they’re already cued up in my readme folder), and I’ll make and use my annotations almost immediately.
While focusing (sitting down, reading with intent) I use EZpdf reader on a 2013 Nexus 7 android tablet which I bought for $100. I use Dropsync on my tablet to synchronize my readme folder with my Dropbox. I also use Swiftkey to speed up the annotation process using smart auto-completion algorithms that learn my often-used words and phrases. Although presumably most portable operating systems have good PDF annotation tools, I’ve found my setup to be a very good compromise of portability, price and reading comfort. When I add a paper to my readme folder, it gets synchronized with my tablet, when I update annotations on the tablet, they’re synchronized with my readme Dropbox folder. This post isn’t really intended as a technical how-to, but if anyone is interested, I can post a walk-through video of the set-up and usage process of my specific set-up that highlights some of the quirks of working with with EZpdf reader – and the workarounds I’ve found for them. If you’re interested – just ask!
While on the move, or while reading casually (maybe a first pass of a paper I’m not sure is really relevant yet), I don’t actually read in a focused way. Instead, I get my tablet to read to me using EZpdf reader’s text-to-speech function and IVONA voices, which really sound remarkably good compared to the default voices included with Apple IOS or Android. While it reads, if I hear something I am interested in, I can make an annotation as it continues reading, then return to that annotation later. If I eventually decide to read this paper in a more focused way, or while writing, I have an actionable ‘hook’ from my first reading to return to.
What do I mean by ‘actionable’? That’s really the most important point to make about reading and taking useful notes:
3. Use action-oriented labels and project-oriented tags
One of the most important things anyone who facilitates useful meetings (and good communication in general) will tell you is to clarify action points and agendas.
When you take a note on a paper, write what it was you wanted to do when taking the note, and what project it related to. I have several action-oriented labels:
todo: The most important label – this reminds me to do something (look up a paper, change something in my manuscript etc.)
idea: I’m inspired with a new idea, somehow based on this paper, but it’s my own thing.
ref: This is a reference, or contains a reference that I want to use for something.
question: or just q: I have a question about this, maybe to ask the author or myself in relation to my data / research.
quote: I want to quote this, or it contains a useful quote
note: Not a specific use in mind for this, but it’s worth remembering next time I pick up this paper.
term: A new term or word I’m not familiar with: I look it up or define it in the annotation.
crit: I have a criticism of this bit of the paper.
I also use project-oriented hashtags for each research project/idea I’m currently working on. So if I’m reading a paper and it says something like:
“Something I want to criticize and respond to in my next article on some topic”
I’ll highlight that bit of the text, copy and paste the text itself that into a PDF annotation, and add a few keywords on the top:
quote: “Something I really disagree with and want to comment on or respond to in my next article on some topic” #sometopic #someothertopic
Or this might spark the idea that I could collect other papers with this same opinion, so I’ll write myself a todo item:
todo: look up other papers that agree with: “Something I really disagree with and want to comment on or respond to in my next article on some topic” #sometopic
This means when I search for my annotations I can extract all the ones to do with #sometopic or #someothertopic projects, I’ll find this one, and I’ll know I wanted to use this as a quote when writing, and that I should add something to my todo list for when I next go to the library or do a literature search.
One of the major logistical problems facing researchers who use large audiovisual data files featuring recordings of human subjects is how to share it with colleagues simply, securely and inexpensively.
By simple, I mean that the a/v file-sharing solution should not need specialized equipment or an expert systems administrator to set it up for you. Most universities and research institutions have in-house research file servers. These may be security audited, up-to-date and well-organized – they may seem unlikely to suddenly lose or delete all your data or randomly restrict access to your colleagues in other institutions. However, in my experience, it’s best to manage your own data and backups!
By secure I mean that it should not rely on cloud-hosted storage (which may store and transfer data anywhere in the world), or allow data to be transferred unencrypted between remote systems. This is often a requirement of UK human subjects/ethical approval – so it’s particularly relevant in the case of UK educational institutions, but this is probably also true elsewhere.
By inexpensive I mean that it should not cost the end-user an ongoing fee, or meter use per gigabyte stored. Commercially available cloud file-storage services like Dropbox, OneDrive, Google Drive or iCloud are relatively cheap up to ~ 1TB storage, they can get quite expensive beyond that, and if you have multiple projects with multiple researchers in different groups sharing data – the total cost for all researchers can become prohibitive.
There are trade-offs between these three requirements – this blog post outlines how to use Syncthing – which I think is an optimal solution – to solve this issue.
What is Syncthing?
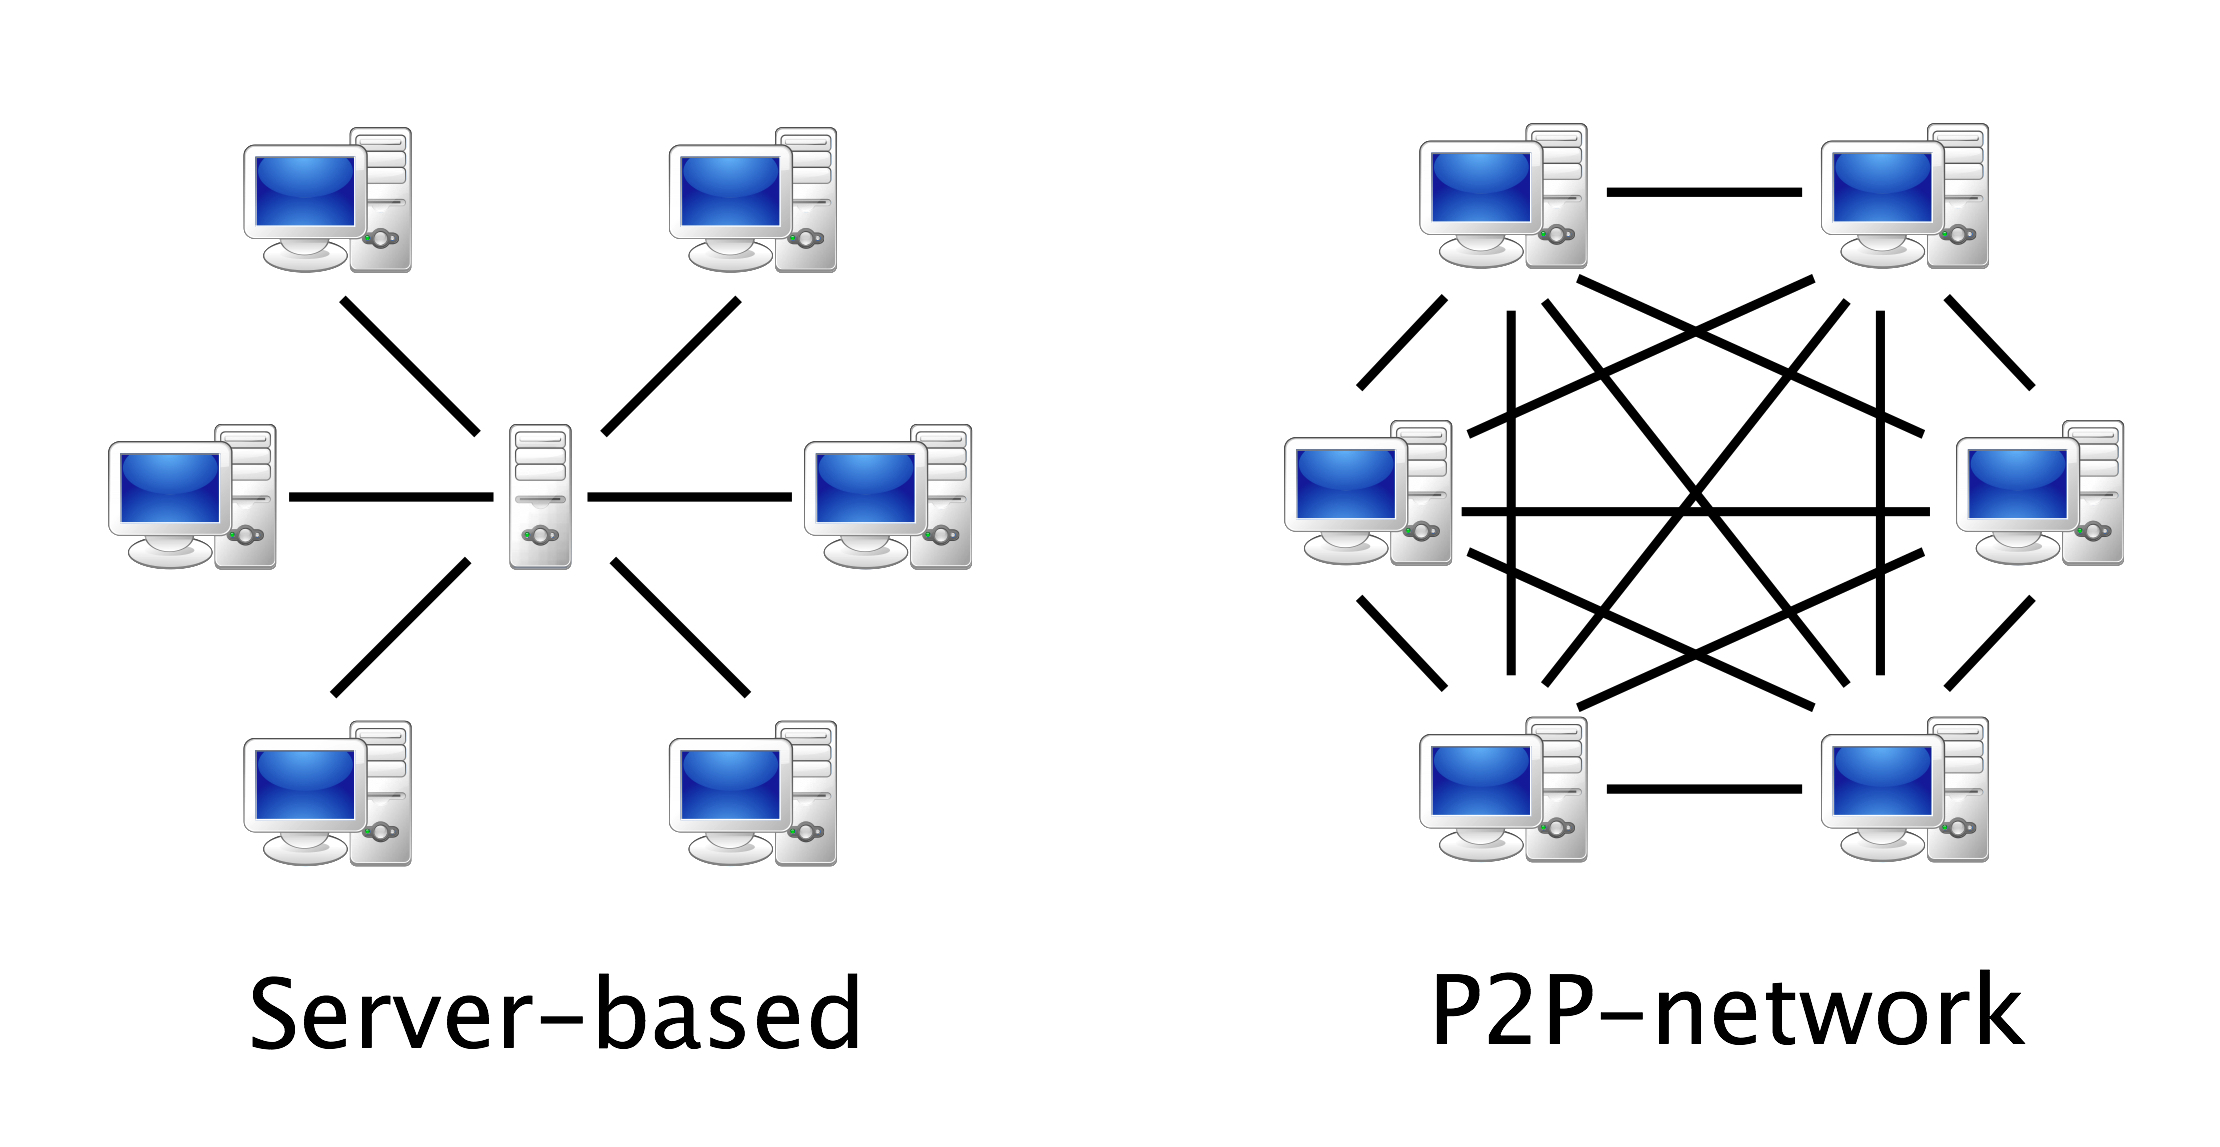
Syncthing is a file synchronization tool – much like Dropbox, but it is peer-to-peer, which means it works like Bittorrent or other file sharing tools that do not require a central server-based system to share files.
A client-server model (left) and a peer-to-peer system (right).
Why use Syncthing?
Firstly, Syncthing is an open source, peer-to-peer file sharing system, which means it is relatively cheap, simple to set up and secure. It is especially good for sharing very large files and collections of files without having to pay or to trust an intermediary to maintain a centralized file server. You run Syncthing on your computer, the person you want to share files with runs it on theirs, and you can set up folders that will synchronize files automatically when both your computers are turned on and connected to the internet. The data is encrypted in transit, and never sits on someone else’s server. Syncthing only requires each user to have a normal computer or laptop, rather than running on a server with each person using a ‘client’. This is more secure, and probably less complex to set up and maintain.
Secondly, Syncthing is open source, under active development and compatible with all major computing platforms because inevitably people will use Mac OSX and Windows, and sometimes *nix. Syncthing is one of many open source tools relevant for educational contexts, which are not only cheaper for individual researchers and teams, but also tend to stick around for longer.
Finally, Syncthing allows each user to choose how they want to organisze their folder structure. Whereas Dropbox uses a standard ‘dropbox’ folder, and (by default, at least) forces everyone use the same folder structure and folder names for their files, Syncthing allows you to put your data wherever you want on your hard drive, but still choose it as a folder to synchronize with your colleagues. So I may choose to put my video file in a folder on my Linux machine here:
/home/saul/data/project1/video1/video1.m4v
while you might have your videos on your windows machine at
A third colleague may store video on their desktop (tut tut) on their Mac at:
/Users/user/Desktop/video files/video1.m4v
We can all then use Syncthing and choose to synchronize my ‘/video1/video1’ folder with your ‘\project1\videos’ folder and our colleague can synchronize with their desktop ‘video files’ folder – so despite us all having different data naming schema, we can collaborate effectively, share files, and keep our own file systems organized in a flexible and personalized way.
For many years I’ve used Dropbox but I’m always running out of space, then having to weed out awkwardly placed or duplicated files from collaborative projects which may or may not still be used or needed by collaborators. So this feature of Syncthing is a huge selling point for me.
What is Syncthing not so good for?
Syncthing is not particularly good for synchronizing millions of small, regularly updated files. Syncthing monitors which files need syncing by scanning its folders every few seconds to find out what has been updated – this can be a bit processor intensive if you have hundreds of thousands of files to scan through. So, it’s best to use it for projects with a few thousand large (especially video/heavy data) files rather than projects with tens of thousands or millions of files. For the same reason, if you need the files to remain synchronized in (close to) real-time, Syncthing’s folder scanning process will probably take too long.
Syncthing is not great for always-online files. Because it is a peer-to-peer system, Syncthing requires the computers you are keeping in sync to be online at the same time for syncrhonization to take place. Dropbox, by contrast, uses an always-online server, so it doesn’t matter if your multiple computers running Dropbox are online at the same time or not – the server will make sure they all have the most recent version of your Dropbox files. So, if you need something always-online, better to use a server-client system like Dropbox, OneDrive, iCloud etc.
Syncthing is not particularly useful on smartphones/tablets. Finally, although Syncthing does have an Android client and an iOS client, these are not officially supported by the same developers who work on syncthing, nor are they going to work if your computer is off-line when you need to grab a file via your mobile syncthing client.
Installing Syncthing
Syncthing has excellent, up-to-date documentation that will guide you through the installation process. However, there are also several helpful videos that will help you install Syncthing on different operating systems. I couldn’t find a video about how to install Syncthing on Mac OSX, so I made one myself.
If you want to learn how to set up Syncthing for special purposes, and you want to explore all the options, I recommend reading the documentation, and if you want an in-depth video guide, I recommend the Nerd on the Street guide to setting up Syncthing. However, for a quick-start video, once you’ve installed it, I’ve created a short video that shows you how to use Syncthing to keep a folder in sync between two computers with the simplest set of default options.
I’ve used Mac OSX (el capitain) in this video, because I think it’s actually harder for most OSX users to understand how to fill in the Folder Path options (the location of the folder you want to sync) when setting up Syncthing for the first time. It’s relatively straight-forward to find Folder Paths in Windows and if you’re using Linux, I expect you’ll already know how to do that.
Troubleshooting
One major issue I’ve seen people having when running Syncthing for the first time is getting Syncthing to run at startup automatically. Although it’s beyond the scope of this article to deal with application startup issues – I’m happy to offer advice with this if you leave questions in the comments after reading the documentation.
Another major issue I had to deal with was cross-platform file-naming issues (especially for Mac OSX users). Basically, different file systems (FAT32, NTFS, exFAT, UFS/+, ext2/3 etc. etc.) allow different kinds of file names. If you are synchronizing folders between different file systems (on external drives, system hard drives, different operating systems etc.) it makes sense to use very conservative conventions.
I recommend the following:
Do not use special characters, apostrophes, colons etc. in your file names.
Use short, informative file naming conventions – include dates, project names etc. but do not use colons for times (like HH:MM:SS) as this will not work on many popular file systems.
There are many alternatives – some of them look very interesting, but none of them fit all the requirements outlined above as well as Syncthing. I’m open to adding to this list – so if you have a solution that isn’t shown here, please do let me know.
Finally – a very good solution, with minimum fuss or technology is to just copy your files onto small external hard drives and snail-mail them to each other in well-padded mailing boxes. That’s often a simpler (if slower) solution than setting up one of these systems!
I just ran a 2 hour workshop for the Media and Arts Technology Doctoral Training Centre using a variant of the Spectroscope Facilitation method during which 10 people showed and discussed their researcher / artist / technologist portfolio websites and gave each other structured feedback. After the show & tell session, each of the participants went home with 27 prioritised ‘todo’ advisory notes written by other participants to improve their own websites. However, one of the most useful outcomes – that I’m going to share here – was a set of 10 best-practice tips derived from each participant writing down what they really liked about each other’s sites.
These are neither comprehensive, nor all compatible with one another – and I certainly could take much of this advice to improve my own website, but anyone thinking of setting up and academic / personal / portfolio site might find these useful. The most important question for anyone to address with their website was to ask who and what is the website for. Is it a CV to convince potential employers in academia, or to appeal to ad agencies, or to attract artistic commissions? Once these central questions were answered, the following tips could be used to improve each site.
Prioritise clarity and coherence.
Make a clear statement of who you are and what you do in plain language – right up front.
What is the website for? If it’s basically a CV, use the word ‘CV’. If it’s a portfolio, use the word ‘portfolio’. Shape the expectations of the visitor so they know what they’re getting.
Add this information to the title/metadata the homepage, so the title bar (and Google’s web crawlers) read e.g. “Name, Job description, Purpose of site”.
If you have a lot of projects to show, put a selection of only the best/most targeted to the purpose of the site on the front page.
Foreground your main activity/role.
If you have multiple quite different audiences/purposes in mind for your site, consider making multiple sites.
However, it can also be useful to show multiple facets of what you do – if one is a minor activity and the other a major activity, combine and show a richer combined picture.
Keep it current.
Make sure you can update it easily, reduce friction by choosing technology that you enjoy using.
Show what’s upcoming – tell people what you’re doing next.
Avoid showing out of date information by e.g. not using temporally-relative wording ‘this year’ etc.
Keep your CV rigorously up to date and centralised (i.e. don’t have Linkedin profiles or freelance CVs sitting out of date around the web). A good hack for this is to use a Google Doc that you update regularly – and link to a PDF-downloadable version of it from your website.
Show people where to go.
Show as many of your menu items as you can all at once – don’t hide menus behind fancy dropdowns or multiple click-throughs.
Optimise for ‘fewer clicks’. Try to make everything on the site only one or maximum two clicks away. The most important things must be one click away and immediately visible on the homepage.
Get a domain name.
Buy your own domain name. It costs almost nothing and it mostly looks more professional.
It’s also more future-proof, i.e. if you buy www.myname.com and point it to a wordpress site, or a squarespace site, or a cargocollective site, but then change where you host the site, you can take the domain with you. If you relied on wordpress.com/myname – you’re stuck with wordpress.
If you can, use short urls e.g. http://myname.com/about or http://myname.com/project/myproject – this is relatively portable (as above) so you can change which software you use to produce your website without being tied to software-specific page names and urls.
It’s good to have your own domain for email (especially if you’re a freelancer – less an issue in academia where people use institutional emails). However, be careful not to use vanity emails like info@myname.com to sign up for core services. Here’s why.
You might want to use a widely identifiable gravatar so that your website is visually identifiable with your social media profiles/comments from around the web.
If you are an artist with lots of great visual work – which unscrupulous people love to use without permission – say how you want people to use it.
If you want people to spread your work and give you credit, use a license such as the CC-BY – or use the CC0 option if you want to put your work in the Public Domain.
Offer alternatives to audiovisual content.
A few images work as well as a video, sometimes better.
Consider using a simple explanatory animated GIF so people don’t have to download a whole video. 1
Always consider people with low bandwidth, small screens, out of date browsers. Responsive designs are easy these days with lots of great templates available for most website/blogging engines or just HTML5 templates.
Enhance your ‘findability’.
Add a list of hardware / software / techniques / approaches used for each project. This shows what you can do, and it helps people using Google to find you and what you know about.
In general think of your site as a dragnet for people to find you. It’s much better to be found than to go knocking on people’s doors – so think about who do you want to find you.
Use analytics – you should know how people see your site, where from, and which pages they visit – it helps you make decisions about how to change and update it.
Link to your social media/other platforms from your site and vice versa (linkedin, twitter, github, academia.edu, researchgate, your institutional sites etc.)
Show people who you are.
It’s amazingly important to care about your web presence these days – make it reflect who you are, what you care about and believe, and make it unique. Of course this also means being critical, self-aware and careful not to project those bits of yourself that might undermine the purpose of your site!
Sometimes a web 1.0 site at an address like http://institutionalname.edu/~yourname is a good way to show who you are – if you’re an academic in engineering or computer science. Go with that, engineering academics who are looking to hire you will recognise you as one of their own.
A really beautiful, unique and intriguing image of your work – or a great video or poem can be a wonderful hook into an art or design-focused site. Intrigue people, then reward them with more eye candy and carefully thought through information.
Show your network – link to others, make sure to credit all collaborators and link to them, they’ll appreciate it!
These are somewhat general tips. There was also a lot more technical advice in our email thread about this workshop, as well as some advice on which website services might be useful. Some of those links are included below – but any further explanation as to what to do with them is well beyond the scope of this post!
Beginners:
WordPress – either as a hosted service – or self-hosted on your own server. If self-hosted, beware! It can be tricky to maintain and has had lots of security problems in the past.
Squarespace – looks easy, but it’s pretty expensive for a simple portfolio/website.
Travis Noakes suggests (see the comments section below), using a unifying visual metaphor that brings together your website, your visual presentations and even the binding of your thesis. Travis’ excellent research blog uses the “+” sign to do this and is well worth checking out as a great example of a researcher’s site that integrates his description of his roles and foci with the site’s navigation and visual communication. He also suggests using Google’s Blogger platform for enhanced google juice and ease of use.
Notes:
A good tip on this from Victor Loux: If you’re considering using a GIF to show a specific interaction in a project, also consider that GIFs can be several megabytes big if they’re wide, as well as being lower quality (limited to 256 colours and less fluid). The trick I’ve used for my website (the ‘PeDeTe’ project) is to actually use a <video> element that acts like a gif (autoplay, looped, and no sound); for the same video length and same resolution, it reduced a 4.8 Mb (!) GIF to a 395 kb mp4 file. Most modern browsers support it and you can certainly find/make a polyfill for older ones. The only downside is that iOS will refuse to autoplay it, unlike GIFs, so that’s just not a viable option if mobile is really important. ↩
This is part II of a two-part post in which I will walk you through some key parts of a technically-savvy user’s long-term literature review and maintenance strategy.
take notes while reading that won’t get lost or damaged by your software,
organise notes and annotations so you won’t forget why you took them,
In this section, you will learn how to:
maintain associated bibliographical records,
use Docear in a way that will keep your literature reviewing current for years to come.
Warning: long post, so here’s a table of contents:
Contents
First, Import your annotations into Docear to manage them
So far, this guide has given you some pretty generic advice about note taking, you could use it in any piece of software. The Docear-specific pay-off for this process comes when you import your PDFs into Docear: you can use Docear’s internal scripting language (well, FreePlane’s version of Groovy) to format, re-organise and label your new annotations automatically. I have some complicated scripts that I won’t cover here, but here’s a very simple one I use to automatically apply visual labels to my annotations.
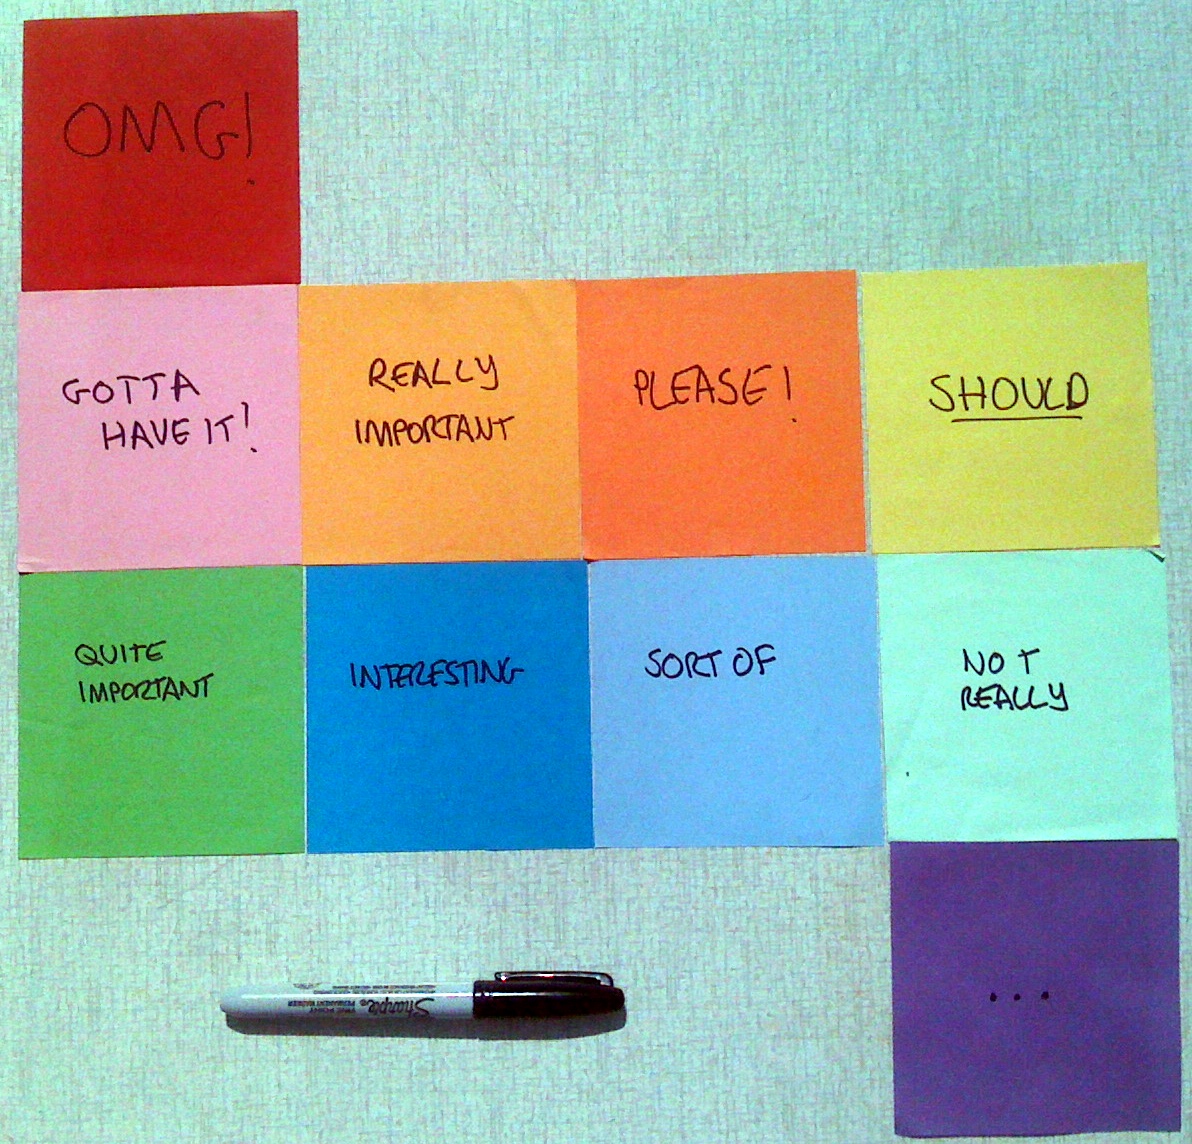
Docear offers a number of visual labels you can use to decorate the nodes in your maps, to make them visually appealing and easily distinguishable:
I have written a script that looks for all annotations beginning with ‘idea’, or ‘ref’ or ‘term’, and allocates them one of a number of pre-set visual labels provided by Docear.
// @ExecutionModes({ON_SELECTED_NODE, ON_SELECTED_NODE_RECURSIVELY})
if (node.text.toLowerCase().startsWith("todo")) {
      node.getIcons().addIcon("checked")
} else if (node.text.toLowerCase().startsWith("idea"))  {
      node.getIcons().addIcon("idea")
} else if (node.text.toLowerCase().startsWith("ref"))  {
      node.getIcons().addIcon("attach")
} else if (node.text.toLowerCase().startsWith("question"))  {
      node.getIcons().addIcon("help")
} else if (node.text.toLowerCase().startsWith("q:"))  {
      node.getIcons().addIcon("help")
} else if (node.text.toLowerCase().startsWith("quote"))  {
      node.getIcons().addIcon("bookmark")
} else if (node.text.toLowerCase().startsWith("note"))  {
      node.getIcons().addIcon("edit")
} else if (node.text.toLowerCase().startsWith("term"))  {
      node.getIcons().addIcon("desktop_new")
} else if (node.text.toLowerCase().startsWith("crit"))  {
      node.getIcons().addIcon("pencil")
}
To install this script, I wrote this code to a file called addiconNodes.groovy, which I then put it in my /home/saul/.docear/scripts directory (NB: the location of this directory may vary on Mac/Win). Docear also has a built-in script editor you can use to write groovy scripts. The script then becomes available as a contextual menu item.
Here are some illustrations showing the script being run on a newly imported paper:
Selecting the script option in Docear:
What it looks like when the script has run finished:
And how you might then choose to organise your annotations:
You’ll find lots of Freeplane scripts you can modify and play with here – there are some amazing possibilities – the icons script above doesn’t even begin to scratch the surface of what this method could do for your literature reviewing process.
Using Docear to manage thousands of papers across multiple projects and multiple years
Docear’s demo shows someone writing a paper with about 20 or 30 references. This is fine for one project, but I have over 3000 PDF books and papers in my literature repository. Over the years, I suspect this will continue to grow. I want to feel secure that my library of research papers, annotations and references is in one safe location on my hard drive. I also don’t want to have to duplicate those PDFs each time I start a new project. Here are some of my solutions to these issues geared towards a long-term research strategy.
First: a geeky caveat
Having recommended Docear for the approach outlined so far, there are some problems with Docear that I think you will have to address if you are really going to use it for a long-term research and literature management strategy.
If you think you might just use it for a masters-level one year project, the rest of this guide probably isn’t necessary. If you want to read your way into and stay up to date with the vast literature of one or more academic fields long-term, read on, but be warned: it gets even more geeky from here on in.
Docear’s default per-project folder structure and its problems
At the moment Docear encourages you to store your PDFs on a per-project basis, as if you were starting from literature year 0 each time you write something. Also (by default, at least) it puts them in a rather obscure folder structure. I don’t really trust myself to reliably back-up obscure folder structures.
Here’s how Docear does a default file structure for a demo project I just created
The idea from Docear’s developers here is that you get a few files by default when you start a new project including a dummy ‘My New Paper.mm’ (.mm stands for Mind Map) , a project-name.bib file and a literature_and_annotations.mm file, and a folder to hold all the PDFs you’ve associated with this project..
The literature_and_annotations.mm file contains a script that – when you open it – will scan through this project-specific literature_repository and check for updated files or new annotations.
This creates several problems:
Docear’s structure works fine for a per-project use, but I have 9GB of PDFs, I do not want to wait for Docear to scan through those and check for updates every time I start it up.
I’d rather not store all my precious PDFs with thousands of hours-worth of annotations 5 levels down an application-specific folder hierarchy that I may or may not remember to transfer to a new machine. Similarly, I don’t want my references – which may have taken a long time to assemble stored in a folder handily called ‘1493C9745013F2UNMIV1XCU93LBPZ4Y0KU14’.
I want to be able to use PDFs and bibliographic data from all my previous projects in new projects easily.
Work-around 1: consolidating your literature archive
Use a ‘main_literature_repository’ for your key files
I create a ‘default’ project into which I first import for all my PDFs and references
I set up this project to store PDFs in a folder in my Dropbox called main_literature_repository.
I put the main BibTeX file for this project in the same folder.
This means I have one canonical BibTeX file with all the books and papers I will ever import in my main_literature_repository folder – this makes it easy to back up. I use Dropbox to keep rough versioning for me in case I do something silly or lose my machine/s – use your backup strategy and folder location of choice.
Use a per-paper mind map for long-term annotation and re-annotation
I delete the literature_and_annotations.mm file from my default project. I do not want to wait 3 hours while Docear scans through all 9GB of my papers when it starts up. Instead, in the same main_literature_repository folder, I create a per-paper mind map.
I do this because I may use a paper six times in six different paper/research contexts. Ideally, I want to be able to read and re-read it, and keep track of what interested me about it and when… not have to delve into each project I used it for.
So, once I’ve done my annotations, I create a new map in my default project, I import the PDF, copy and paste the title of the PDF and use it to name the new mind map identically to the paper, so that in my main_literature_repository folder I have:
Apart from anything else, I can glance through the folder listed alphabetically and see which papers I have actually read! Now every time I update my annotations in that paper, I can import them into this paper-specific map, and organise them.
I might want to do this in a number of ways (one big list, thematically etc.) but I usually organise them to show how they relate to the project I’m currently working on. If I read that paper three or four times, and each time I organise the new annotations in this way, after six or seven readings/uses of that paper it’s going to be interesting to be able to see how my use of this paper has changed over time.
A quick example of importing a paper:
I download a paper helpfully entitled: ‘12312131231512312313.pdf’ from a publisher. I re-name it something useful (e.g.:AuthornameYYYY-title.pdf)2, and put it into my main_literature_repository folder, using Docear or Jabref to add or automatically import its bibliographical record into my default project BibTeX file. Once I’ve read it and taken notes in annotations, I manually create a new map just for this paper in the same main_literature_repository folder. This is now the mother lode folder with all my really important work in it.
Work-around 2: using your papers across multiple projects
This bit is kind of tricky and involves many trade-offs, I think Docear will fix it some day, for now, this is how I am doing it.
I create a new project, and treat it as a ‘sub-project’ of my default project
When I start a new Docear project, I let Docear create a default folder structure something like the one above. To get literature from my main_literature_repository folder into this new project, I create symbolic file system links to the relevant PDF files in my main_literature_repository in the new sub-project-specific literature_repository folder.
Now if I open my literature_and_annotations.mm file in the new sub-project, it will import these new PDFs and their associated annotations and I can start working with them. Of course any changes to annotations I make in these maps will also change annotations in the original PDFs.
Maintaining bibliographical references across Docear projects (and other software)
The only issue with this approach so far is that your new project-specific BibTeX file will not automatically import metadata from your ‘default’ project. This means that when you import your PDFs into this new project’s literature_and_annotations.mm map, they will have no bibliographical reference data attached.
To understand why – and how to solve it – you need to know a little bit more about how Docear works:
Docear allows you to re-organise your annotations while maintaining their associations with the bibliographical reference of the paper they’re drawn from by linking nodes in your Mind Map (.mm) files to PDFs referenced in your BibTeX file. Docear does this by adding a ‘file’ BibTeX field entry for each paper. Here’s an example of a BibTeX entry from my databse:
ARTICLE{Hepburn2012,
  author = {Alexa Hepburn and Sue Wilkinson and Rebecca Shaw},
  title = {Repairing self- and recipient reference},
  journal = {Research on Language and Social Interaction},
  year = {2012},
  volume = {45},
  pages = {175-190},
  number = {2},
  file = {:/home/saul/main_literature_repository/hepburn_repairingselfand_2012.pdf:PDF},
  keywords = {EMCA, Self-reference, Reference ; Repair},
}
So when Docear scans this PDF, it extracts its annotations, places them in the map, and creates a hyperlink to the PDF listed the file field. This means if I click on the node, it opens the file. Docear also extracts the bibliographical information from this BibTeX reference, and then adds them as attributes of the associated annotation node on my map.
So, when I create a symbolic link to this file in my new sub-project, Docear sees it as a new PDF, namely:
But it doesn’t have any BibTeX data in this new project, so it won’t recognise this PDF and paste in associated bibliographical data.
To solve this issue, there are several possible solutions:
Sym link your ‘default project’ BibTeX file into each new sub-project using a symlink – just like you do with your PDF files.
Duplicate your ‘default project’ BibTeX file into each new sub-project, search/replacing the ‘file’ field of each entry to point to your new sub-project’s literature_repository folder.
Or, (and this is what I do), open your main BibTeX file in a recent, stand-alone version of JabRef and use the ‘write XMP data’ option to make sure that the PDFs themselves contain their own reference data. When you import these PDFs, you can then use the reference embedded in the PDF itself to create a new and separate project-specific BiBteX file.
JabRef’s XMP writing option:
This third option is preferable to me for several reasons:
I don’t want to see all my references in every new project – it’s distracting.
XMP data can be read by lots of other bits of software so it makes my reference library somewhat more portable. Also, if I lose my BibTeX file in some catastrophic data loss episode, as long as I have my PDFs with XMP bibliographic data I can pretty much reconstruct my literature, annotation and reference archive from just those files.
I may want to update my bibliographical records for a new project, but keep the references of older projects intact. Although I’m aware that I improve my bibliographies continually and incrementally, I really want to control how I change them. For example, if I continually use my default project BibTeX file, symlinked in to each new sub-project as in option 1, I may not be able to re-generate a paper I wrote three years ago before I made those changes and improvements. I really want that paper to be re-created exactly as it was when I wrote it, including all the reference details and errors. I can always update an old BibTeX file from an old project easily – because the PDF file itself now contains the latest up-to-date XMP data.
I see this feature of the latest, stand-alone version of JabRef (not available in Docear’s embedded version of JabRef) as a significant plus in terms of the sustainability of this approach to literature management.
Things I didn’t cover but may post about in the future
There are lots of other things you can do using this approach to Docear – and Docear’s approach in general, a few I can think of that I didn’t cover are:
Using the command line to search/filter your annotations.
Using recoll, spotlight or similar configurable full text search systems on your repository.
Importing folder structures containing other research materials into your map.
Using Docear (or freeplane) to take detailed and well structured notes during lectures.
Using Docear to manage and search Jeffersonian transcripts of conversational data.
If you have any questions or would like to hear about these, drop me an email or get me on @saul
Notes
^ Because I like small tools for simple jobs, I actually do this using JabRef in stand-alone mode, along with JabRef’s rename files plugin to do this automatically and configurably. NB: Docear will do this automatically in upcoming versions – the feature is already in there, just not quite ready yet.
This is part I of a two-part post in which I will walk you through some key parts of a technically-savvy user’s long-term literature review and maintenance strategy. In part I you will learn how to use Docear to:
take notes while reading that won’t get lost or damaged by your software,
organise notes and annotations so you won’t forget why you took them,
In part II, should you choose to get geeky and read that bit too, you will learn to:
maintain associated bibliographical records,
use Docear in a way that will keep your literature reviewing current for years to come.
Warning: long post, so here’s a table of contents:
Contents
Introduction
What this guide is for
There are many software systems that purport to be helpful in managing academic literature, and everyone swears by their own. My belief about software is that it’s usually a nightmare, and your choice should be driven by considerations of damage limitation. With that in mind, I am using Docear to limit the damage that software can do to my literature reviewing and thesis preparation process.
This guide will outline some ways to use this software with long-term sustainability in mind. If you don’t know what Docear is, you could spend 6 minutes watching this video.
If you’re starting a PhD or a research process, and thinking about how to keep up with the literature long-term, you might want to think about using Docear in the ways described here. To get started with that, first download and install Docear, read Docear’s own very good user guide to understand the basics, then come back and read this1.
Why Docear works for a long-term research strategy
My choices are driven by issues of long-term software sustainability, and focus on cross-compatibility, reliability and stability. Docear fits my criteria because:
It’s Open Source software using well adopted, documented and supported file formats.
Docear’s plain text-based file formats for are searchable and editable.
Text-based files enable version control and collaboration (including with your future self).
Docear, JabRef and FreePlane all work together or separably on most platforms.
In general, Docear conforms with the tenets of Unix Philosophy i.e.: Docear is designed to be modular, clear, simple, transparent, robust, and extensible for users and developers.
What all this means for academics is that
You are probably always going to be able to edit and view these files on any platform.
If you just want to change a bibliographic reference, you can just use the bibliography manager (or a text editor) to do it on any computing platform without even firing up Docear.
If you just want to view your Docear file on Android, i0S, or using any mind-map viewer, you can open it (albeit with limited features) in FreePlane, FreeMind, Xmind or the many associated pieces of software that can read these files.
If you want to search your entire archive of papers, you can do it using grep on a command line or with any text-search and indexing system that can read your file system (I use Recoll).
It doesn’t mess with your files or do complex or potentially destructive things, use fancy databases etc. You can move away from Docear at any time – you’ll still have your annotations, your PDFs, your BibTeX reference files.
Import annotations from PDFs, and cross-sync them (change the annotation in your PDF – it gets changed in Docear, change it in Docear, it gets synced in your PDF).
Organise your annotations in multiple ways
Organise your annotations visually by research theme / category / heading
Organise your annotations visually by paper / book / author
Mix these up, copy and paste annotations multiple times, make further notes on annotations etc.
Import file/folder structures from your hard disk, so you can get an overview of your data, files and research materials alongside your literature, and make notes and connections between them.
Maintain the bibliographical associations of your annotations and notes, even after copy/pasting/reorganising them.
Just to re-state this: I’m not going to go through these basics in this how-to, so if you want to learn to use Docear from scratch you really should read the manual. What follows are some adaptations I’ve made to the Docear workflow that I think make it even more useful as a secure and long-term bet for research literature management.
How to take notes that won’t get lost or corrupted
PDFs, however flawed as a document format, are a de facto standard in academia and aren’t going away soon. You can read, edit and share them relatively easily on all devices and platforms, so that’s probably how you should store your annotations and bibliographical data.
General annotation strategy
Many pieces of literature review / bibliography management / annotation software keep notes and bibliographical records scattered about in proprietary databases or separate annotation files, so following Docear’s excellent advice on the issue I use ezPDF Reader on Android, and PDF-XChange Viewer on Linux (via wine) to make my annotations in my PDFs themselves.
Docear allows you to manage these annotations effectively without sacrificing the simplicity and security of having it all in one, cross-platform, easily accessible file.
Synchronisation and backup across clients/computers
The benefits of this are clear: you can easily back up your PDFs.
I use Dropsync to synchronise my main_literature_repository folder with a folder on my Android tablet, so when I’m on the go I can take notes and have them appear automatically in my literature review mind map when I start up Docear.
I tried using Dropbox’s own android client, I found that it would sync too frequently, and sometimes randomly deletes its temporary files. For this reason I recommend syncing your entire PDF repository to your mobile devices, editing the PDF locally (on the android device’s file system), then synchronising with Dropbox or whatever local/cloud/repo/backup service you prefer.
How to remember why you took your notes in the first place
Use action-related tags for each annotation
I have most of my research ideas while reading, but they’re not all just ‘notes’, they are really different in response to different ideas about what I plan to do with that idea. So I find it useful to distinguish between the kinds of notes I take on documents. When I take an annotation, I track that difference by starting the annotation with one of 10 or so labels:
todo: The most important label – this reminds me to do something (look up a paper, change something in my manuscript etc.)
idea: I’m inspired with a new idea, somehow based on this paper, but it’s my own thing.
ref: This is a reference, or contains a reference that I want to use for something.
question: or just q: I have a question about this, maybe to ask the author or myself in relation to my data / research.
quote: I want to quote this, or it contains a useful quote
note: Not a specific use in mind for this, but it’s worth remembering next time I pick up this paper.
term: A new term or word I’m not familiar with: I look it up or define it in the annotation.
crit: I have a criticism of this bit of the paper.
There are a few others I use occasionally, but these are the most common. You probably can think of your own based on how you would categorise the kinds of thoughts that come to you while reading research papers.
Use keywords for each research project/idea
I have 3 or 4 project constantly on the go, and lots of ideas for new projects and papers. I want to capture my responses to what I’m reading in relation to those projects in a reliable way.
So, I have short, unique keywords for each of my projects:
camedia: a CA project about how people talk about the recording devices they’re using
cadance: a CA project about partner dance
thesis: my thesis
thesis_noticings: my chapter on noticings
thesis_introduction: get it?
So if I’m reading a paper and it says something like:
“Something I really disagree with and want to comment on or respond to in my next article on dance”
I’ll highlight, copy and paste that into a new annotation, and add a few keywords on the top:
quote: cadance: "Something I really disagree with and want to comment on or respond to in my next article on dance"
This means when I search for all my annotations to do with ‘cadance’ project, I’ll find this one, and I’ll know I wanted to use this as a quote.
Similarly, I may have multiple projects:
quote: cadance: thesis_noticings: "Something I really disagree with and want to comment on or respond to in my next article on dance"
If I want to quote something, but also want to write a note about it, I’ll make two separate annotations on the PDF, one that says:
quote: cadance: thesis_noticings: "Something I really disagree with and want to comment on or respond to in my next article on dance"
The other that says:
note: cadance: thesis_noticings: "Something I really disagree with and want to comment on or respond to in my next article on dance": I really disagree with this for reason, reason and reason.
These will show up in my literature review map as two separate annotations, with different actions attached to them.
Use auto-completion software to make this less painful
I use Switfkey for all my annotation on my Android tablet (where I do most of it). This greatly reduces the time required to type in repetitive tags or keywords that I use all the time to enhance my annotations (see the next section). It also offers auto-complete suggestions so I can remember more complex project keywords / tags easily.
That’s the general advice bit. Geeky advice follows in part II.
So far, this guide has given you some pretty generic advice about note taking, you could use it in any piece of software. The Docear-specific pay-off for this process comes when you import your PDFs into Docear. However, that bit gets pretty geeky. You’ll need to be comfortable with scripting, modifying workflows of existing software packages, and generally be unperturbed by geeky terminology.
If this isn’t your thing, you can just use Docear with the above strategies – or use them more generally in your literature reviewing.
^ One little gotcha: if you’re using a Mac (esp. Yosemite (10.9.X or newer)), you’ll have to do some terminal diddling to make sure you’ve enabled software from unsigned sources to run on your machine or you’ll get an unhelpful error message. Thanks Apple!
Of course I could just use a WYSIWYG text editor like LibreOffice – but now I’ve experienced the power of LaTeX for document preparation and publication, I really can’t see myself going back.
When doing CA it seems particularly important to have transcriptions legibly in the body of the paper and visible during the writing process, because many of the analytical observations come, or get significantly modified at the point of writing about them, double and triple checking assumptions, and cross-referencing with the CA literature while tweaking citations.
The Simplest Solution: Markdown + Pandoc
Markdown is my favourite lightweight markup language, a highly readable format with which you can write a visually pleasing text file, which you can then convert into almost any other format – HTML, OpenOffice, LaTeX, RTF, etc. using Pandoc. There are many similar systems, notably reStructuredText and Textile, all of which you can use to write your text file, and other conversion tools/toolsets, but in my experience, Markdown and Pandoc are the most useful combination in an academic context 1.
There are lots of great things about markdown:
Just edit simple text files – no weird file formats to get corrupted or mangled.
Less verbose and complicated-looking than LaTeX.
Small files are easy to share/collaborate on with others (everyone gets to use their favourite editor).
There are some great pandoc plugins for my favourite text editor vim.
However, the best thing is that, used along with the XeTeX typesetting engine, it solves the problem with CA transcriptions being unreadable in LaTeX/pdflatex.
For example, in my first CA-laced paper, my transcriptions looked like this in my LaTeX source:
\begin{table*}[!ht]
\hfill{}
\texttt{
  \begin{tabular}{@{}p{2mm}p{2mm}p{150mm}@{}}
 & D: &  0:h (I k-)= \\
 & A: &  =Dz  that  make any sense  to  you?  \\
 & C: &  Mn mh. I don' even know who she is.  \\
 & A: &  She's that's, the Sister Kerrida, \hspace{.3mm} who, \\
 & D: &  \hspace{76mm}\raisebox{0pt}[0pt][0pt]{ \raisebox{2.5mm}{[}}'hhh  \\
 & D: &  Oh \underline{that's} the one you to:ld me you bou:ght.= \\
 & C: &  \hspace{2mm}\raisebox{0pt}[0pt][0pt]{ \raisebox{2.5mm}{[}} Oh-- \hspace{42mm}\raisebox{0pt}[0pt][0pt]{             \raisebox{2mm}{\lceil}} \\
 & A: &  \hspace{60.2mm}\raisebox{0pt}[0pt][0pt]{ \raisebox{3.1mm}{\lfloor}}\underline{Ye:h} \\
  \end{tabular}
\hfill{}
}
\caption{ Evaluation of a new artwork from (JS:I. -1) \cite[p.78]{Pomerantz1984} .}
\label{ohprefix}
\end{table*}
which renders this:
A simpler way to do this in Markdown (with none of the fancy stuff) is to use Markdown’s ‘verbatim’ environment – you do this by putting four spaces or one tab before each line in your transcript (including blank lines). Here’s the messy LaTeX above re-done in simple Markdown.
Overall, I think the Markdown version represents a significant improvement in legibility while writing. I think it might be possible to do the same in LaTeX using the {verbatim} environment, but the fact that Markdown also lets me concentrate on writing without throwing errors or refusing to compile lets me spend longer on the writing than on endless text-fiddling procrastination.
When it comes to rendering, I feed my markdown file to pandoc:
If you want to use the nicely stretched ceiling characters for overlap marking, or the raised full stop / bullet operator for inbreaths, you can do so, but you’ll need to run Pandoc (see below) referencing a font that has those characters. For example, you could use CAfont and add:
--variable monofont=CAfont
to the pandoc command above.
The default.csl file is a citation style language file to customise how bibliographical references are rendered.
If you’re only adding a few examples to your document, this will probably work fine. If you are writing a thesis or a longer document – read on.
For Longer Texts: Markdown + Pandoc + LaTeX
The above approach may work for writing a short paper with one or two examples, for a thesis or a longer piece where you may have many examples, you’re going to have to take this a step further and use some LaTeX within your Markdown document. The bad news, you will have to use LaTeX, templates and some code to deal with:
Example Layout: you probably want your examples to be graphically separated from your text in a consistent way.
Document layout: you may need to make some stylistic tweaks to how your document prints out.
Referencing: you will want to use labels for your examples so you can cross-reference them automatically within the text and not have to re-label them every time you make a change.
Audio/video links: you may want to include links to audio/video examples in your files.
The good news: your CA transcript examples will still be easy to read/edit, and actually this is all pretty straight forward once you’ve got it set up.
I’ve made a downloadable archive of the three files I use every time I create a new document. Download those. There is also a working demo (README.md) and some image files that you can use to edit/test things, or modify them to create your own.
Along with these examples inside the camarkdown_files folder you will find:
template.txt: a LaTeX template that Pandoc uses when it renders PDFs – with macros etc.
margins.sty: a little margins file I canuse to tweak the overall page layout separately (US Letter vs. A4 etc.)
Whenever you start a new document, these three files into the same folder.
A little explanation
Without getting too geeky about it, here’s a little explanation of how I use this setup:
Whenever I convert my Mardown to PDF using Pandoc, I add:
--template template.txt
to the pandoc command to make sure it uses this template. The template is based on the default LaTeX template Pandoc always uses to convert Markdown to PDF via LaTeX, but I’ve added a macro: caextract.
Basically the caextract environment sets the default monospaced font, and (optionally) creates a to an online media file referenced in the Markdown file (see working example below), it also formats the paragraph containing the example as a framed float to divide it from the body of the text, and changes the listings name to ‘Extract’, so references list it as ‘Extract 1’ rather than ‘Figure 1’.
Here’s the relevant bits from the header section of template.txt
Here is a full example from a paper I’m writing at the moment that you can tweak and play with. It’s all done in simple markdown, using a little bit of LaTeX embedded within the Markdown file to call the macro.
So where I want my extract to appear in my Markdown file, I add:
By contrast, Sara, Paul and Anne - marked in red in figure
\ref{stopping-postures} - step back, split their weight and
stop dancing together with the onset of Teacher's
"\verb|G O :̲ ̲:̲ ̲O̲ : : d!|". Without having space to analyse
this method, it is worth noting in closing that the regularity
of these methods and their interactional contingencies are
shown in the [slow-motion sections of the video](https://www.dropbox.com/s/jnpf5pnxcy4dg8m/lexical-features.mov)
by how dancers who stop like Jim are all pulled off balance
by dancers who stop like Paul, Sara and Anne.
It should look something like this:
A few notes on how this works:
The main reason for the macro is to enable cross-referencing. In the Markdown file, within each caextract I use \label{my-label} to label my examples. Then I can reference them anywhere in my Markdown file with something like “See extract \ref{my-label}”.
If you don’t have any media, just leave out the \medialink line.
You can put anything in the \caption section – your example name if you have a set naming schema for your corpus.
Note the neat Markdown trick in the paragraph above: I use “\verb|This comes out verbatim|” for a short inline bit of monospaced text.
Rendering your CA extracts using Pandoc
Finally, making sure you have your csl file (apa.csl), your images, your template.txt file and your margins.sty file all in the same folder with your example (I find that convenient), and making sure you have a nice monospaced font to use (CAfont is great) in place, run something like this:
You can, of course, run this command from the terminal – swapping out the relevant variables as needed, but I use vim-pandoc’s PandocRegisterExecutor function to run this whenever I type the local leader character twice (,,) followed by pdf. See https://github.com/vim-pandoc/vim-pandoc for documentation of that kind of thing.
I’m happy to answer any questions here or on @saul.
Notes:
Not all of these systems support bibliographical references with BibTeX – Markdown + Pandoc does this quite elegantly ↩
This cheat sheet (PDF version) provides all the symbols you will encounter in Schegloff (2007): a useful reminder while doing an initial sequential analysis of your data. Use with caution, and remember to re-read the last chapter, as well as Schegloff (2005) beforehand. Usages are referenced with example and page numbers.
+ : more of a FPP or SPP i.e.: +F / +S (used in combination with other labels) (7.05, p. 121)1
b : base pair i.e. Fb or Sb
pre : pre-sequence marker
e.g. Fpre or Spre of a pre-expansion sequence (5.32, p. 77, see note 5 p. 27)
can take b and / or numbering for multi-sequence analyses.
ins or i : insert expansion FPPins or SPPins (can take b / numbering). (6.08, p.103 / 6.01, p.105)
insins : nested insert expansions (can be further nested e.g.: insinsins ) (6.17, p.110)
post : post-expansion (p. 27 note 5)
Position-specific markers:
pre-S : a preliminary (e.g. anticipatory account) coming between F and S. (p. 69 ex. 5.19)
preSb : a preliminary to a base sequence (p. 84 ex. 5.38)
SCT : sequence closing third (can be used with numbering, + and design feature labels) (7.03, p.119)
PCM : post-completion musing (7.32, p. 143)
Action labels
Obviously actions can be described in many ways, but Schegloff (2007) only uses these ones:
off : offer (could also be req for requests (10.14, pp 213-214), ass for assessments etc. etc.)2
acc : accept prior action (5.39, p. 85)
rej : reject prior action (5.39, p. 85)
prerej : a pre-rejection (could be used for any action) (5.39, p. 85)
req1 / off2 / acc2 / acc1 : numbered actions for multi/nested-sequence analyses. (5.38, p. 85)
retr : disavowal or retraction of prior action (9.03b, p. 185)
alt : alternative version of prior action (7.50c, pp. 166-167)
again : reissuing a prior action (7.50b, pp. 165-166)
redo : reworking/redoing of a prior action (7.49, pp. 163-164)
add : addition to prior action (7.49, pp. 163-164)
Design feature labels
up : upgrade (7.43, p. 157)
hedge or hdg : hedge (7.50b, pp. 165-166)
agree : agreement with preference (5.32, p. 77)
rev : reversal of preference / type conformity (5.32, p. 77)
cnt : counter (2.01 p.17)
References
Schegloff, E. A. (2005). On integrity in inquiry… of the investigated, not the investigator. Discourse Studies, 7(4-5), 455–480.
Schegloff, E. A. (2007). Sequence organization in interaction: Volume 1: A primer in conversation analysis. Cambridge: Cambridge University Press.
This is rather ambiguously described in passing as: “‘preferred’ or ‘+ {plus]’ second pair parts” (Schegloff 2007 p. 120). However, these are not equivalents but alternatives. Confusingly, the literature does sometimes use the + sign to indicate preference in analytic transcripts. Schegloff (2007) uses it to indicate ‘more’ of an FPP or SPP.↩
NB: When using action labels with a b marker, separate them with a comma for clarity e.g.: Fb, req (10.14, pp. 213-214).↩