blog

How to share large amounts of research video data with Syncthing

Syncthing Logo

Syncthing Logo

One of the major logistical problems facing researchers who use large audiovisual data files featuring recordings of human subjects is how to share it with colleagues simply, securely and inexpensively.

  • By simple, I mean that the a/v file-sharing solution should not need specialized equipment or an expert systems administrator to set it up for you. Most universities and research institutions have in-house research file servers. These may be security audited, up-to-date and well-organized – they may seem unlikely to suddenly lose or delete all your data or randomly restrict access to your colleagues in other institutions. However, in my experience, it’s best to manage your own data and backups!
  • By secure I mean that it should not rely on cloud-hosted storage (which may store and transfer data anywhere in the world), or allow data to be transferred unencrypted between remote systems. This is often a requirement of UK human subjects/ethical approval – so it’s particularly relevant in the case of UK educational institutions, but this is probably also true elsewhere.
  • By inexpensive I mean that it should not cost the end-user an ongoing fee, or meter use per gigabyte stored. Commercially available cloud file-storage services like Dropbox, OneDrive, Google Drive or iCloud are relatively cheap up to ~ 1TB storage, they can get quite expensive beyond that, and if you have multiple projects with multiple researchers in different groups sharing data – the total cost for all researchers can become prohibitive.

There are trade-offs between these three requirements – this blog post outlines how to use Syncthing – which I think is an optimal solution – to solve this issue.

What is Syncthing?

Syncthing is a file synchronization tool – much like Dropbox, but it is peer-to-peer, which means it works like Bittorrent or other file sharing tools that do not require a central server-based system to share files.
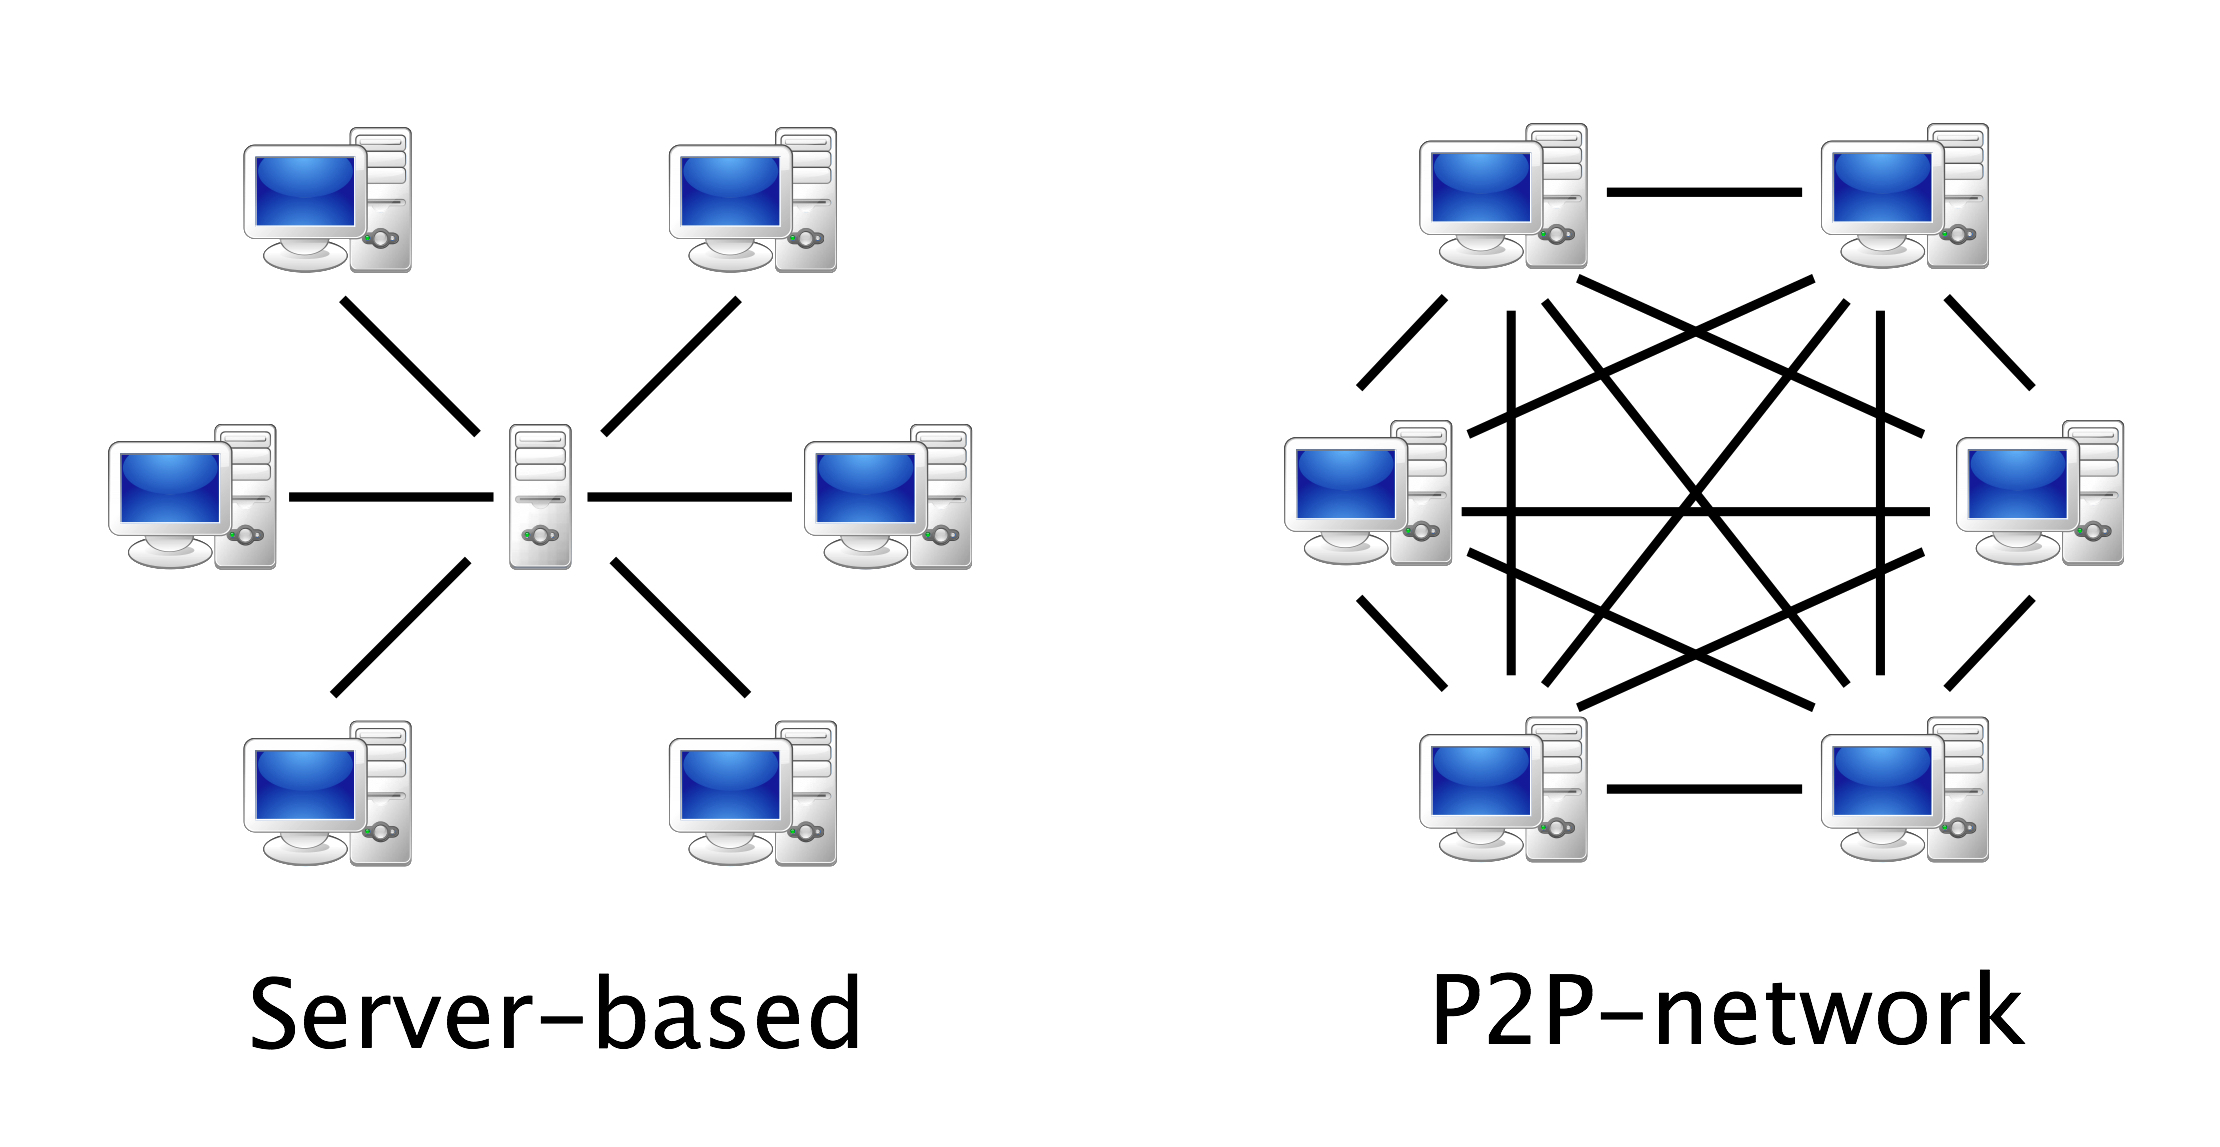
A client-server model (left) and a peer-to-peer system (right)
A client-server model (left) and a peer-to-peer system (right).

Why use Syncthing?

Firstly, Syncthing is an open source, peer-to-peer file sharing system, which means it is relatively cheap, simple to set up and secure. It is especially good for sharing very large files and collections of files without having to pay or to trust an intermediary to maintain a centralized file server. You run Syncthing on your computer, the person you want to share files with runs it on theirs, and you can set up folders that will synchronize files automatically when both your computers are turned on and connected to the internet. The data is encrypted in transit, and never sits on someone else’s server. Syncthing only requires each user to have a normal computer or laptop, rather than running on a server with each person using a ‘client’. This is more secure, and probably less complex to set up and maintain.

Secondly, Syncthing is open source, under active development and compatible with all major computing platforms because inevitably people will use Mac OSX and Windows, and sometimes *nix. Syncthing is one of many open source tools relevant for educational contexts, which are not only cheaper for individual researchers and teams, but also tend to stick around for longer.

Finally, Syncthing allows each user to choose how they want to organisze their folder structure. Whereas Dropbox uses a standard ‘dropbox’ folder, and (by default, at least) forces everyone use the same folder structure and folder names for their files, Syncthing allows you to put your data wherever you want on your hard drive, but still choose it as a folder to synchronize with your colleagues. So I may choose to put my video file in a folder on my Linux machine here:

/home/saul/data/project1/video1/video1.m4v

while you might have your videos on your windows machine at

C:\Users\Yourname\projects\project1\videos\video1.m4v

A third colleague may store video on their desktop (tut tut) on their Mac at:

/Users/user/Desktop/video files/video1.m4v

We can all then use Syncthing and choose to synchronize my ‘/video1/video1’ folder with your ‘\project1\videos’ folder and our colleague can synchronize with their desktop ‘video files’ folder – so despite us all having different data naming schema, we can collaborate effectively, share files, and keep our own file systems organized in a flexible and personalized way.

For many years I’ve used Dropbox but I’m always running out of space, then having to weed out awkwardly placed or duplicated files from collaborative projects which may or may not still be used or needed by collaborators. So this feature of Syncthing is a huge selling point for me.

What is Syncthing not so good for?

Syncthing is not particularly good for synchronizing millions of small, regularly updated files. Syncthing monitors which files need syncing by scanning its folders every few seconds to find out what has been updated – this can be a bit processor intensive if you have hundreds of thousands of files to scan through. So, it’s best to use it for projects with a few thousand large (especially video/heavy data) files rather than projects with tens of thousands or millions of files. For the same reason, if you need the files to remain synchronized in (close to) real-time, Syncthing’s folder scanning process will probably take too long.

Syncthing is not great for always-online files. Because it is a peer-to-peer system, Syncthing requires the computers you are keeping in sync to be online at the same time for syncrhonization to take place. Dropbox, by contrast, uses an always-online server, so it doesn’t matter if your multiple computers running Dropbox are online at the same time or not – the server will make sure they all have the most recent version of your Dropbox files. So, if you need something always-online, better to use a server-client system like Dropbox, OneDrive, iCloud etc.

Syncthing is not particularly useful on smartphones/tablets. Finally, although Syncthing does have an Android client and an iOS client, these are not officially supported by the same developers who work on syncthing, nor are they going to work if your computer is off-line when you need to grab a file via your mobile syncthing client.

Installing Syncthing

Syncthing has excellent, up-to-date documentation that will guide you through the installation process. However, there are also several helpful videos that will help you install Syncthing on different operating systems. I couldn’t find a video about how to install Syncthing on Mac OSX, so I made one myself.

Installing Syncthing on Mac OSX (with Homebrew):


Installing Syncthing on Windows


Installing Syncthing on Linux


Setting up and using Syncthing to share data

If you want to learn how to set up Syncthing for special purposes, and you want to explore all the options, I recommend reading the documentation, and if you want an in-depth video guide, I recommend the Nerd on the Street guide to setting up Syncthing. However, for a quick-start video, once you’ve installed it, I’ve created a short video that shows you how to use Syncthing to keep a folder in sync between two computers with the simplest set of default options.

I’ve used Mac OSX (el capitain) in this video, because I think it’s actually harder for most OSX users to understand how to fill in the Folder Path options (the location of the folder you want to sync) when setting up Syncthing for the first time. It’s relatively straight-forward to find Folder Paths in Windows and if you’re using Linux, I expect you’ll already know how to do that.


Troubleshooting

One major issue I’ve seen people having when running Syncthing for the first time is getting Syncthing to run at startup automatically. Although it’s beyond the scope of this article to deal with application startup issues – I’m happy to offer advice with this if you leave questions in the comments after reading the documentation.

Another major issue I had to deal with was cross-platform file-naming issues (especially for Mac OSX users). Basically, different file systems (FAT32, NTFS, exFAT, UFS/+, ext2/3 etc. etc.) allow different kinds of file names. If you are synchronizing folders between different file systems (on external drives, system hard drives, different operating systems etc.) it makes sense to use very conservative conventions.

I recommend the following:

Alternatives to Syncthing

There are many alternatives – some of them look very interesting, but none of them fit all the requirements outlined above as well as Syncthing. I’m open to adding to this list – so if you have a solution that isn’t shown here, please do let me know.

Finally – a very good solution, with minimum fuss or technology is to just copy your files onto small external hard drives and snail-mail them to each other in well-padded mailing boxes. That’s often a simpler (if slower) solution than setting up one of these systems!

How to share large amounts of research video data with Syncthing Read More »

10 best practice tips for your research/portfolio website

Spectrascope facilitation cards

I just ran a 2 hour workshop for the Media and Arts Technology Doctoral Training Centre using a variant of the Spectroscope Facilitation method during which 10 people showed and discussed their researcher / artist / technologist portfolio websites and gave each other structured feedback. After the show & tell session, each of the participants went home with 27 prioritised ‘todo’ advisory notes written by other participants to improve their own websites. However, one of the most useful outcomes – that I’m going to share here – was a set of 10 best-practice tips derived from each participant writing down what they really liked about each other’s sites.

Spectrascope facilitation cards

These are neither comprehensive, nor all compatible with one another – and I certainly could take much of this advice to improve my own website, but anyone thinking of setting up and academic / personal / portfolio site might find these useful. The most important question for anyone to address with their website was to ask who and what is the website for. Is it a CV to convince potential employers in academia, or to appeal to ad agencies, or to attract artistic commissions? Once these central questions were answered, the following tips could be used to improve each site.

  1. Prioritise clarity and coherence.
    • Make a clear statement of who you are and what you do in plain language – right up front.
    • What is the website for? If it’s basically a CV, use the word ‘CV’. If it’s a portfolio, use the word ‘portfolio’. Shape the expectations of the visitor so they know what they’re getting.
    • Add this information to the title/metadata the homepage, so the title bar (and Google’s web crawlers) read e.g. “Name, Job description, Purpose of site”.
    • If you have a lot of projects to show, put a selection of only the best/most targeted to the purpose of the site on the front page.
  2. Foreground your main activity/role.

    • If you have multiple quite different audiences/purposes in mind for your site, consider making multiple sites.
    • However, it can also be useful to show multiple facets of what you do – if one is a minor activity and the other a major activity, combine and show a richer combined picture.
  3. Keep it current.
    • Make sure you can update it easily, reduce friction by choosing technology that you enjoy using.
    • Show what’s upcoming – tell people what you’re doing next.
    • Avoid showing out of date information by e.g. not using temporally-relative wording ‘this year’ etc.
    • Keep your CV rigorously up to date and centralised (i.e. don’t have Linkedin profiles or freelance CVs sitting out of date around the web). A good hack for this is to use a Google Doc that you update regularly – and link to a PDF-downloadable version of it from your website.
  4. Show people where to go.
    • Show as many of your menu items as you can all at once – don’t hide menus behind fancy dropdowns or multiple click-throughs.
    • Optimise for ‘fewer clicks’. Try to make everything on the site only one or maximum two clicks away. The most important things must be one click away and immediately visible on the homepage.
  5. Get a domain name.
    • Buy your own domain name. It costs almost nothing and it mostly looks more professional.
    • It’s also more future-proof, i.e. if you buy www.myname.com and point it to a wordpress site, or a squarespace site, or a cargocollective site, but then change where you host the site, you can take the domain with you. If you relied on wordpress.com/myname – you’re stuck with wordpress.
    • If you can, use short urls e.g. http://myname.com/about or http://myname.com/project/myproject – this is relatively portable (as above) so you can change which software you use to produce your website without being tied to software-specific page names and urls.
    • It’s good to have your own domain for email (especially if you’re a freelancer – less an issue in academia where people use institutional emails). However, be careful not to use vanity emails like info@myname.com to sign up for core services. Here’s why.
  6. Use a nice photo of yourself doing something.
    • It’s good to show something about yourself – but try to show yourself doing something relevant to the style and purpose of your site.
    • You might want to use a widely identifiable gravatar so that your website is visually identifiable with your social media profiles/comments from around the web.
  7. Use relevant copyright notices.
    • As long as you’ve created your website, whatever you publish is legally yours whether you add a colophon with a ‘©’ symbol or not. The symbol is just there to advise people on how to use your content.
    • If you are an artist with lots of great visual work – which unscrupulous people love to use without permission – say how you want people to use it.
    • If you want people to spread your work and give you credit, use a license such as the CC-BY – or use the CC0 option if you want to put your work in the Public Domain.
  8. Offer alternatives to audiovisual content.
    • A few images work as well as a video, sometimes better.
    • Consider using a simple explanatory animated GIF so people don’t have to download a whole video. 1
    • Always consider people with low bandwidth, small screens, out of date browsers. Responsive designs are easy these days with lots of great templates available for most website/blogging engines or just HTML5 templates.
  9. Enhance your ‘findability’.
    • Add a list of hardware / software / techniques / approaches used for each project. This shows what you can do, and it helps people using Google to find you and what you know about.
    • In general think of your site as a dragnet for people to find you. It’s much better to be found than to go knocking on people’s doors – so think about who do you want to find you.
    • Use analytics – you should know how people see your site, where from, and which pages they visit – it helps you make decisions about how to change and update it.
    • Link to your social media/other platforms from your site and vice versa (linkedin, twitter, github, academia.edu, researchgate, your institutional sites etc.)
  10. Show people who you are.
    • It’s amazingly important to care about your web presence these days – make it reflect who you are, what you care about and believe, and make it unique. Of course this also means being critical, self-aware and careful not to project those bits of yourself that might undermine the purpose of your site!
    • Sometimes a web 1.0 site at an address like  http://institutionalname.edu/~yourname is a good way to show who you are – if you’re an academic in engineering or computer science. Go with that, engineering academics who are looking to hire you will recognise you as one of their own.
    • A really beautiful, unique and intriguing image of your work – or a great video or poem can be a wonderful hook into an art or design-focused site. Intrigue people, then reward them with more eye candy and carefully thought through information.
    • Show your network – link to others, make sure to credit all collaborators and link to them, they’ll appreciate it!

These are somewhat general tips. There was also a lot more technical advice in our email thread about this workshop, as well as some advice on which website services might be useful. Some of those links are included below – but any further explanation as to what to do with them is well beyond the scope of this post!

Beginners:

  • WordPress – either as a hosted service – or self-hosted on your own server. If self-hosted, beware! It can be tricky to maintain and has had lots of security problems in the past.
  • Squarespace – looks easy, but it’s pretty expensive for a simple portfolio/website.

Intermediate/advanced: (thanks to Victor Loux).

Hosting:

Thanks to Toby Harris, Victor Loux, Daniel GabanaJacob HarrisonJulie Freeman, Laurel Pardue, Raphael Kim, and Betül Aksu for presenting their works in progress and giving great feedback.


Update 7/18/2016:

Travis Noakes suggests (see the comments section below), using a unifying visual metaphor that brings together your website, your visual presentations and even the binding of your thesis. Travis’ excellent research blog uses the “+” sign to do this and is well worth checking out as a great example of a researcher’s site that integrates his description of his roles and foci with the site’s navigation and visual communication. He also suggests using Google’s Blogger platform for enhanced google juice and ease of use.

Notes:

  1. A good tip on this from Victor Loux: If you’re considering using a GIF to show a specific interaction in a project, also consider that GIFs can be several megabytes big if they’re wide, as well as being lower quality (limited to 256 colours and less fluid). The trick I’ve used for my website (the ‘PeDeTe’ project) is to actually use a <video> element that acts like a gif (autoplay, looped, and no sound); for the same video length and same resolution, it reduced a 4.8 Mb (!) GIF to a 395 kb mp4 file. Most modern browsers support it and you can certainly find/make a polyfill for older ones. The only downside is that iOS will refuse to autoplay it, unlike GIFs, so that’s just not a viable option if mobile is really important.

10 best practice tips for your research/portfolio website Read More »

Rhythmical coordination of performers and audience in partner dance

What can audience members’ embodied, rhythmical movements tell us about their experience of a musical dance performance? And what do their responses reveal about the composition, organisation and production of the performance itself?

Saul Albert, Rhythmical coordination of performers and audience in partner dance. Delineating improvised and choreographed interaction, in "Etnografia e ricerca qualitativa" 3/2015, pp. 399-428, doi: 10.3240/81723
Saul Albert, Rhythmical coordination of performers and audience in partner dance. Delineating improvised and choreographed interaction, in “Etnografia e ricerca qualitativa” 3/2015, pp. 399-428, doi: 10.3240/81723

I wrote a paper that focuses on how partner dancers and audience members move together during an improvised social dance performance. The central finding from this paper is a proposal for how we can draw empirical distinctions between improvised and non-improvised (or choreographed) movements.

This important distinction – which if you think about it, is very difficult to describe in theory – can be made in practice by tracking how participants deal with moments where the rhythmical coordination of (in this case) the audience’s clapping, the musical structure and the dancers’ joint movements seems likely to break down.

The paper then proposes a way of developing this form of analysis using a model of temporal patterning derived from biological systems.

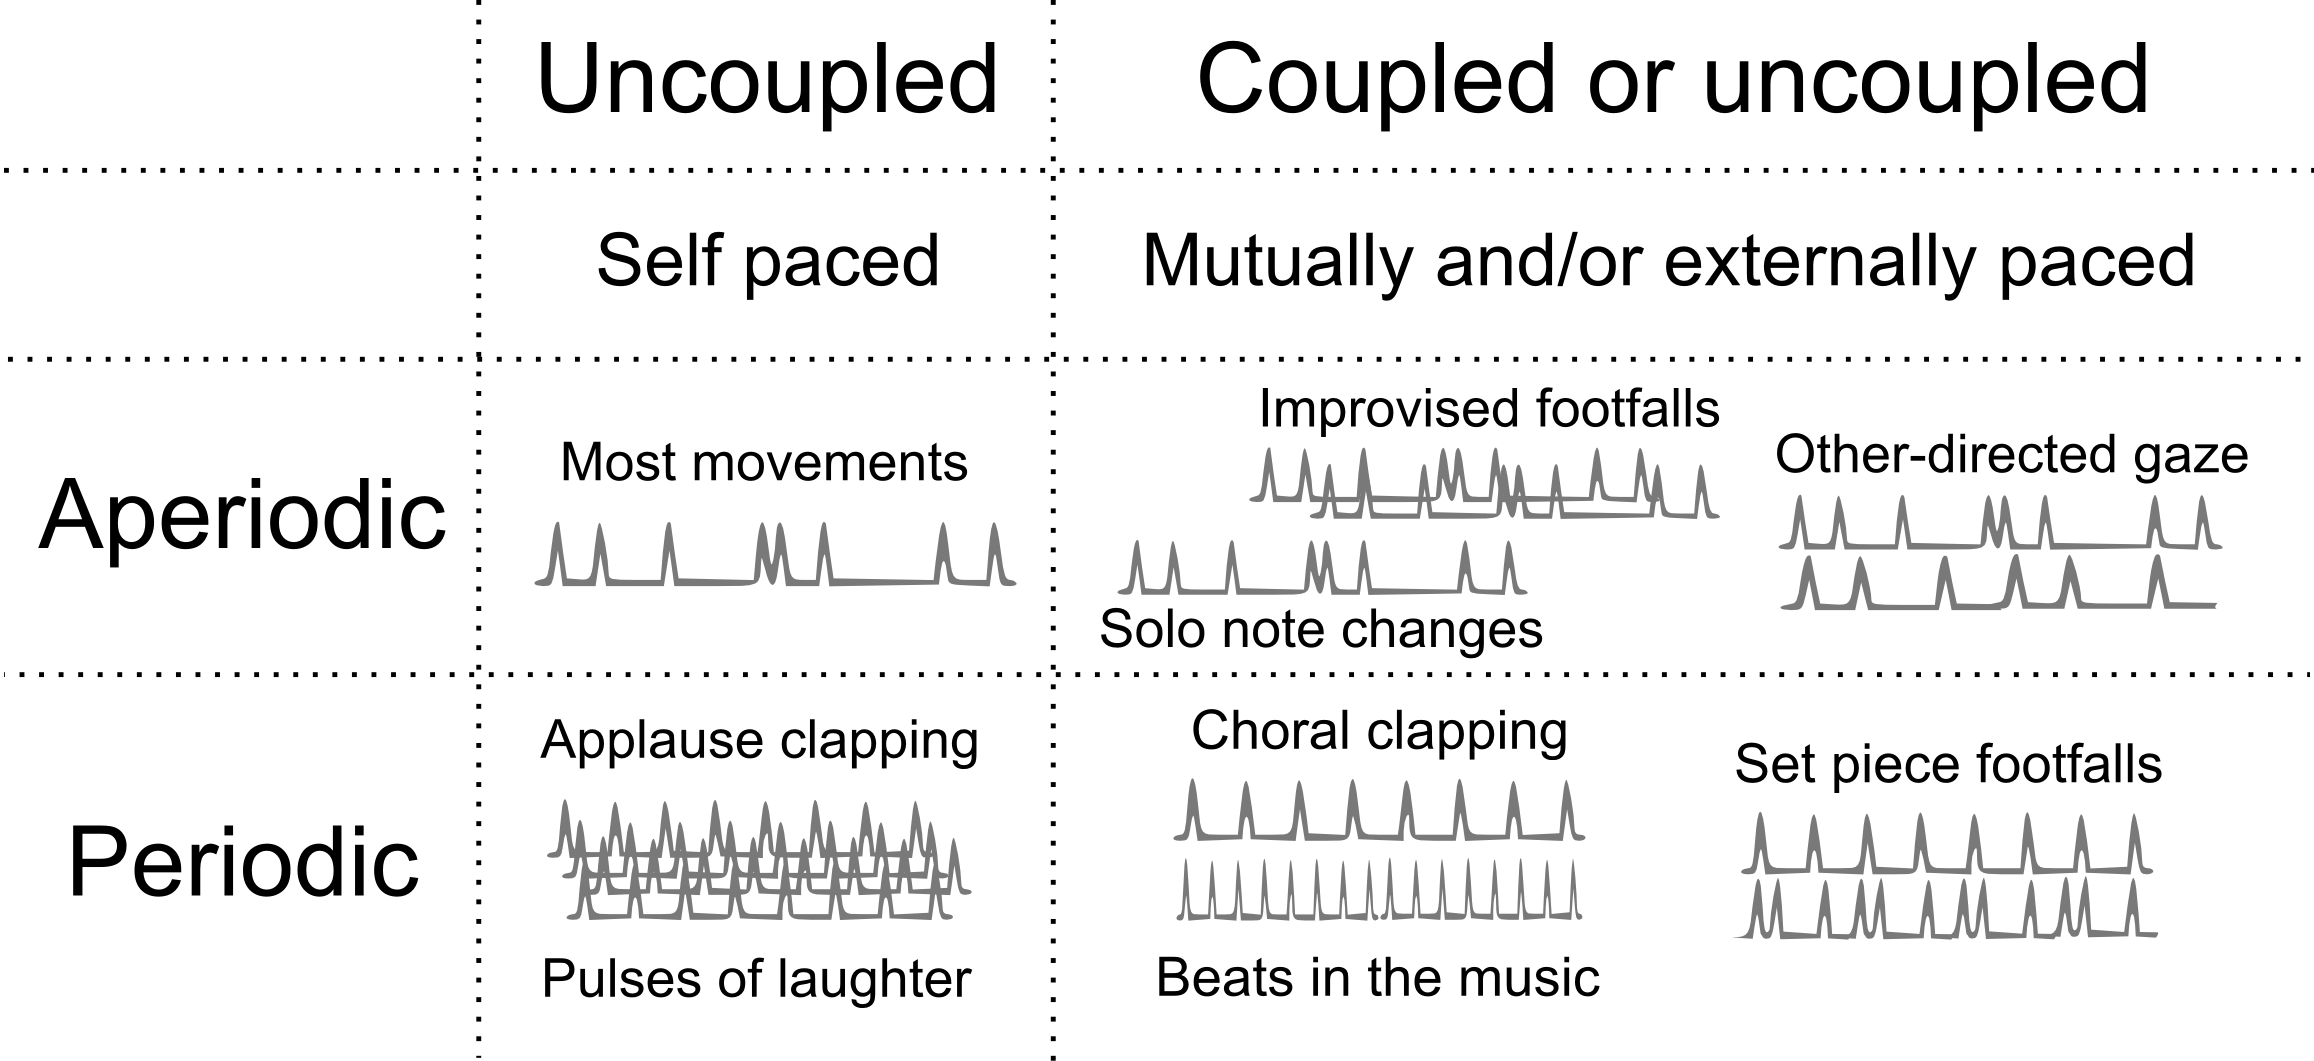
FIGURE 2. Visual depiction of the proposed definitional framework, from Ravignani, A., Bowling, D. L., & Fitch, W. T. (2014). Chorusing, synchrony, and the evolutionary functions of rhythm. Frontiers in Psychology, 5, 1118. http://doi.org/10.3389/fpsyg.2014.01118

This approach, combined with analytical methods that are more often used to study conversation and human interaction, shows how researchers can explore the communicative uses of rhythm as a situated interactional resource, and find out, in specific cases and styles, how people build sophisticated social meanings through embodied interactions.

The whole paper consists of a single case analysis of a 10 second clip from a now-classic Lindy Hop Jack and Jill competition performance by Michael Seguin and Frida Sehgerdahl. Here’s the dance in question – the clip starts at 1 minute in, but really – watch the whole thing.

The systematic ways participants in this situation manage disruptions to the audience’s rhythmical clapping in relation to the dancers’ movements shows how they all work to uphold the relevance of normative patterns of mutual coordination. That’s a fancy way of saying that what is considered ‘good’ in this particular partner dance is not some fixed model of perfect dance movement, but the threat (and eventual narrow avoidance) of screwing up. This kind of analysis reveals how dancers initiate, sustain and complete distinct phases of spontaneous movement as embodied social actions.

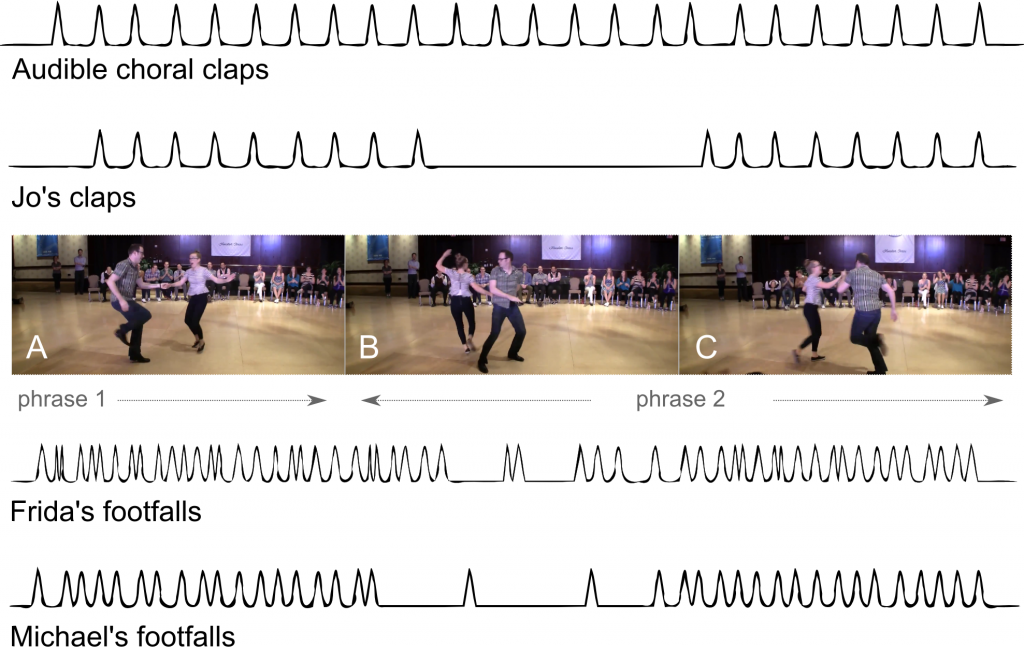
The analysis in the paper uses detailed, empirical examples of rhythmical coordination to show how dancers and audience members combine improvisation and set-piece choreography. Here’s an example from the conclusion that shows just a few of the rhythmical patterns we can derive from a detailed analysis of just 10 seconds of dancing.

The audience's clapping mapped to the clapping of a specific member of the audience (Jo Hoffberg!) and the footfalls of each dancer.
The audience’s clapping mapped to the clapping of a specific member of the audience (Jo Hoffberg!) and the footfalls of each dancer.

This kind of analysis may not tell us much about the qualitative detail of the dance. However, it provides a clear empirical resource for further analytical work – which can then be analysed in relation to more everyday forms of rhythmical coordination. This provides a starting point for analysing the dancers’ activities and the audience’s response in a way that draws on empirically observable materials that also focuses on the methods the participants themselves use to make sense of those materials.

The approach proposed by this paper shows how people use whatever materials are available including visible, audible and tactile bodily actions as part of a communicative environment. It shows how they can combine these resources in an ad-hoc fashion to coordinate and communicate their movements – much as we do in everyday talk in interaction.

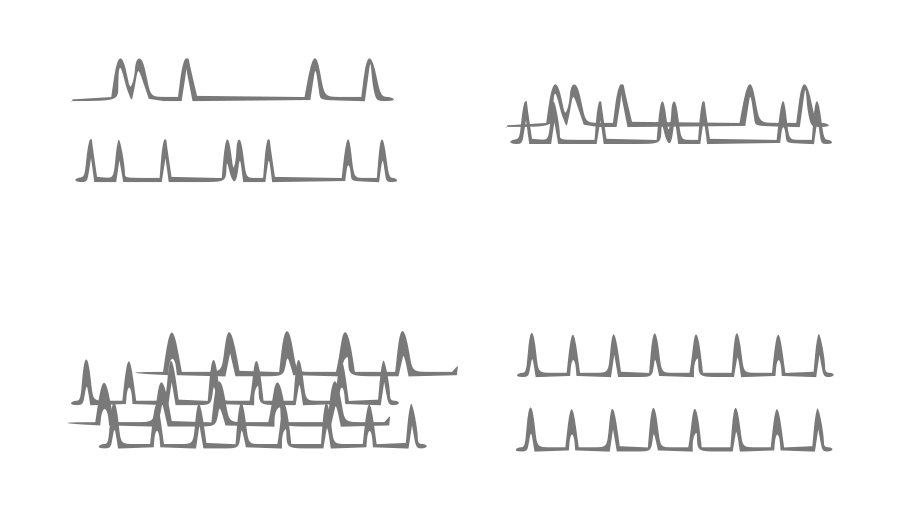
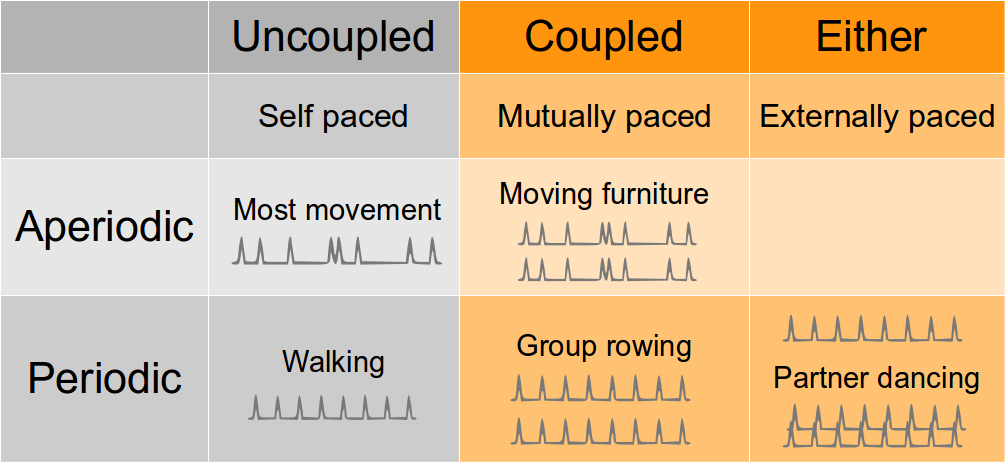
For example, here’s a diagram that shows some of the empirical distinctions we can make about rhythmical coordination in various everyday activities.

Patterns of rhythmical coordination in everyday activities, derived from Chauvigné, L. A. S., Gitau, K. M., & Brown, S. (2014). The neural basis of audiomotor entrainment: an ALE meta-analysis. Frontiers in Human Neuroscience, 8, 776. http://doi.org/10.3389/fnhum.2014.00776

Based on this kind of analysis, the paper maps out all the available rhythms in that particular 10 second clip – and shows how they are organised in clearly distinctive patterns.

Coupled and uncoupled forms of rhythmical coordination
Coupled and uncoupled forms of rhythmical coordination in the 10 seconds of dancing in Michael and Frida’s Jack and Jill.

The purpose, and overall take-away from this paper is that when people talk about the ‘language of dance’, it’s not just an empty idiom, or a transposition of linguistic/semiotic theories onto bodily movements. Dance, seen in its broader social and interactional context, and especially in vernacular dance practices actually functions much like language. In fact, it may be quite difficult to draw clear empirical distinctions between dance, sign language and other forms of communicative social action.

Of course this paper doesn’t go that far – it is intended to set a course for future work as part of a larger project on partner dance as an interactional practice. It suggests that a good place to start understanding the ‘language of dance’ is to look at vernacular practices – where improvisation is combined with set-piece choreography through ad-hoc embodied social action. In particular, the paper suggests that rhythm is one way we can begin to look at dance – and other socio-aesthetic practices – as everyday interactional achievements.

Many thanks to Jonathan Jow and the Lindy Library for the awesome video data. If you want to geek out about it, you can watch another version of the same few moments of dance from a slightly different angle courtesy of Patrick and Natasha. Thanks also to the paper’s two anonymous reviewers, and to Chiara Bassetti and Emanuele Bottazzi for their help and for co-editing the special issue ERQ on Rhythm in Social Interaction in which this paper appears.

Rhythmical coordination of performers and audience in partner dance Read More »

Improvisation ≠ non-improvisation

As part of a research project into partner dance as an interactional achievement, I presented a short paper at the 2015 Joint Improvisation Meeting in Paris. The presentation draws on research published in a paper I wrote on the rhythmical coordination of performers and audience members in a dance improvisation. Thanks to CNRS Paris and the organisers for making this video of the talk available available.

References

If you just saw a presentation of this paper, here are the references for the talk – there are more in the paper linked above.

  • Atkinson, J. Maxwell. 1984. “Public Speaking and Audience Responses: some Techniques for Inviting Applause.” In Structures of Social Action: Studies in Conversation Analysis, edited by J. Maxwell Atkinson and John Heritage, 370–410. Cambridge University Press.
  • Boden, MA. 2003. The Creative Mind: Myths and Mechanisms. London: Routledge.
  • Broth, Mathias. 2011. “The Theatre Performance as Interaction Between Actors and Their Audience.” Nottingham French Studies 50 (2): 113–133.
  • Broth, Mathias, and Leelo Keevallik. 2014. “Getting Ready to Move as a Couple: Accomplishing Mobile Formations in a Dance Class.” Space and Culture 17 (2) (\#jan\#): 107–121. doi:10.1177/1206331213508483.
  • Chauvigné, Léa A. S., Kevin M Gitau, and Steven Brown. 2014. “The Neural Basis of Audiomotor Entrainment: an ALE Meta-Analysis.” Frontiers in Human Neuroscience 8. doi:10.3389/fnhum.2014.00776.
  • Clayman, Steven E. 1993. “Booing: The Anatomy of a Disaffiliative Response.” American Sociological Review: 110–130.
  • DeMers, Joseph Daniel. 2013. “Frame Matching and ΔP T ED: a Framework for Teaching Swing and Blues Dance Partner Connection.” Research in Dance Education 14 (1) (Apr): 71–80. doi:10.1080/14647893.2012.688943. http://dx.doi.org/10.1080/14647893.2012.688943.
  • Gardair, Colombine. 2013. “Assembling Audiences.” PhD thesis, Queen Mary University of London.
  • Goodwin, Charles. 2007. “Interactive Footing.” In Reporting Talk, edited by E Holt and Rebecca Clift, 16–46. Cambridge: Cambridge University Press.
  • Jackson, Jonathan David. 2001. “Improvisation in African-American Vernacular Dancing.” Dance Research Journal 33 (2) (Winter): 40–53. doi:10.2307/1477803.
  • Keevallik, Leelo. 2010. “Bodily Quoting in Dance Correction.” Research on Language & Social Interaction 43 (4) (\#nov\#): 401–426. doi:10.1080/08351813.2010.518065.
  • Puri, Rajika, and Diana Hart-Johnson. 1995. “Thinking with Movement: Improvising Versus Composing.” In Human Action Signs in Cultural Context: The Visible and the Invisible in Movement and Dance, edited by Brenda Margaret Farnell and Drid Williams, 158–185. Metuchen, N.J.: Scarecrow Press.
  • Ravignani, Andrea, Daniel L Bowling, and W Tecumseh Fitch. 2014. “Chorusing, Synchrony, and the Evolutionary Functions of Rhythm.” Frontiers in Psychology 5. doi:10.3389/fpsyg.2014.01118.
  • Sacks, Harvey, and Emanuel A Schegloff. 2002. “Home Position.” Gesture 2: 133–146. doi:10.1075/gest.2.2.02sac.
  • Schober, Michael F., and Neta Spiro. 2014. “Jazz Improvisers’ Shared Understanding: a Case Study.” Frontiers in Psychology 5 (August) (\#aug\#): 1–21. doi:10.3389/fpsyg.2014.00808.
  • Sloboda, John A. 1986. “The Musical Mind” (Apr). doi:10.1093/acprof:oso/9780198521280.001.0001. http://dx.doi.org/10.1093/acprof:oso/9780198521280.001.0001.

Improvisation ≠ non-improvisation Read More »

Sustainable Research Literature Management with Docear part II

docear.png

This is part II of a two-part post in which I will walk you through some key parts of a technically-savvy user’s long-term literature review and maintenance strategy.

In part I you learned to

  • take notes while reading that won’t get lost or damaged by your software,
  • organise notes and annotations so you won’t forget why you took them,

In this section, you will learn how to:

  • maintain associated bibliographical records,
  • use Docear in a way that will keep your literature reviewing current for years to come.

Warning: long post, so here’s a table of contents:

Contents

First, Import your annotations into Docear to manage them

So far, this guide has given you some pretty generic advice about note taking, you could use it in any piece of software. The Docear-specific pay-off for this process comes when you import your PDFs into Docear: you can use Docear’s internal scripting language (well, FreePlane’s version of Groovy) to format, re-organise and label your new annotations automatically. I have some complicated scripts that I won’t cover here, but here’s a very simple one I use to automatically apply visual labels to my annotations.

Docear offers a number of visual labels you can use to decorate the nodes in your maps, to make them visually appealing and easily distinguishable:

icons.png

I have written a script that looks for all annotations beginning with ‘idea’, or ‘ref’ or ‘term’, and allocates them one of a number of pre-set visual labels provided by Docear.

// @ExecutionModes({ON_SELECTED_NODE, ON_SELECTED_NODE_RECURSIVELY})
if (node.text.toLowerCase().startsWith("todo")) {
      node.getIcons().addIcon("checked")
} else if (node.text.toLowerCase().startsWith("idea"))  {
      node.getIcons().addIcon("idea")
} else if (node.text.toLowerCase().startsWith("ref"))  {
      node.getIcons().addIcon("attach")
} else if (node.text.toLowerCase().startsWith("question"))  {
      node.getIcons().addIcon("help")
} else if (node.text.toLowerCase().startsWith("q:"))  {
      node.getIcons().addIcon("help")
} else if (node.text.toLowerCase().startsWith("quote"))  {
      node.getIcons().addIcon("bookmark")
} else if (node.text.toLowerCase().startsWith("note"))  {
      node.getIcons().addIcon("edit")
} else if (node.text.toLowerCase().startsWith("term"))  {
      node.getIcons().addIcon("desktop_new")
} else if (node.text.toLowerCase().startsWith("crit"))  {
      node.getIcons().addIcon("pencil")
}

To install this script, I wrote this code to a file called addiconNodes.groovy, which I then put it in my /home/saul/.docear/scripts directory (NB: the location of this directory may vary on Mac/Win). Docear also has a built-in script editor you can use to write groovy scripts. The script then becomes available as a contextual menu item.

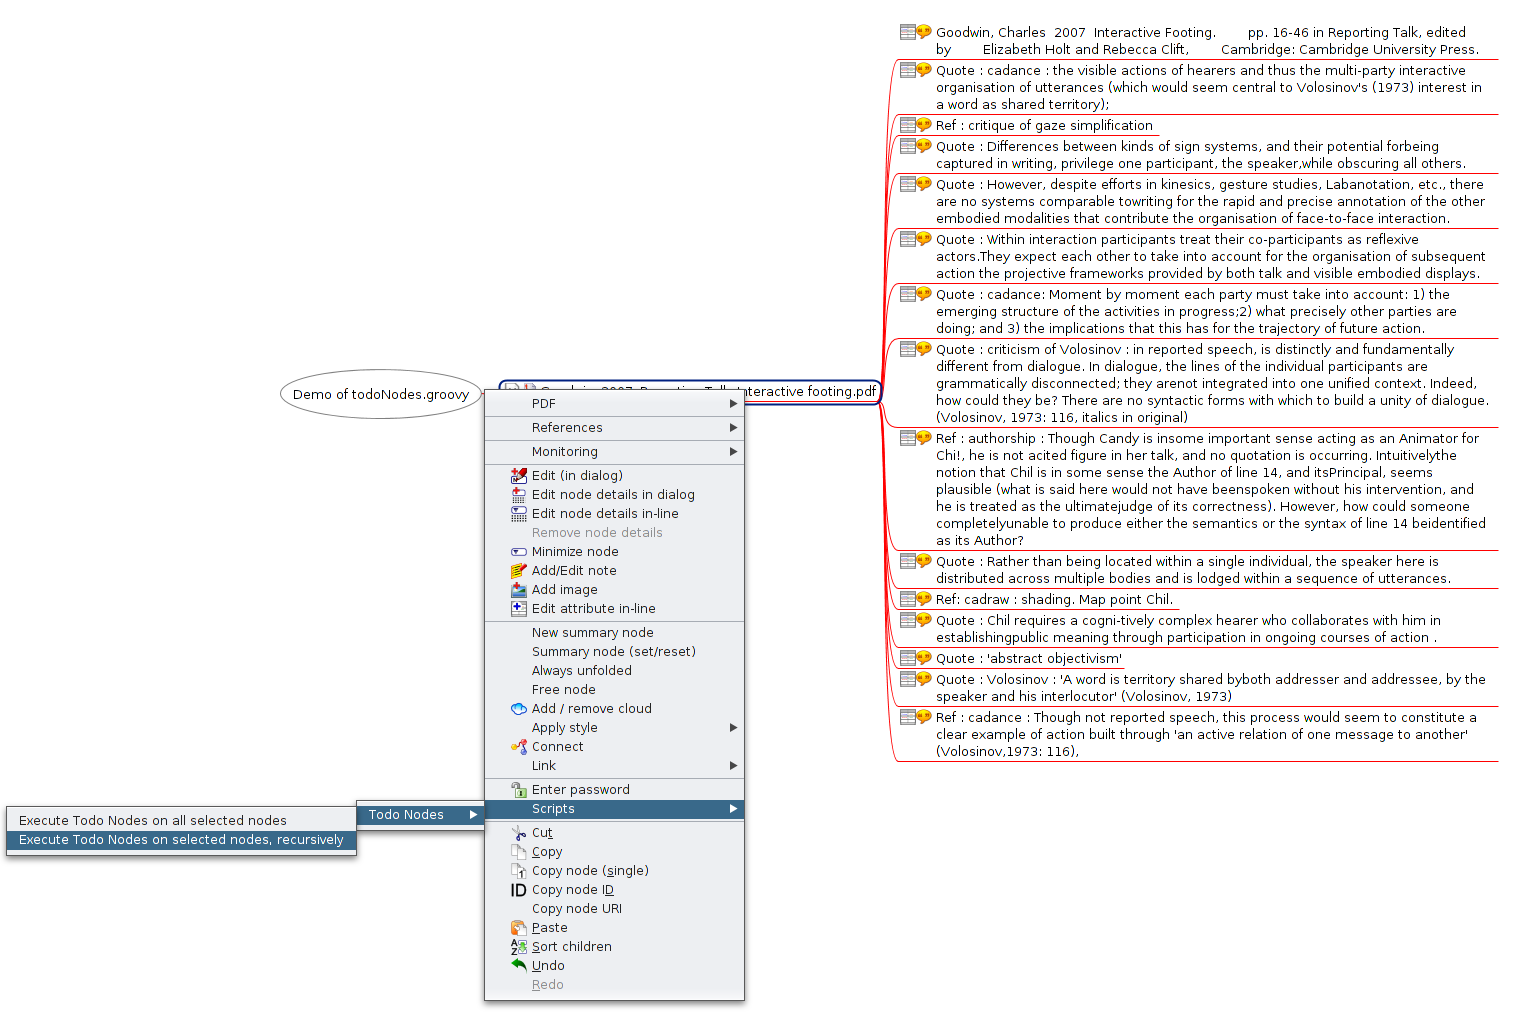
Here are some illustrations showing the script being run on a newly imported paper:
before.png

Selecting the script option in Docear:
during.png

What it looks like when the script has run finished:
after.png

And how you might then choose to organise your annotations:
organised.png

You’ll find lots of Freeplane scripts you can modify and play with here – there are some amazing possibilities – the icons script above doesn’t even begin to scratch the surface of what this method could do for your literature reviewing process.

Using Docear to manage thousands of papers across multiple projects and multiple years

Docear’s demo shows someone writing a paper with about 20 or 30 references. This is fine for one project, but I have over 3000 PDF books and papers in my literature repository. Over the years, I suspect this will continue to grow. I want to feel secure that my library of research papers, annotations and references is in one safe location on my hard drive. I also don’t want to have to duplicate those PDFs each time I start a new project. Here are some of my solutions to these issues geared towards a long-term research strategy.

First: a geeky caveat

Having recommended Docear for the approach outlined so far, there are some problems with Docear that I think you will have to address if you are really going to use it for a long-term research and literature management strategy.

If you think you might just use it for a masters-level one year project, the rest of this guide probably isn’t necessary. If you want to read your way into and stay up to date with the vast literature of one or more academic fields long-term, read on, but be warned: it gets even more geeky from here on in.

Docear’s default per-project folder structure and its problems

At the moment Docear encourages you to store your PDFs on a per-project basis, as if you were starting from literature year 0 each time you write something. Also (by default, at least) it puts them in a rather obscure folder structure. I don’t really trust myself to reliably back-up obscure folder structures.

Here’s how Docear does a default file structure for a demo project I just created

/Home
    /Docear
            /projects
                /Docear demo
                    /_data
                        /!!!info.txt
                        /1493C9745013F2UNMIV1XCU93LBPZ4Y0KU14
                            /default_files
                                /Docear demo.bib
                                /literature_and_annotations.mm
                                /temp.mm
                                /trash.mm
                            /My Drafts
                                /My New Paper.mm
                            /settings.xml
                    /literature_repository
                        /where_I_am_expected_to_put_my_pdfs.pdf
                        /Example PDFs
                            /Docears_sample_PDFs.pdf
                    /Project Data.mm

The idea from Docear’s developers here is that you get a few files by default when you start a new project including a dummy ‘My New Paper.mm’ (.mm stands for Mind Map) , a project-name.bib file and a literature_and_annotations.mm file, and a folder to hold all the PDFs you’ve associated with this project..

The literature_and_annotations.mm file contains a script that – when you open it – will scan through this project-specific literature_repository and check for updated files or new annotations.

This creates several problems:

  1. Docear’s structure works fine for a per-project use, but I have 9GB of PDFs, I do not want to wait for Docear to scan through those and check for updates every time I start it up.
  2. I’d rather not store all my precious PDFs with thousands of hours-worth of annotations 5 levels down an application-specific folder hierarchy that I may or may not remember to transfer to a new machine. Similarly, I don’t want my references – which may have taken a long time to assemble stored in a folder handily called ‘1493C9745013F2UNMIV1XCU93LBPZ4Y0KU14’.
  3. I want to be able to use PDFs and bibliographic data from all my previous projects in new projects easily.

Work-around 1: consolidating your literature archive

Use a ‘main_literature_repository’ for your key files

  • I create a ‘default’ project into which I first import for all my PDFs and references
  • I set up this project to store PDFs in a folder in my Dropbox called main_literature_repository.
  • I put the main BibTeX file for this project in the same folder.

This means I have one canonical BibTeX file with all the books and papers I will ever import in my main_literature_repository folder – this makes it easy to back up. I use Dropbox to keep rough versioning for me in case I do something silly or lose my machine/s – use your backup strategy and folder location of choice.

Use a per-paper mind map for long-term annotation and re-annotation

I delete the literature_and_annotations.mm file from my default project. I do not want to wait 3 hours while Docear scans through all 9GB of my papers when it starts up. Instead, in the same main_literature_repository folder, I create a per-paper mind map.

I do this because I may use a paper six times in six different paper/research contexts. Ideally, I want to be able to read and re-read it, and keep track of what interested me about it and when… not have to delve into each project I used it for.

So, once I’ve done my annotations, I create a new map in my default project, I import the PDF, copy and paste the title of the PDF and use it to name the new mind map identically to the paper, so that in my main_literature_repository folder I have:

/home
    /saul
        /literature_repository
                /my_new_favourite_paper.pdf
                /my_new_favourite_paper.mm

Apart from anything else, I can glance through the folder listed alphabetically and see which papers I have actually read! Now every time I update my annotations in that paper, I can import them into this paper-specific map, and organise them.

I might want to do this in a number of ways (one big list, thematically etc.) but I usually organise them to show how they relate to the project I’m currently working on. If I read that paper three or four times, and each time I organise the new annotations in this way, after six or seven readings/uses of that paper it’s going to be interesting to be able to see how my use of this paper has changed over time.

A quick example of importing a paper:

I download a paper helpfully entitled: ‘12312131231512312313.pdf’ from a publisher. I re-name it something useful (e.g.:AuthornameYYYY-title.pdf)2, and put it into my main_literature_repository folder, using Docear or Jabref to add or automatically import its bibliographical record into my default project BibTeX file. Once I’ve read it and taken notes in annotations, I manually create a new map just for this paper in the same main_literature_repository folder. This is now the mother lode folder with all my really important work in it.

Work-around 2: using your papers across multiple projects

This bit is kind of tricky and involves many trade-offs, I think Docear will fix it some day, for now, this is how I am doing it.

I create a new project, and treat it as a ‘sub-project’ of my default project

When I start a new Docear project, I let Docear create a default folder structure something like the one above. To get literature from my main_literature_repository folder into this new project, I create symbolic file system links to the relevant PDF files in my main_literature_repository in the new sub-project-specific literature_repository folder.

So the original PDFs live here:

/home
    /saul
         /literature_repository
                    /my_new_favourite_paper1.pdf
                    /my_new_favourite_paper2.pdf
                    /my_new_favourite_paper3.pdf
                    /my_new_favourite_paper4.pdf

I create a new Docear project and create symlinks (only for the relevant PDFs) here:

/Home
    /Docear
            /projects
                /Docear demo
                    /_data
                        /!!!info.txt
                        /1493C9745013F2UNMIV1XCU93LBPZ4Y0KU14
                            /default_files
                                /Docear demo.bib
                                /literature_and_annotations.mm
                                /temp.mm
                                /trash.mm
                            /My Drafts
                                /My New Paper.mm
                            /settings.xml
                    /literature_repository
                        /link_to_my_new_favourite_paper1.pdf
                        /link_to_my_new_favourite_paper2.pdf
                        /link_to_my_new_favourite_paper3.pdf
                        /link_to_my_new_favourite_paper4.pdf
                        /Example PDFs
                            /Docears_default_sample.pdf
                    /Project Data.mm

Now if I open my literature_and_annotations.mm file in the new sub-project, it will import these new PDFs and their associated annotations and I can start working with them. Of course any changes to annotations I make in these maps will also change annotations in the original PDFs.

Maintaining bibliographical references across Docear projects (and other software)

The only issue with this approach so far is that your new project-specific BibTeX file will not automatically import metadata from your ‘default’ project. This means that when you import your PDFs into this new project’s literature_and_annotations.mm map, they will have no bibliographical reference data attached.

To understand why – and how to solve it – you need to know a little bit more about how Docear works:

Docear allows you to re-organise your annotations while maintaining their associations with the bibliographical reference of the paper they’re drawn from by linking nodes in your Mind Map (.mm) files to PDFs referenced in your BibTeX file. Docear does this by adding a ‘file’ BibTeX field entry for each paper. Here’s an example of a BibTeX entry from my databse:

ARTICLE{Hepburn2012,
  author = {Alexa Hepburn and Sue Wilkinson and Rebecca Shaw},
  title = {Repairing self- and recipient reference},
  journal = {Research on Language and Social Interaction},
  year = {2012},
  volume = {45},
  pages = {175-190},
  number = {2},
  file = {:/home/saul/main_literature_repository/hepburn_repairingselfand_2012.pdf:PDF},
  keywords = {EMCA, Self-reference, Reference ; Repair},
}

So when Docear scans this PDF, it extracts its annotations, places them in the map, and creates a hyperlink to the PDF listed the file field. This means if I click on the node, it opens the file. Docear also extracts the bibliographical information from this BibTeX reference, and then adds them as attributes of the associated annotation node on my map.

So, when I create a symbolic link to this file in my new sub-project, Docear sees it as a new PDF, namely:

/home/saul/Docear/projects/sub-project-title/literature_repository/hepburn_repairingselfand_2012.pdf

But it doesn’t have any BibTeX data in this new project, so it won’t recognise this PDF and paste in associated bibliographical data.

To solve this issue, there are several possible solutions:

  • Sym link your ‘default project’ BibTeX file into each new sub-project using a symlink – just like you do with your PDF files.
  • Duplicate your ‘default project’ BibTeX file into each new sub-project, search/replacing the ‘file’ field of each entry to point to your new sub-project’s literature_repository folder.
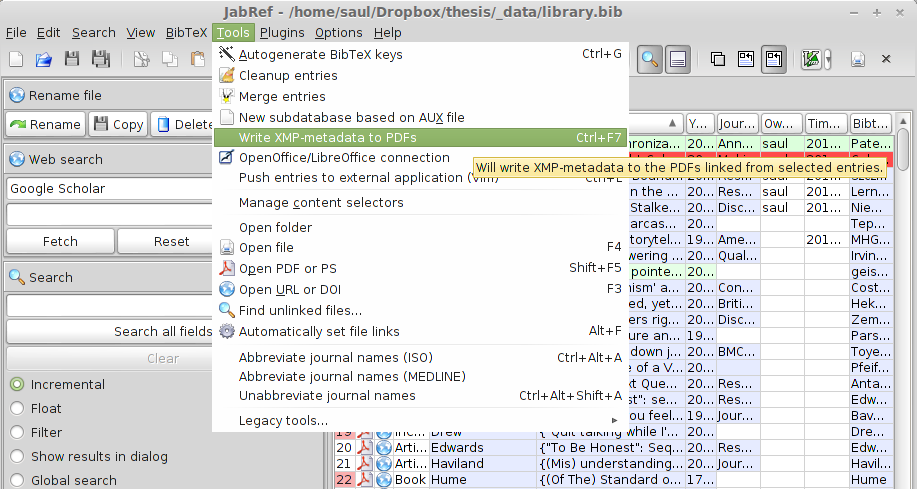
  • Or, (and this is what I do), open your main BibTeX file in a recent, stand-alone version of JabRef and use the ‘write XMP data’ option to make sure that the PDFs themselves contain their own reference data. When you import these PDFs, you can then use the reference embedded in the PDF itself to create a new and separate project-specific BiBteX file.

JabRef’s XMP writing option:

jabref_xmpp.png

This third option is preferable to me for several reasons:

  1. I don’t want to see all my references in every new project – it’s distracting.
  2. XMP data can be read by lots of other bits of software so it makes my reference library somewhat more portable. Also, if I lose my BibTeX file in some catastrophic data loss episode, as long as I have my PDFs with XMP bibliographic data I can pretty much reconstruct my literature, annotation and reference archive from just those files.
  3. I may want to update my bibliographical records for a new project, but keep the references of older projects intact. Although I’m aware that I improve my bibliographies continually and incrementally, I really want to control how I change them. For example, if I continually use my default project BibTeX file, symlinked in to each new sub-project as in option 1, I may not be able to re-generate a paper I wrote three years ago before I made those changes and improvements. I really want that paper to be re-created exactly as it was when I wrote it, including all the reference details and errors. I can always update an old BibTeX file from an old project easily – because the PDF file itself now contains the latest up-to-date XMP data.

I see this feature of the latest, stand-alone version of JabRef (not available in Docear’s embedded version of JabRef) as a significant plus in terms of the sustainability of this approach to literature management.

Things I didn’t cover but may post about in the future

There are lots of other things you can do using this approach to Docear – and Docear’s approach in general, a few I can think of that I didn’t cover are:

  • Using the command line to search/filter your annotations.
  • Using recoll, spotlight or similar configurable full text search systems on your repository.
  • Importing folder structures containing other research materials into your map.
  • Using Docear (or freeplane) to take detailed and well structured notes during lectures.
  • Using Docear to manage and search Jeffersonian transcripts of conversational data.

If you have any questions or would like to hear about these, drop me an email or get me on @saul

Notes

  1. ^ Because I like small tools for simple jobs, I actually do this using JabRef in stand-alone mode, along with JabRef’s rename files plugin to do this automatically and configurably. NB: Docear will do this automatically in upcoming versions – the feature is already in there, just not quite ready yet.

Sustainable Research Literature Management with Docear part II Read More »

Sustainable Research Literature Management with Docear part I

docear.png

This is part I of a two-part post in which I will walk you through some key parts of a technically-savvy user’s long-term literature review and maintenance strategy. In part I you will learn how to use Docear to:

  • take notes while reading that won’t get lost or damaged by your software,
  • organise notes and annotations so you won’t forget why you took them,

In part II, should you choose to get geeky and read that bit too, you will learn to:

  • maintain associated bibliographical records,
  • use Docear in a way that will keep your literature reviewing current for years to come.

Warning: long post, so here’s a table of contents:

Contents

Introduction

What this guide is for

There are many software systems that purport to be helpful in managing academic literature, and everyone swears by their own. My belief about software is that it’s usually a nightmare, and your choice should be driven by considerations of damage limitation. With that in mind, I am using Docear to limit the damage that software can do to my literature reviewing and thesis preparation process.

This guide will outline some ways to use this software with long-term sustainability in mind. If you don’t know what Docear is, you could spend 6 minutes watching this video.

If you’re starting a PhD or a research process, and thinking about how to keep up with the literature long-term, you might want to think about using Docear in the ways described here. To get started with that, first download and install Docear, read Docear’s own very good user guide to understand the basics, then come back and read this1.

Why Docear works for a long-term research strategy

There are lots of good reasons listed on the Docear website that compare Docear’s features to Zotero, Mendeley or other reference management systems.

My choices are driven by issues of long-term software sustainability, and focus on cross-compatibility, reliability and stability. Docear fits my criteria because:

  • It’s Open Source software using well adopted, documented and supported file formats.
  • Docear’s plain text-based file formats for are searchable and editable.
  • Text-based files enable version control and collaboration (including with your future self).
  • Docear, JabRef and FreePlane all work together or separably on most platforms.

In general, Docear conforms with the tenets of Unix Philosophy i.e.: Docear is designed to be modular, clear, simple, transparent, robust, and extensible for users and developers.

What all this means for academics is that

  • You are probably always going to be able to edit and view these files on any platform.
  • If you just want to change a bibliographic reference, you can just use the bibliography manager (or a text editor) to do it on any computing platform without even firing up Docear.
  • If you just want to view your Docear file on Android, i0S, or using any mind-map viewer, you can open it (albeit with limited features) in FreePlane, FreeMind, Xmind or the many associated pieces of software that can read these files.
  • If you want to search your entire archive of papers, you can do it using grep on a command line or with any text-search and indexing system that can read your file system (I use Recoll).
  • It doesn’t mess with your files or do complex or potentially destructive things, use fancy databases etc. You can move away from Docear at any time – you’ll still have your annotations, your PDFs, your BibTeX reference files.

No vendor lock-in, no dodgy or dangerous games with your data. That’s a lot of damage-limitation right there, and this isn’t even mentioning a compelling and unusual combination of features that Docear itself documents very well – so I won’t go over those, but nonetheless, here is my list of:

Killer features of Docear

  • Import annotations from PDFs, and cross-sync them (change the annotation in your PDF – it gets changed in Docear, change it in Docear, it gets synced in your PDF).
  • Organise your annotations in multiple ways
    • Organise your annotations visually by research theme / category / heading
    • Organise your annotations visually by paper / book / author
    • Mix these up, copy and paste annotations multiple times, make further notes on annotations etc.
  • Import file/folder structures from your hard disk, so you can get an overview of your data, files and research materials alongside your literature, and make notes and connections between them.
  • Maintain the bibliographical associations of your annotations and notes, even after copy/pasting/reorganising them.

Just to re-state this: I’m not going to go through these basics in this how-to, so if you want to learn to use Docear from scratch you really should read the manual. What follows are some adaptations I’ve made to the Docear workflow that I think make it even more useful as a secure and long-term bet for research literature management.

How to take notes that won’t get lost or corrupted

PDFs, however flawed as a document format, are a de facto standard in academia and aren’t going away soon. You can read, edit and share them relatively easily on all devices and platforms, so that’s probably how you should store your annotations and bibliographical data.

General annotation strategy

Many pieces of literature review / bibliography management / annotation software keep notes and bibliographical records scattered about in proprietary databases or separate annotation files, so following Docear’s excellent advice on the issue I use ezPDF Reader on Android, and PDF-XChange Viewer on Linux (via wine) to make my annotations in my PDFs themselves.

Docear allows you to manage these annotations effectively without sacrificing the simplicity and security of having it all in one, cross-platform, easily accessible file.

Synchronisation and backup across clients/computers

The benefits of this are clear: you can easily back up your PDFs.

I use Dropsync to synchronise my main_literature_repository folder with a folder on my Android tablet, so when I’m on the go I can take notes and have them appear automatically in my literature review mind map when I start up Docear.

I tried using Dropbox’s own android client, I found that it would sync too frequently, and sometimes randomly deletes its temporary files. For this reason I recommend syncing your entire PDF repository to your mobile devices, editing the PDF locally (on the android device’s file system), then synchronising with Dropbox or whatever local/cloud/repo/backup service you prefer.

How to remember why you took your notes in the first place

Use action-related tags for each annotation

I have most of my research ideas while reading, but they’re not all just ‘notes’, they are really different in response to different ideas about what I plan to do with that idea. So I find it useful to distinguish between the kinds of notes I take on documents. When I take an annotation, I track that difference by starting the annotation with one of 10 or so labels:

  • todo: The most important label – this reminds me to do something (look up a paper, change something in my manuscript etc.)
  • idea: I’m inspired with a new idea, somehow based on this paper, but it’s my own thing.
  • ref: This is a reference, or contains a reference that I want to use for something.
  • question: or just q: I have a question about this, maybe to ask the author or myself in relation to my data / research.
  • quote: I want to quote this, or it contains a useful quote
  • note: Not a specific use in mind for this, but it’s worth remembering next time I pick up this paper.
  • term: A new term or word I’m not familiar with: I look it up or define it in the annotation.
  • crit: I have a criticism of this bit of the paper.

There are a few others I use occasionally, but these are the most common. You probably can think of your own based on how you would categorise the kinds of thoughts that come to you while reading research papers.

Use keywords for each research project/idea

I have 3 or 4 project constantly on the go, and lots of ideas for new projects and papers. I want to capture my responses to what I’m reading in relation to those projects in a reliable way.

So, I have short, unique keywords for each of my projects:

  • camedia: a CA project about how people talk about the recording devices they’re using
  • cadance: a CA project about partner dance
  • thesis: my thesis
  • thesis_noticings: my chapter on noticings
  • thesis_introduction: get it?

So if I’m reading a paper and it says something like:

“Something I really disagree with and want to comment on or respond to in my next article on dance”

I’ll highlight, copy and paste that into a new annotation, and add a few keywords on the top:

    quote: cadance: "Something I really disagree with and want to comment on or respond to in my next article on dance"

This means when I search for all my annotations to do with ‘cadance’ project, I’ll find this one, and I’ll know I wanted to use this as a quote.

Similarly, I may have multiple projects:

    quote: cadance: thesis_noticings: "Something I really disagree with and want to comment on or respond to in my next article on dance"

If I want to quote something, but also want to write a note about it, I’ll make two separate annotations on the PDF, one that says:

    quote: cadance: thesis_noticings: "Something I really disagree with and want to comment on or respond to in my next article on dance"

The other that says:

    note: cadance: thesis_noticings: "Something I really disagree with and want to comment on or respond to in my next article on dance": I really disagree with this for reason, reason and reason.

These will show up in my literature review map as two separate annotations, with different actions attached to them.

Use auto-completion software to make this less painful

I use Switfkey for all my annotation on my Android tablet (where I do most of it). This greatly reduces the time required to type in repetitive tags or keywords that I use all the time to enhance my annotations (see the next section). It also offers auto-complete suggestions so I can remember more complex project keywords / tags easily.

That’s the general advice bit. Geeky advice follows in part II.

So far, this guide has given you some pretty generic advice about note taking, you could use it in any piece of software. The Docear-specific pay-off for this process comes when you import your PDFs into Docear. However, that bit gets pretty geeky. You’ll need to be comfortable with scripting, modifying workflows of existing software packages, and generally be unperturbed by geeky terminology.

If this isn’t your thing, you can just use Docear with the above strategies – or use them more generally in your literature reviewing.

If you are geekily inclined, or just curious, check out part II of this post.

Notes

  1. ^ One little gotcha: if you’re using a Mac (esp. Yosemite (10.9.X or newer)), you’ll have to do some terminal diddling to make sure you’ve enabled software from unsigned sources to run on your machine or you’ll get an unhelpful error message. Thanks Apple!

Sustainable Research Literature Management with Docear part I Read More »

Pandoc + Markdown for Conversation Analytic Transcripts

markdown.png

A while back I wrote a blog post detailing why I chose Pandoc and Markdown to write papers including Jeffersonian Conversation Analytic transcripts. It wasn’t very detailed though, because a full explanation of how to set up a compatible text-based writing workflow was an onerous task – one happily now completed beautifully by Dennis Tenen and Grant Wythoff’s guide to Sustainable Authorship in Plain Text using Pandoc and Markdown.

So, I decided to update this how-to for anyone using Pandoc and Markdown to start including CA style transcriptions quickly and easily.

To go along with this how-to, there is also a set of demo files you can download to try out this approach. However, before you do that you probably want to get a pandoc + markdown setup installed.

The Problem

There are great software tools out there for CA-style transcription, my favourite is CLAN for a number of reasons. However, I can’t find any resources online about how to publish CA-style transcriptions without being forced through some eye-bleeding LaTeX diddling every time.

Of course I could just use a WYSIWYG text editor like LibreOffice – but now I’ve experienced the power of LaTeX for document preparation and publication, I really can’t see myself going back.

When doing CA it seems particularly important to have transcriptions legibly in the body of the paper and visible during the writing process, because many of the analytical observations come, or get significantly modified at the point of writing about them, double and triple checking assumptions, and cross-referencing with the CA literature while tweaking citations.

The Simplest Solution: Markdown + Pandoc

Markdown is my favourite lightweight markup language, a highly readable format with which you can write a visually pleasing text file, which you can then convert into almost any other format – HTML, OpenOffice, LaTeX, RTF, etc. using Pandoc. There are many similar systems, notably reStructuredText and Textile, all of which you can use to write your text file, and other conversion tools/toolsets, but in my experience, Markdown and Pandoc are the most useful combination in an academic context 1.

There are lots of great things about markdown:

  • Just edit simple text files – no weird file formats to get corrupted or mangled.
  • Less verbose and complicated-looking than LaTeX.
  • Small files are easy to share/collaborate on with others (everyone gets to use their favourite editor).
  • There are some great pandoc plugins for my favourite text editor vim.

However, the best thing is that, used along with the XeTeX typesetting engine, it solves the problem with CA transcriptions being unreadable in LaTeX/pdflatex.

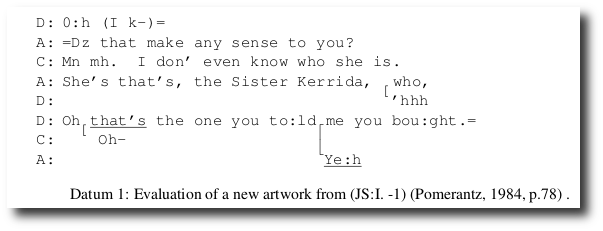
For example, in my first CA-laced paper, my transcriptions looked like this in my LaTeX source:

\begin{table*}[!ht]
\hfill{}
\texttt{
  \begin{tabular}{@{}p{2mm}p{2mm}p{150mm}@{}}
 & D: &  0:h (I k-)= \\
 & A: &  =Dz  that  make any sense  to  you?  \\
 & C: &  Mn mh. I don' even know who she is.  \\
 & A: &  She's that's, the Sister Kerrida, \hspace{.3mm} who, \\
 & D: &  \hspace{76mm}\raisebox{0pt}[0pt][0pt]{ \raisebox{2.5mm}{[}}'hhh  \\
 & D: &  Oh \underline{that's} the one you to:ld me you bou:ght.= \\
 & C: &  \hspace{2mm}\raisebox{0pt}[0pt][0pt]{ \raisebox{2.5mm}{[}} Oh-- \hspace{42mm}\raisebox{0pt}[0pt][0pt]{             \raisebox{2mm}{\lceil}} \\
 & A: &  \hspace{60.2mm}\raisebox{0pt}[0pt][0pt]{ \raisebox{3.1mm}{\lfloor}}\underline{Ye:h} \\
  \end{tabular}
\hfill{}
}
\caption{ Evaluation of a new artwork from (JS:I. -1) \cite[p.78]{Pomerantz1984} .}
\label{ohprefix}
\end{table*}

which renders this:

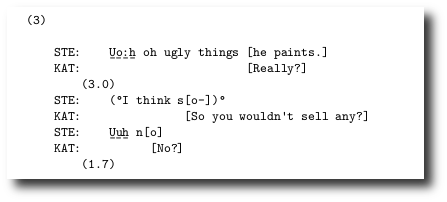
A simpler way to do this in Markdown (with none of the fancy stuff) is to use Markdown’s ‘verbatim’ environment – you do this by putting four spaces or one tab before each line in your transcript (including blank lines). Here’s the messy LaTeX above re-done in simple Markdown.

(3)

STE:        U̲o̲:̲h̲ oh ugly things [he paints.] 
KAT:                            [Really?] 
        (3.0) 
STE:        (°I think s[o-])°
KAT:                   [So you wouldn't sell any?] 
STE:        U̲u̲h̲ n[o] 
KAT:              [No?] 
        (1.7)

which renders like this:

ugly_things.png

Overall, I think the Markdown version represents a significant improvement in legibility while writing. I think it might be possible to do the same in LaTeX using the {verbatim} environment, but the fact that Markdown also lets me concentrate on writing without throwing errors or refusing to compile lets me spend longer on the writing than on endless text-fiddling procrastination.

When it comes to rendering, I feed my markdown file to pandoc:

$ pandoc --latex-engine xelatex --bibliography library.bib --csl default.csl -N -o  paper_title.pdf paper_title.markdown

If you want to use the nicely stretched ceiling characters for overlap marking, or the raised full stop / bullet operator for inbreaths, you can do so, but you’ll need to run Pandoc (see below) referencing a font that has those characters. For example, you could use CAfont and add:

--variable monofont=CAfont

to the pandoc command above.

The default.csl file is a citation style language file to customise how bibliographical references are rendered.

If you’re only adding a few examples to your document, this will probably work fine. If you are writing a thesis or a longer document – read on.

For Longer Texts: Markdown + Pandoc + LaTeX

The above approach may work for writing a short paper with one or two examples, for a thesis or a longer piece where you may have many examples, you’re going to have to take this a step further and use some LaTeX within your Markdown document. The bad news, you will have to use LaTeX, templates and some code to deal with:

  1. Example Layout: you probably want your examples to be graphically separated from your text in a consistent way.
  2. Document layout: you may need to make some stylistic tweaks to how your document prints out.
  3. Referencing: you will want to use labels for your examples so you can cross-reference them automatically within the text and not have to re-label them every time you make a change.
  4. Audio/video links: you may want to include links to audio/video examples in your files.

The good news: your CA transcript examples will still be easy to read/edit, and actually this is all pretty straight forward once you’ve got it set up.

What you will need

First, you need a working Pandoc + Markdown setup installed. You also need a nice monospaced font installed – I use CAfont by the amazing CHILDES project.

I’ve made a downloadable archive of the three files I use every time I create a new document. Download those. There is also a working demo (README.md) and some image files that you can use to edit/test things, or modify them to create your own.

Along with these examples inside the camarkdown_files folder you will find:

  • template.txt: a LaTeX template that Pandoc uses when it renders PDFs – with macros etc.
  • apa.csl: a citation style language file describing how I want my APA citations rendered.
  • margins.sty: a little margins file I canuse to tweak the overall page layout separately (US Letter vs. A4 etc.)

Whenever you start a new document, these three files into the same folder.

A little explanation

Without getting too geeky about it, here’s a little explanation of how I use this setup:

Whenever I convert my Mardown to PDF using Pandoc, I add:

--template template.txt

to the pandoc command to make sure it uses this template. The template is based on the default LaTeX template Pandoc always uses to convert Markdown to PDF via LaTeX, but I’ve added a macro: caextract.

Basically the caextract environment sets the default monospaced font, and (optionally) creates a to an online media file referenced in the Markdown file (see working example below), it also formats the paragraph containing the example as a framed float to divide it from the body of the text, and changes the listings name to ‘Extract’, so references list it as ‘Extract 1’ rather than ‘Figure 1’.

Here’s the relevant bits from the header section of template.txt

    \newcommand{\medialink}[2] { \begin{flushright} \href{#1}{#2}\\ \end{flushright} 
    } 
    $if(highlighting-macros)$
    $highlighting-macros$
    $endif$
    $if(verbatim-in-note)$
    \usepackage{fancyvrb}
    $endif$
    \usepackage{listings}
    \lstnewenvironment{extract}[1][]{
        \renewcommand*{\lstlistingname}{Extract}
        \lstset{frame=single,basicstyle=\small\ttfamily,keepspaces=true,#1}
    }{}

And this bit goes into the main section of the template:

    \usepackage{float}
    \floatstyle{ruled}
    \newfloat{caextract}{htp}{lop}
    \floatname{caextract}{Extract}

A working example

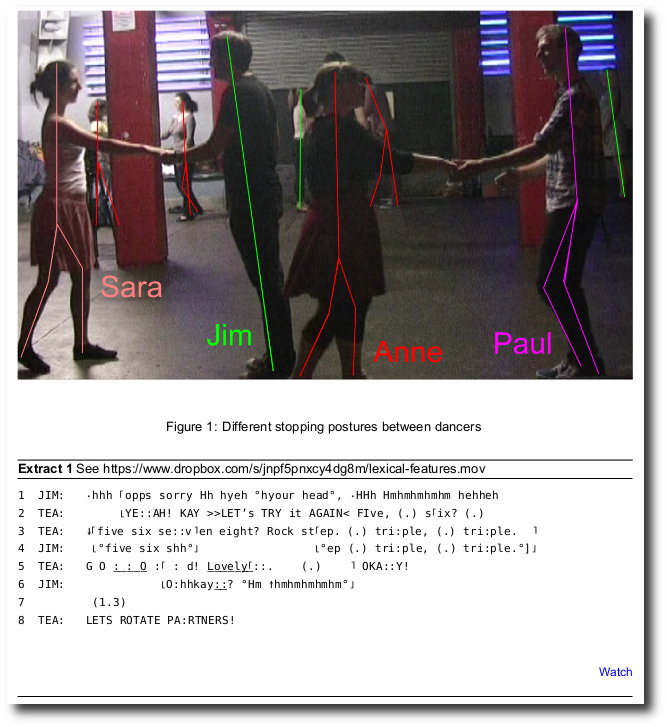
Here is a full example from a paper I’m writing at the moment that you can tweak and play with. It’s all done in simple markdown, using a little bit of LaTeX embedded within the Markdown file to call the macro.

So where I want my extract to appear in my Markdown file, I add:

![Different stopping postures between dancers \label{stopping-postures}](images/stopping-postures.png)

\begin{caextract}[H]
\caption{See https://www.dropbox.com/s/jnpf5pnxcy4dg8m/lexical-features.mov}
\label{lexical-features}
\begin{small}
\begin{verbatim}

1  JIM:   ∙hhh ⌈opps sorry Hh hyeh °hyour head°, ∙HHh Hmhmhmhmhm hehheh
2  TEA:        ⌊YE::AH! KAY >>LET's TRY it AGAIN< FIve, (.) s⌈ix? (.)
3  TEA:   ↓⌈five six se::v⌉en eight? Rock st⌈ep. (.) tri:ple, (.) tri:ple.  ⌉
4  JIM:    ⌊°five six shh°⌋                 ⌊°ep (.) tri:ple, (.) tri:ple.°]⌋
5  TEA:   G O :̲ ̲:̲ ̲O̲ :⌈ : d! L̲o̲v̲e̲l̲y̲⌈̲::.    (.)    ⌉ OKA::Y!
6  JIM:              ⌊O:hhkay:̲:̲? °Hm ↑hmhmhmhmhm°⌋
7          (1.3)
8  TEA:   LETS ROTATE PA:RTNERS!

\end{verbatim}
\medialink{https://www.dropbox.com/s/e960eu94ji7ncn3/lexical-features.mov}{Watch}

\end{small}
\end{caextract}

That should render something like this:

A later paragraph refers to the figure like so:

By contrast, Sara, Paul and Anne - marked in red in figure 
\ref{stopping-postures} - step back, split their weight and 
stop dancing together with the onset of Teacher's 
"\verb|G O :̲ ̲:̲ ̲O̲ : : d!|". Without having space to analyse 
this method, it is worth noting in closing that the regularity 
of these methods and their interactional contingencies are 
shown in the [slow-motion sections of the video](https://www.dropbox.com/s/jnpf5pnxcy4dg8m/lexical-features.mov) 
by how dancers who stop like Jim are all pulled off balance 
by dancers who stop like Paul, Sara and Anne.

It should look something like this:

A few notes on how this works:

  • The main reason for the macro is to enable cross-referencing. In the Markdown file, within each caextract I use \label{my-label} to label my examples. Then I can reference them anywhere in my Markdown file with something like “See extract \ref{my-label}”.
  • If you don’t have any media, just leave out the \medialink line.
  • You can put anything in the \caption section – your example name if you have a set naming schema for your corpus.
  • Note the neat Markdown trick in the paragraph above: I use “\verb|This comes out verbatim|” for a short inline bit of monospaced text.

Rendering your CA extracts using Pandoc

Finally, making sure you have your csl file (apa.csl), your images, your template.txt file and your margins.sty file all in the same folder with your example (I find that convenient), and making sure you have a nice monospaced font to use (CAfont is great) in place, run something like this:

pandoc --latex-engine xelatex --csl apa.csl --variable monofont=CAfont --variable mainfont=Arial --variable fontsize=12pt -H margins.sty --template template.txt --bibliography /path/to/library.bib -o README.pdf README.md

You can, of course, run this command from the terminal – swapping out the relevant variables as needed, but I use vim-pandoc’s PandocRegisterExecutor function to run this whenever I type the local leader character twice (,,) followed by pdf. See https://github.com/vim-pandoc/vim-pandoc for documentation of that kind of thing.

I’m happy to answer any questions here or on @saul.

Notes:

  1. Not all of these systems support bibliographical references with BibTeX – Markdown + Pandoc does this quite elegantly

Pandoc + Markdown for Conversation Analytic Transcripts Read More »

Schegloff Sequencing Labels Cheat Sheet

This cheat sheet (PDF version) provides all the symbols you will encounter in Schegloff (2007): a useful reminder while doing an initial sequential analysis of your data. Use with caution, and remember to re-read the last chapter, as well as Schegloff (2005) beforehand. Usages are referenced with example and page numbers.

Adjacency pair labels

  • F / FPP : First Pair Part
  • S / SPP : Second Pair Part (2.01 p. 17)

Sequence management markers:

  • 1 / 2 / 3 : subscript numbering for multi-sequence analyses e.g.: Fb1, Fb1 (5.30, p.75)
  • + : more of a FPP or SPP i.e.: +F / +S (used in combination with other labels) (7.05, p. 121)1
  • b : base pair i.e. Fb or Sb
  • pre : pre-sequence marker
    • e.g. Fpre or Spre of a pre-expansion sequence (5.32, p. 77, see note 5 p. 27)
    • can take b and / or numbering for multi-sequence analyses.
  • ins or i : insert expansion FPPins or SPPins (can take b / numbering). (6.08, p.103 / 6.01, p.105)
  • insins : nested insert expansions (can be further nested e.g.: insinsins ) (6.17, p.110)
  • post : post-expansion (p. 27 note 5)

Position-specific markers:

  • pre-S : a preliminary (e.g. anticipatory account) coming between F and S. (p. 69 ex. 5.19)
  • preSb : a preliminary to a base sequence (p. 84 ex. 5.38)
  • SCT : sequence closing third (can be used with numbering, + and design feature labels) (7.03, p.119)
  • PCM : post-completion musing (7.32, p. 143)

Action labels

Obviously actions can be described in many ways, but Schegloff (2007) only uses these ones:

  • off : offer (could also be req for requests (10.14, pp 213-214), ass for assessments etc. etc.)2
  • acc : accept prior action (5.39, p. 85)
  • rej : reject prior action (5.39, p. 85)
  • prerej : a pre-rejection (could be used for any action) (5.39, p. 85)
  • req1 / off2 / acc2 / acc1 : numbered actions for multi/nested-sequence analyses. (5.38, p. 85)
  • retr : disavowal or retraction of prior action (9.03b, p. 185)
  • alt : alternative version of prior action (7.50c, pp. 166-167)
  • again : reissuing a prior action (7.50b, pp. 165-166)
  • redo : reworking/redoing of a prior action (7.49, pp. 163-164)
  • add : addition to prior action (7.49, pp. 163-164)

Design feature labels

  • up : upgrade (7.43, p. 157)
  • hedge or hdg : hedge (7.50b, pp. 165-166)
  • agree : agreement with preference (5.32, p. 77)
  • rev : reversal of preference / type conformity (5.32, p. 77)
  • cnt : counter (2.01 p.17)

References

  • Schegloff, E. A. (2005). On integrity in inquiry… of the investigated, not the investigator. Discourse Studies, 7(4-5), 455–480.
  • Schegloff, E. A. (2007). Sequence organization in interaction: Volume 1: A primer in conversation analysis. Cambridge: Cambridge University Press.

  1. This is rather ambiguously described in passing as: “‘preferred’ or ‘+ {plus]’ second pair parts” (Schegloff 2007 p. 120). However, these are not equivalents but alternatives. Confusingly, the literature does sometimes use the + sign to indicate preference in analytic transcripts. Schegloff (2007) uses it to indicate ‘more’ of an FPP or SPP.
  2. NB: When using action labels with a b marker, separate them with a comma for clarity e.g.: Fb, req (10.14, pp. 213-214).

Schegloff Sequencing Labels Cheat Sheet Read More »

ICCA 2014 and the Future(ology) of CA

Still from Ari Folman’s “The Congress.”
Still from Ari Folman’s film “The Congress.”

Summary:

  • A brief account of my experience of ICCA 2014 (the 4th International Conference on Conversation Analysis).
  • Tips gleaned about how to present interactional data analysis in 20 minues.
  • What I learned about terminology in the analysis and presentation of CA research.
  • A little reflection on what ICCA 2014 meant for the origins and future of CA.

Introduction

In The Futurological Congress (1971) by Polish science fiction author Stanislaw Lem the protagonist attends a meeting of 70,000 researchers in the increasingly popular discipline of Futurology. There are so many Futurologists these days that they can’t possibly all give their papers in full, so they are assigned index numbers, then when it’s their turn to present they stand up and say the number. Of course there also isn’t time for questions, so all questions have to be submitted in advance and delivered by the questioners standing up and saying the number. Then the speaker may respond with the index number of their response and so on.

ICCA 2014 at UCLA was not quite at this stage yet, but it was still an awesome experience to see 500 Conversation Analysts and Ethnomethodologists from around the world gathered to present papers to one another in one of nine concurrent sessions, each paper containing a series of line-numbered transcripts of spates of interaction each of which – in themselves – could have been the subject of an entire day’s workshop.

Having watched something like 50 presentations in 4 days, with a vast range of styles and approaches, the purpose of this post is to collate tips and ideas for presentation of this kind of research, as well as provide those who weren’t able to be there with a brief impression of what ICCA 2014 was like to attend.

Overall Impressions of ICCA 2014

Conference opening speech by John heritage
Conference opening speech by John Heritage

Firstly, a brief impression, which I hope will dispel any negative implication in my referencing Lem’s sci-fi satire in the introduction. This was an extraordinarily well organised and enjoyable event. The venue, the programme, the facilities, and all the important basics were so well organised, they appeared seamless. Sessions progressed on time and with a cooperative and collegial atmosphere that everyone – especially the heroic session chairs, graduate helpers and local organisers – worked so hard to maintain. Despite its size and the diversity of approaches to the study of human interaction, my overall sense was that this conference served an unusually cohesive research community with a strong set of methodological and philosophical alignments. This became most evident to me when I realized – after fretting over having to hop between the 9 concurrent sessions to catch everything I wanted to see – that I could just as well stay put in one session, or walk into almost any other one and still find something interesting and comprehensible to me going on in every room. This is a real contrast with other conferences I’ve attended, especially in a Computer Science context where the widespread intra-field specialization means that walking into the wrong session might result in having to sit and listen to an hour of highly technical niche gibberish.

The panels I enjoyed most used this double aspect of EM/CA’s ethnographic subject-diversity and its methodological coherence to great effect. For example Arnulf Depperman’s excellent sessions on ‘Disjunct and convergent temporalities and the coordination of action’ brought together Jürgen Streeck’s work on the postural configurations of car mechanics at work, Dirk vom Lehn’s work on gallery and museum visiting, as well as Depperman’s own research into driving instruction, and Sae Oshima’s analysis of the interactional dynamics of stylists and clients as they come to the evaluation-relevant endpoint of a haircut. This was one of the most powerful examples to me of how very different interactional contexts and activities, looked at together with different analytic foci, can cohere by allowing a sense of the stable underlying structure of natural human interaction and conversation to emerge from the mix.

Two approaches to presenting (and doing) interaction analysis

Having mentioned ‘methodological coherence’, I should also point out that there were very different approaches and methods too, and they were also presented quite differently. The most obvious differences in overall approach were somewhat similar to the different dimensions of distinction in CA drawn by Emmanuel Schegloff (1996) in his paper on person reference between single case and interaction-oriented analyses on one hand, and aggregate and system-oriented analyses on the other. While these distinctions were not always entirely clear in the 20 minutes most people had to present, it became clear to me that the best presentations were the ones that chose a style to match this aspect of their analytic approach.

Here are some tips based on the best of each type of presentation that I saw. Some are common knowledge or are gleaned along with my reading of the King’s group’s excellent book on video analysis (Heath, Hindmarsh & Luff 2010).

Tips for presenting single case / interaction-oriented analyses

  1. Get to the data almost immediately, show first then tell.
  2. Make the context descriptions as integrated into the presentation as possible, and always illustrated with visible examples.
  3. Make time to show the same clip as many times as possible at multiple speeds.
  4. Don’t sit still – physically demonstrate and illustrate the embodied actions that are being talked about.
  5. Show clips with and without audio, but make sure to use the volume control when speaking over the video otherwise its impossible to hear.
  6. Avoid using transcripts, or if necessary use subtitles to avoid splitting audience focus between page and screen.
  7. If there are transcripts/cartoons/diagrams, show those first, then the video so the audience knows what to look for and gets the satisfaction of seeing it.

Jon Hindmarsh’s presentation was an excellent example of this approach. He showed the same clips on silent repeat while he walked around talking and gesticulating about them animatedly. He also returned to the same clips at the beginning and end of his session, giving us the opportunity to see our perception of the action in the clips changing as we heard his analysis. The final time we saw it at the end was quite powerful for this reason.

Tips for presenting aggregate / system-oriented analyses

  1. Make clips and transcripts as short and concise as possible, just focus on the phenomenon in question.
  2. If there is important stuff earlier or later on in the interaction, show it on screen using subtitles/animation.
  3. Make introductions pithy and descriptive, but don’t spend too long on them. If relationships etc. are important, do a diagram.
  4. When showing an interactional effect, show it not happening too. Standard practices should be demonstrated alongside deviant cases.
  5. When going through the analysis, only talk about details relevant to the phenomenon. A presentation is not the place for a comprehensive analysis, and it’s distracting from the main point.
  6. Be extra careful not to run out of time. Almost all the presentations ran out of time, and whereas I could still get a lot from a badly timed interaction-oriented analysis, it was really hard to make sense of aggregate analyses that never completed their narrative arc.
  7. Don’t show video if the analysis does not depend on it.

Alexa Hepburn and Paul Drew’s paper on absent apologies was a great example of an aggregate analysis of a phenomenon that – by virtue of its absence – required both deviant and non-deviant cases to be presented in a kind of drip-drip of evidence, building up to an aggregate view of the phenomenon. Along the way there were lots of mini-system insights into how the mechanisms of accounting and accountability for apologies work in different ways, and although they did run out of time a bit, they were able to skip several of the deviant cases to complete the overall picture and reach the phenomenon in question. They also had excellent transcripts which included the ethnographic glosses so you could also reconstruct the missing pieces of the puzzle from the data after the fact.

The most important thing I learned at ICCA 2014

In Lem’s novel, the academic discipline of futurology is based on a practical extrapolation of Sapir-Whorfian notions of language being a necessary prerequisite for rendering the world intelligible through thought. The practice of futurology involves future-casting by a kind of reverse-etymology. Futurologists come up with new words and phrases and evaluate them for their potential meaningfulness. The idea is that if your phrase is semantically loaded and suggestive of other, related terminologies, it may at some point come to mean something. The implications of those potential meanings are then the concern of futurologists.

Alongside a fantastic series of pre-conference workshops, graduate students were invited to sign up to have lunch with a group of CA grandees. I was thrilled to get (literally) a ticket to talk with Anita Pomerantz – whose work was the starting point for my entire PhD thesis. It was great to meet and thank her in person for that, and very interesting to hear what she had to say when I insisted she give us some sage advice (her own very gracious approach was to focus on us and our research interests). Notably, she said “don’t use the term preference”, and went on to advise against using terms like “adjacency pair” and all the other bits of terminology established analytically by her first generation of CA people.

This intrigued me, as she is often credited with initiating a whole rich seam of work on preference and dispreference with her work on compliment responses (1978) and second assessments (1984). She explained that she was telling us to avoid using these words as shortcuts to, or even replacements for a proper analysis. I have heard similar things from others in her generation, for whom using these terms must feel very different given that they had to do the analytic work first to clarify and then invent them.

As the conference proceeded, I got a very tangible sense of why this advice is so important. Very often I saw people presenting great research, but peppering their presentations with these kinds of keywords, usually needlessly. These terms are useful, especially for structuring training and disciplined analysis, and for spreading knowledge about CA and its inner workings. It’s hard to imagine a CA textbook not including a full description of adjacency pairs or preference organization. However, their use in this context mostly seemed aimed at expressing group membership rather than contributing to the analysis at hand.

So, given that this was my first CA conference, the key thing I learned at ICCA 2014 was that it’s only worth naming these analytic terms in presentations of research findings where they are absolutely salient to the analysis and phenomena at hand. The transcripts and the data are presented so that other researchers who are familiar with CA methods can challenge the conclusions drawn from them. All the CA terminology is a vital but essentially back-room business that doesn’t need to feature in the presentation of findings at all.

The Future(ology) of CA

Given the breadth and diversity of the research presented at ICCA 2014, it’s difficult to sum it up in anything other than a very partial and subjective way. Having said that, there were a few moments and aspects of the event that suggested some interesting potential directions of contemporary CA.

Firstly, there was a set of presentations in the ‘Hybrids Heretics and Converts’ category that had its own panel on the Friday. Unfortunately I missed most of this, but had the chance to speak to some of the presenters and their colleagues – many from the Max Planck Institute for Psycholinguistics in Nijmegen, and most supervised by Stephen Levinson. The presentations I did see had a distinctive style and structure, familiar to me from hypothetico-deductive models of presentation that I see in my home disciplines of Computer Science and Engineering. I was pleased to see Schegloff in these panels, respectfully engaged with (mostly) young researchers, offering constructive critique. One of his criticisms of much of the experimental work presented was that it tended to focus on moments of experimentally-salient (but interactionally isolated) conversational structure. His argument was that talk is densely layered and interconnected, and that by isolating temporal fragments of talk from continuous processes of interaction, all that contextual interconnection is lost. It was great that there was space for debate focussed on these issues that extend from long-running questions of quantification in the study of human interaction, which is especially healthy given the quantitative (though not yet widespread experimental) turn in recent prominent CA work.

Photo of Harvey Sacks from the exhibition 'Order At All Points'
Photo of Harvey Sacks from the exhibition ‘Order at all points: the work of Harvey Sacks’

Secondly, the ISCA general meeting was interesting for me, as a neophyte, to find out more about CA as an organisational project, and get a feel for its origins and future. It was lovely to see Schegloff being awarded an honour for lifetime achievement, and the speeches and presentations were moving, especially given that this is the 40 year anniversary of what is often seen as the founding of the discipline with Sacks Schegloff and Jefferson’s 1974 turn-taking paper. There was also a fantastic exhibition entitled “Order at All Points: The Work of Harvey Sacks” in the Young library featuring key papers, letters, photos and artifacts from the Sacks archive. Alongside these celebrations, ISCA chair John Heritage set out that the focus of the next four years would be on developing and disseminating more educational resources in CA – and he announced that Schegloff was very generously donating all his transcripts, course notes, assignments and recordings to ISCA for publication. While many people whooped and cheered at this bit, Schegloff turned around in his seat at the front and hooted “Yo:::u’ll be S^OrE:::e,” at the crowd.

Video still from the exhibition 'Order at all points: the work of Harvey Sacks'
Video still from the exhibition ‘Order at all points: the work of Harvey Sacks’

Finally, the ICCA baton was passed from ICCA 2014 lead organiser Tanya Stivers to conference chair Paul Drew at Loughborough where the 2017 conference will take place, with Lorenza Mondada also announcing that there would be an interim ISCA-sponsored conference in Basel in 2015 entitled ‘Revisiting Participation’. Given how much I enjoyed and got out of ICCA 2014, I’m very much looking forward to those.

References

  • Heath, C., Hindmarsh, J., & Luff, P. (2010). Video in qualitative research: analysing social interaction in everyday life. Sage Publications.
  • Lem, S. (1985). The Futurological Congress (from the Memoirs of Ijon Tichy). Harcourt Brace Jovanovich.
  • Schegloff, E. A. (1996). Some Practices for Referring to Persons in Talk-in-Interaction: A Partial Sketch of a Systematics. In B. Fox (Ed.), Studies in Anaphora (pp. 437–85). Amsterdam: John Benjamins Publishing Company.
  • Pomerantz, A. (1978). Compliment responses: Notes on the co-operation of multiple constraints. In J. Schenkein (Ed.), Studies in the organization of conversational interaction. Academic Press.
  • Pomerantz, A. (1984). Agreeing and disagreeing with assessments : some features of preferred / dispreferred turn shapes. In J. M. Atkinson (Ed.), Structures of social action: Studies in Conversation Analysis (pp. 57–101). London: Cambridge University Press.

ICCA 2014 and the Future(ology) of CA Read More »

Two forms of silent contemplation – talk at ICCA 2014

For the International Conference on Conversation Analysis 2014 I gave a talk on some work derived from my PhD: Respecifying Aesthetics. It looked at two forms of silent contemplation – and two sequential positions for bringing off silences as accountable moments for subjective contemplation and aesthetic judgement.

The talk looked at where this conventional notion of aesthetic judgment as an internal, ineffable phenomenon might come from in practical terms. In philosophical terms the idea comes from Kant, who gets it from Hume, who draws on Shaftesbury. I think Hume puts it best.

Hume

But this talk isn’t about philosophical aesthetics – it’s about the practical production of contemplation in interaction. It points to the kinds of practical phenomena that we can observe in people’s interactional behaviors that might have inspired philosophers to hypothesise that aesthetic judgments are ineffable, internal, psychological activities.

The empirical crux points to two positions in sequences of talk that people can use to present something as arising from contemplation. The first is done as an initial noticing or assessment, launched from first position without reference to prior talk or action. The second is produced as a subsequent noticing – launched in first position as though responsive to some tacit prior ‘first’.

By studying the practical structure of these ostensibly internal, ineffable events, we can develop more plausible hypotheses about how aesthetic experiences function in theoretical or psychological terms.

References 

  • Coulter, J., & Parsons, E. (1990). The praxiology of perception: Visual orientations and practical action. Inquiry, 33(3).
  • Eriksson, M. (2009). Referring as interaction: On the interplay between linguistic and bodily practices. Journal of Pragmatics, 41(2), 240–262. doi:10.1016/j.pragma.2008.10.011
  • Goodwin, C. (1996). Transparent vision. In E. A. Schegloff & S. A. Thompson (Eds.), Interaction and Grammar (pp. 370–404). Cambridge: Cambridge University Press.
  • Goodwin, C., & Goodwin, M. (1987). Concurrent Operations on Talk: Notes on the Interactive Organization of Assesments. Papers in Pragmatics, 1(1).
  • Goffman, E. (1981). Forms of Talk. Philadelphia: University of Pennsylvania Press.
  • Heath, C., & vom Lehn, D. (2001). Configuring exhibits. The interactional production of experience in museums and galleries. In H. Knoblauch & H. Kotthoff (Eds.), Verbal Art across Cultures. The aesthetics and proto-aestehtics of communication (pp. 281–297). Tübingen: Gunter Narr Verlag.
  • Heritage, J. (2012). Epistemics in Action: Action Formation and Territories of Knowledge. Research on Language & Social Interaction, 45(1), 1–29.
  • Heritage, J., & Raymond, G. (2005). The Terms of Agreement: Indexing Epistemic Authority and Subordination in Talk-in-Interaction. Social Psychology Quarterly, 68(1), 15–38.
  • Kamio, A. (1997). Territory of information. J. Benjamins Publishing Company.
  • Leder, H. (2013). Next steps in neuroaesthetics: Which processes and processing stages to study? Psychology of Aesthetics, Creativity, and the Arts, 7(1), 27–37.
  • Pomerantz, A. (1984). Agreeing and disagreeing with assessments: Some features of preferred/dispreferred turn shapes. In J. M. Atkinson & J. Heritage (Eds.), Structures of social action: Studies in Conversation Analysis (pp. 57–102). Cambridge: Cambridge University Press.
  • Schegloff, E. A. (1996). Some Practices for Referring to Persons in Talk-in-Interaction: A Partial Sketch of a Systematics. In B. Fox (Ed.), Studies in Anaphora (pp. 437–85). Amsterdam: John Benjamins Publishing Company.
  • Schegloff, E. A. (2007). Sequence organization in interaction: Volume 1: A primer in conversation analysis. Cambridge: Cambridge Univ Press.
  • Schegloff, E. A., & Sacks, H. (1973). Opening up closings. Semiotica, 8(4), 289–327.
  • Stivers, T., & Rossano, F. (2010). Mobilizing Response. Research on Language & Social Interaction, 43(1), 3–31.
  • Vom Lehn, D. (2013). Withdrawing from exhibits: The interactional organisation of museum visits. In P. Haddington, L. Mondada, & M. Nevile (Eds.), Interaction and Mobility. Language and the Body in Motion (pp. 1–35). Berlin: De Gruyter.

Two forms of silent contemplation – talk at ICCA 2014 Read More »