geek

How to share large amounts of research video data with Syncthing

Syncthing Logo

Syncthing Logo

One of the major logistical problems facing researchers who use large audiovisual data files featuring recordings of human subjects is how to share it with colleagues simply, securely and inexpensively.

  • By simple, I mean that the a/v file-sharing solution should not need specialized equipment or an expert systems administrator to set it up for you. Most universities and research institutions have in-house research file servers. These may be security audited, up-to-date and well-organized – they may seem unlikely to suddenly lose or delete all your data or randomly restrict access to your colleagues in other institutions. However, in my experience, it’s best to manage your own data and backups!
  • By secure I mean that it should not rely on cloud-hosted storage (which may store and transfer data anywhere in the world), or allow data to be transferred unencrypted between remote systems. This is often a requirement of UK human subjects/ethical approval – so it’s particularly relevant in the case of UK educational institutions, but this is probably also true elsewhere.
  • By inexpensive I mean that it should not cost the end-user an ongoing fee, or meter use per gigabyte stored. Commercially available cloud file-storage services like Dropbox, OneDrive, Google Drive or iCloud are relatively cheap up to ~ 1TB storage, they can get quite expensive beyond that, and if you have multiple projects with multiple researchers in different groups sharing data – the total cost for all researchers can become prohibitive.

There are trade-offs between these three requirements – this blog post outlines how to use Syncthing – which I think is an optimal solution – to solve this issue.

What is Syncthing?

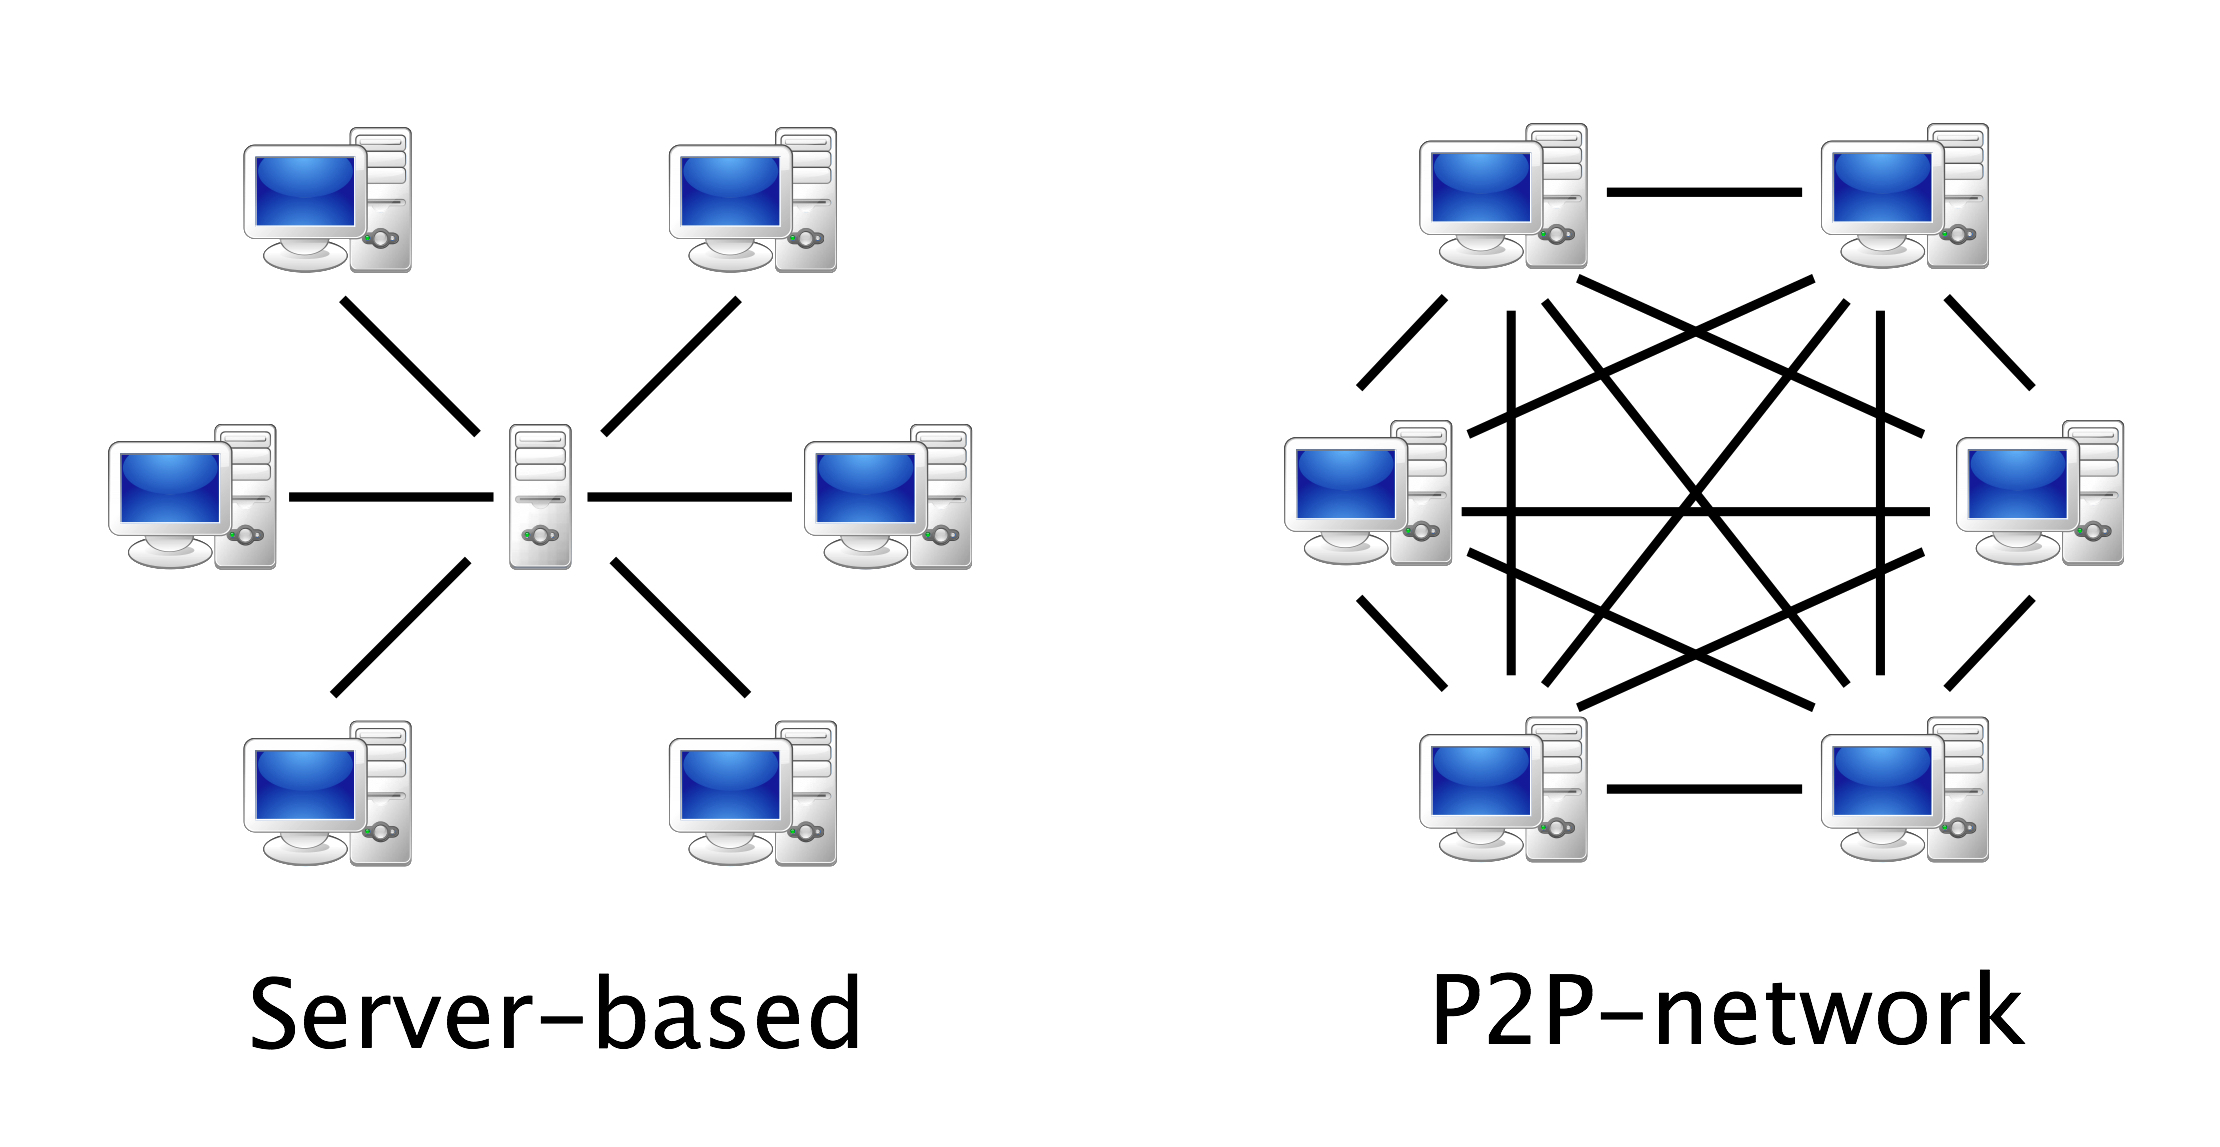
Syncthing is a file synchronization tool – much like Dropbox, but it is peer-to-peer, which means it works like Bittorrent or other file sharing tools that do not require a central server-based system to share files.

A client-server model (left) and a peer-to-peer system (right)
A client-server model (left) and a peer-to-peer system (right).

Why use Syncthing?

Firstly, Syncthing is an open source, peer-to-peer file sharing system, which means it is relatively cheap, simple to set up and secure. It is especially good for sharing very large files and collections of files without having to pay or to trust an intermediary to maintain a centralized file server. You run Syncthing on your computer, the person you want to share files with runs it on theirs, and you can set up folders that will synchronize files automatically when both your computers are turned on and connected to the internet. The data is encrypted in transit, and never sits on someone else’s server. Syncthing only requires each user to have a normal computer or laptop, rather than running on a server with each person using a ‘client’. This is more secure, and probably less complex to set up and maintain.

Secondly, Syncthing is open source, under active development and compatible with all major computing platforms because inevitably people will use Mac OSX and Windows, and sometimes *nix. Syncthing is one of many open source tools relevant for educational contexts, which are not only cheaper for individual researchers and teams, but also tend to stick around for longer.

Finally, Syncthing allows each user to choose how they want to organisze their folder structure. Whereas Dropbox uses a standard ‘dropbox’ folder, and (by default, at least) forces everyone use the same folder structure and folder names for their files, Syncthing allows you to put your data wherever you want on your hard drive, but still choose it as a folder to synchronize with your colleagues. So I may choose to put my video file in a folder on my Linux machine here:

/home/saul/data/project1/video1/video1.m4v

while you might have your videos on your windows machine at

C:\Users\Yourname\projects\project1\videos\video1.m4v

A third colleague may store video on their desktop (tut tut) on their Mac at:

/Users/user/Desktop/video files/video1.m4v

We can all then use Syncthing and choose to synchronize my ‘/video1/video1’ folder with your ‘\project1\videos’ folder and our colleague can synchronize with their desktop ‘video files’ folder – so despite us all having different data naming schema, we can collaborate effectively, share files, and keep our own file systems organized in a flexible and personalized way.

For many years I’ve used Dropbox but I’m always running out of space, then having to weed out awkwardly placed or duplicated files from collaborative projects which may or may not still be used or needed by collaborators. So this feature of Syncthing is a huge selling point for me.

What is Syncthing not so good for?

Syncthing is not particularly good for synchronizing millions of small, regularly updated files. Syncthing monitors which files need syncing by scanning its folders every few seconds to find out what has been updated – this can be a bit processor intensive if you have hundreds of thousands of files to scan through. So, it’s best to use it for projects with a few thousand large (especially video/heavy data) files rather than projects with tens of thousands or millions of files. For the same reason, if you need the files to remain synchronized in (close to) real-time, Syncthing’s folder scanning process will probably take too long.

Syncthing is not great for always-online files. Because it is a peer-to-peer system, Syncthing requires the computers you are keeping in sync to be online at the same time for syncrhonization to take place. Dropbox, by contrast, uses an always-online server, so it doesn’t matter if your multiple computers running Dropbox are online at the same time or not – the server will make sure they all have the most recent version of your Dropbox files. So, if you need something always-online, better to use a server-client system like Dropbox, OneDrive, iCloud etc.

Syncthing is not particularly useful on smartphones/tablets. Finally, although Syncthing does have an Android client and an iOS client, these are not officially supported by the same developers who work on syncthing, nor are they going to work if your computer is off-line when you need to grab a file via your mobile syncthing client.

Installing Syncthing

Syncthing has excellent, up-to-date documentation that will guide you through the installation process. However, there are also several helpful videos that will help you install Syncthing on different operating systems. I couldn’t find a video about how to install Syncthing on Mac OSX, so I made one myself.

Installing Syncthing on Mac OSX (with Homebrew):


Installing Syncthing on Windows


Installing Syncthing on Linux


Setting up and using Syncthing to share data

If you want to learn how to set up Syncthing for special purposes, and you want to explore all the options, I recommend reading the documentation, and if you want an in-depth video guide, I recommend the Nerd on the Street guide to setting up Syncthing. However, for a quick-start video, once you’ve installed it, I’ve created a short video that shows you how to use Syncthing to keep a folder in sync between two computers with the simplest set of default options.

I’ve used Mac OSX (el capitain) in this video, because I think it’s actually harder for most OSX users to understand how to fill in the Folder Path options (the location of the folder you want to sync) when setting up Syncthing for the first time. It’s relatively straight-forward to find Folder Paths in Windows and if you’re using Linux, I expect you’ll already know how to do that.


Troubleshooting

One major issue I’ve seen people having when running Syncthing for the first time is getting Syncthing to run at startup automatically. Although it’s beyond the scope of this article to deal with application startup issues – I’m happy to offer advice with this if you leave questions in the comments after reading the documentation.

Another major issue I had to deal with was cross-platform file-naming issues (especially for Mac OSX users). Basically, different file systems (FAT32, NTFS, exFAT, UFS/+, ext2/3 etc. etc.) allow different kinds of file names. If you are synchronizing folders between different file systems (on external drives, system hard drives, different operating systems etc.) it makes sense to use very conservative conventions.

I recommend the following:

Alternatives to Syncthing

There are many alternatives – some of them look very interesting, but none of them fit all the requirements outlined above as well as Syncthing. I’m open to adding to this list – so if you have a solution that isn’t shown here, please do let me know.

Finally – a very good solution, with minimum fuss or technology is to just copy your files onto small external hard drives and snail-mail them to each other in well-padded mailing boxes. That’s often a simpler (if slower) solution than setting up one of these systems!

How to share large amounts of research video data with Syncthing Read More »

10 best practice tips for your research/portfolio website

Spectrascope facilitation cards

I just ran a 2 hour workshop for the Media and Arts Technology Doctoral Training Centre using a variant of the Spectroscope Facilitation method during which 10 people showed and discussed their researcher / artist / technologist portfolio websites and gave each other structured feedback. After the show & tell session, each of the participants went home with 27 prioritised ‘todo’ advisory notes written by other participants to improve their own websites. However, one of the most useful outcomes – that I’m going to share here – was a set of 10 best-practice tips derived from each participant writing down what they really liked about each other’s sites.

Spectrascope facilitation cards

These are neither comprehensive, nor all compatible with one another – and I certainly could take much of this advice to improve my own website, but anyone thinking of setting up and academic / personal / portfolio site might find these useful. The most important question for anyone to address with their website was to ask who and what is the website for. Is it a CV to convince potential employers in academia, or to appeal to ad agencies, or to attract artistic commissions? Once these central questions were answered, the following tips could be used to improve each site.

  1. Prioritise clarity and coherence.
    • Make a clear statement of who you are and what you do in plain language – right up front.
    • What is the website for? If it’s basically a CV, use the word ‘CV’. If it’s a portfolio, use the word ‘portfolio’. Shape the expectations of the visitor so they know what they’re getting.
    • Add this information to the title/metadata the homepage, so the title bar (and Google’s web crawlers) read e.g. “Name, Job description, Purpose of site”.
    • If you have a lot of projects to show, put a selection of only the best/most targeted to the purpose of the site on the front page.
  2. Foreground your main activity/role.

    • If you have multiple quite different audiences/purposes in mind for your site, consider making multiple sites.
    • However, it can also be useful to show multiple facets of what you do – if one is a minor activity and the other a major activity, combine and show a richer combined picture.
  3. Keep it current.
    • Make sure you can update it easily, reduce friction by choosing technology that you enjoy using.
    • Show what’s upcoming – tell people what you’re doing next.
    • Avoid showing out of date information by e.g. not using temporally-relative wording ‘this year’ etc.
    • Keep your CV rigorously up to date and centralised (i.e. don’t have Linkedin profiles or freelance CVs sitting out of date around the web). A good hack for this is to use a Google Doc that you update regularly – and link to a PDF-downloadable version of it from your website.
  4. Show people where to go.
    • Show as many of your menu items as you can all at once – don’t hide menus behind fancy dropdowns or multiple click-throughs.
    • Optimise for ‘fewer clicks’. Try to make everything on the site only one or maximum two clicks away. The most important things must be one click away and immediately visible on the homepage.
  5. Get a domain name.
    • Buy your own domain name. It costs almost nothing and it mostly looks more professional.
    • It’s also more future-proof, i.e. if you buy www.myname.com and point it to a wordpress site, or a squarespace site, or a cargocollective site, but then change where you host the site, you can take the domain with you. If you relied on wordpress.com/myname – you’re stuck with wordpress.
    • If you can, use short urls e.g. http://myname.com/about or http://myname.com/project/myproject – this is relatively portable (as above) so you can change which software you use to produce your website without being tied to software-specific page names and urls.
    • It’s good to have your own domain for email (especially if you’re a freelancer – less an issue in academia where people use institutional emails). However, be careful not to use vanity emails like info@myname.com to sign up for core services. Here’s why.
  6. Use a nice photo of yourself doing something.
    • It’s good to show something about yourself – but try to show yourself doing something relevant to the style and purpose of your site.
    • You might want to use a widely identifiable gravatar so that your website is visually identifiable with your social media profiles/comments from around the web.
  7. Use relevant copyright notices.
    • As long as you’ve created your website, whatever you publish is legally yours whether you add a colophon with a ‘©’ symbol or not. The symbol is just there to advise people on how to use your content.
    • If you are an artist with lots of great visual work – which unscrupulous people love to use without permission – say how you want people to use it.
    • If you want people to spread your work and give you credit, use a license such as the CC-BY – or use the CC0 option if you want to put your work in the Public Domain.
  8. Offer alternatives to audiovisual content.
    • A few images work as well as a video, sometimes better.
    • Consider using a simple explanatory animated GIF so people don’t have to download a whole video. 1
    • Always consider people with low bandwidth, small screens, out of date browsers. Responsive designs are easy these days with lots of great templates available for most website/blogging engines or just HTML5 templates.
  9. Enhance your ‘findability’.
    • Add a list of hardware / software / techniques / approaches used for each project. This shows what you can do, and it helps people using Google to find you and what you know about.
    • In general think of your site as a dragnet for people to find you. It’s much better to be found than to go knocking on people’s doors – so think about who do you want to find you.
    • Use analytics – you should know how people see your site, where from, and which pages they visit – it helps you make decisions about how to change and update it.
    • Link to your social media/other platforms from your site and vice versa (linkedin, twitter, github, academia.edu, researchgate, your institutional sites etc.)
  10. Show people who you are.
    • It’s amazingly important to care about your web presence these days – make it reflect who you are, what you care about and believe, and make it unique. Of course this also means being critical, self-aware and careful not to project those bits of yourself that might undermine the purpose of your site!
    • Sometimes a web 1.0 site at an address like  http://institutionalname.edu/~yourname is a good way to show who you are – if you’re an academic in engineering or computer science. Go with that, engineering academics who are looking to hire you will recognise you as one of their own.
    • A really beautiful, unique and intriguing image of your work – or a great video or poem can be a wonderful hook into an art or design-focused site. Intrigue people, then reward them with more eye candy and carefully thought through information.
    • Show your network – link to others, make sure to credit all collaborators and link to them, they’ll appreciate it!

These are somewhat general tips. There was also a lot more technical advice in our email thread about this workshop, as well as some advice on which website services might be useful. Some of those links are included below – but any further explanation as to what to do with them is well beyond the scope of this post!

Beginners:

  • WordPress – either as a hosted service – or self-hosted on your own server. If self-hosted, beware! It can be tricky to maintain and has had lots of security problems in the past.
  • Squarespace – looks easy, but it’s pretty expensive for a simple portfolio/website.

Intermediate/advanced: (thanks to Victor Loux).

Hosting:

Thanks to Toby Harris, Victor Loux, Daniel GabanaJacob HarrisonJulie Freeman, Laurel Pardue, Raphael Kim, and Betül Aksu for presenting their works in progress and giving great feedback.


Update 7/18/2016:

Travis Noakes suggests (see the comments section below), using a unifying visual metaphor that brings together your website, your visual presentations and even the binding of your thesis. Travis’ excellent research blog uses the “+” sign to do this and is well worth checking out as a great example of a researcher’s site that integrates his description of his roles and foci with the site’s navigation and visual communication. He also suggests using Google’s Blogger platform for enhanced google juice and ease of use.

Notes:

  1. A good tip on this from Victor Loux: If you’re considering using a GIF to show a specific interaction in a project, also consider that GIFs can be several megabytes big if they’re wide, as well as being lower quality (limited to 256 colours and less fluid). The trick I’ve used for my website (the ‘PeDeTe’ project) is to actually use a <video> element that acts like a gif (autoplay, looped, and no sound); for the same video length and same resolution, it reduced a 4.8 Mb (!) GIF to a 395 kb mp4 file. Most modern browsers support it and you can certainly find/make a polyfill for older ones. The only downside is that iOS will refuse to autoplay it, unlike GIFs, so that’s just not a viable option if mobile is really important.

10 best practice tips for your research/portfolio website Read More »

Pandoc + Markdown for Conversation Analytic Transcripts

markdown.png

A while back I wrote a blog post detailing why I chose Pandoc and Markdown to write papers including Jeffersonian Conversation Analytic transcripts. It wasn’t very detailed though, because a full explanation of how to set up a compatible text-based writing workflow was an onerous task – one happily now completed beautifully by Dennis Tenen and Grant Wythoff’s guide to Sustainable Authorship in Plain Text using Pandoc and Markdown.

So, I decided to update this how-to for anyone using Pandoc and Markdown to start including CA style transcriptions quickly and easily.

To go along with this how-to, there is also a set of demo files you can download to try out this approach. However, before you do that you probably want to get a pandoc + markdown setup installed.

The Problem

There are great software tools out there for CA-style transcription, my favourite is CLAN for a number of reasons. However, I can’t find any resources online about how to publish CA-style transcriptions without being forced through some eye-bleeding LaTeX diddling every time.

Of course I could just use a WYSIWYG text editor like LibreOffice – but now I’ve experienced the power of LaTeX for document preparation and publication, I really can’t see myself going back.

When doing CA it seems particularly important to have transcriptions legibly in the body of the paper and visible during the writing process, because many of the analytical observations come, or get significantly modified at the point of writing about them, double and triple checking assumptions, and cross-referencing with the CA literature while tweaking citations.

The Simplest Solution: Markdown + Pandoc

Markdown is my favourite lightweight markup language, a highly readable format with which you can write a visually pleasing text file, which you can then convert into almost any other format – HTML, OpenOffice, LaTeX, RTF, etc. using Pandoc. There are many similar systems, notably reStructuredText and Textile, all of which you can use to write your text file, and other conversion tools/toolsets, but in my experience, Markdown and Pandoc are the most useful combination in an academic context 1.

There are lots of great things about markdown:

  • Just edit simple text files – no weird file formats to get corrupted or mangled.
  • Less verbose and complicated-looking than LaTeX.
  • Small files are easy to share/collaborate on with others (everyone gets to use their favourite editor).
  • There are some great pandoc plugins for my favourite text editor vim.

However, the best thing is that, used along with the XeTeX typesetting engine, it solves the problem with CA transcriptions being unreadable in LaTeX/pdflatex.

For example, in my first CA-laced paper, my transcriptions looked like this in my LaTeX source:

\begin{table*}[!ht]
\hfill{}
\texttt{
  \begin{tabular}{@{}p{2mm}p{2mm}p{150mm}@{}}
 & D: &  0:h (I k-)= \\
 & A: &  =Dz  that  make any sense  to  you?  \\
 & C: &  Mn mh. I don' even know who she is.  \\
 & A: &  She's that's, the Sister Kerrida, \hspace{.3mm} who, \\
 & D: &  \hspace{76mm}\raisebox{0pt}[0pt][0pt]{ \raisebox{2.5mm}{[}}'hhh  \\
 & D: &  Oh \underline{that's} the one you to:ld me you bou:ght.= \\
 & C: &  \hspace{2mm}\raisebox{0pt}[0pt][0pt]{ \raisebox{2.5mm}{[}} Oh-- \hspace{42mm}\raisebox{0pt}[0pt][0pt]{             \raisebox{2mm}{\lceil}} \\
 & A: &  \hspace{60.2mm}\raisebox{0pt}[0pt][0pt]{ \raisebox{3.1mm}{\lfloor}}\underline{Ye:h} \\
  \end{tabular}
\hfill{}
}
\caption{ Evaluation of a new artwork from (JS:I. -1) \cite[p.78]{Pomerantz1984} .}
\label{ohprefix}
\end{table*}

which renders this:

A simpler way to do this in Markdown (with none of the fancy stuff) is to use Markdown’s ‘verbatim’ environment – you do this by putting four spaces or one tab before each line in your transcript (including blank lines). Here’s the messy LaTeX above re-done in simple Markdown.

(3)

STE:        U̲o̲:̲h̲ oh ugly things [he paints.] 
KAT:                            [Really?] 
        (3.0) 
STE:        (°I think s[o-])°
KAT:                   [So you wouldn't sell any?] 
STE:        U̲u̲h̲ n[o] 
KAT:              [No?] 
        (1.7)

which renders like this:

ugly_things.png

Overall, I think the Markdown version represents a significant improvement in legibility while writing. I think it might be possible to do the same in LaTeX using the {verbatim} environment, but the fact that Markdown also lets me concentrate on writing without throwing errors or refusing to compile lets me spend longer on the writing than on endless text-fiddling procrastination.

When it comes to rendering, I feed my markdown file to pandoc:

$ pandoc --latex-engine xelatex --bibliography library.bib --csl default.csl -N -o  paper_title.pdf paper_title.markdown

If you want to use the nicely stretched ceiling characters for overlap marking, or the raised full stop / bullet operator for inbreaths, you can do so, but you’ll need to run Pandoc (see below) referencing a font that has those characters. For example, you could use CAfont and add:

--variable monofont=CAfont

to the pandoc command above.

The default.csl file is a citation style language file to customise how bibliographical references are rendered.

If you’re only adding a few examples to your document, this will probably work fine. If you are writing a thesis or a longer document – read on.

For Longer Texts: Markdown + Pandoc + LaTeX

The above approach may work for writing a short paper with one or two examples, for a thesis or a longer piece where you may have many examples, you’re going to have to take this a step further and use some LaTeX within your Markdown document. The bad news, you will have to use LaTeX, templates and some code to deal with:

  1. Example Layout: you probably want your examples to be graphically separated from your text in a consistent way.
  2. Document layout: you may need to make some stylistic tweaks to how your document prints out.
  3. Referencing: you will want to use labels for your examples so you can cross-reference them automatically within the text and not have to re-label them every time you make a change.
  4. Audio/video links: you may want to include links to audio/video examples in your files.

The good news: your CA transcript examples will still be easy to read/edit, and actually this is all pretty straight forward once you’ve got it set up.

What you will need

First, you need a working Pandoc + Markdown setup installed. You also need a nice monospaced font installed – I use CAfont by the amazing CHILDES project.

I’ve made a downloadable archive of the three files I use every time I create a new document. Download those. There is also a working demo (README.md) and some image files that you can use to edit/test things, or modify them to create your own.

Along with these examples inside the camarkdown_files folder you will find:

  • template.txt: a LaTeX template that Pandoc uses when it renders PDFs – with macros etc.
  • apa.csl: a citation style language file describing how I want my APA citations rendered.
  • margins.sty: a little margins file I canuse to tweak the overall page layout separately (US Letter vs. A4 etc.)

Whenever you start a new document, these three files into the same folder.

A little explanation

Without getting too geeky about it, here’s a little explanation of how I use this setup:

Whenever I convert my Mardown to PDF using Pandoc, I add:

--template template.txt

to the pandoc command to make sure it uses this template. The template is based on the default LaTeX template Pandoc always uses to convert Markdown to PDF via LaTeX, but I’ve added a macro: caextract.

Basically the caextract environment sets the default monospaced font, and (optionally) creates a to an online media file referenced in the Markdown file (see working example below), it also formats the paragraph containing the example as a framed float to divide it from the body of the text, and changes the listings name to ‘Extract’, so references list it as ‘Extract 1’ rather than ‘Figure 1’.

Here’s the relevant bits from the header section of template.txt

    \newcommand{\medialink}[2] { \begin{flushright} \href{#1}{#2}\\ \end{flushright} 
    } 
    $if(highlighting-macros)$
    $highlighting-macros$
    $endif$
    $if(verbatim-in-note)$
    \usepackage{fancyvrb}
    $endif$
    \usepackage{listings}
    \lstnewenvironment{extract}[1][]{
        \renewcommand*{\lstlistingname}{Extract}
        \lstset{frame=single,basicstyle=\small\ttfamily,keepspaces=true,#1}
    }{}

And this bit goes into the main section of the template:

    \usepackage{float}
    \floatstyle{ruled}
    \newfloat{caextract}{htp}{lop}
    \floatname{caextract}{Extract}

A working example

Here is a full example from a paper I’m writing at the moment that you can tweak and play with. It’s all done in simple markdown, using a little bit of LaTeX embedded within the Markdown file to call the macro.

So where I want my extract to appear in my Markdown file, I add:

![Different stopping postures between dancers \label{stopping-postures}](images/stopping-postures.png)

\begin{caextract}[H]
\caption{See https://www.dropbox.com/s/jnpf5pnxcy4dg8m/lexical-features.mov}
\label{lexical-features}
\begin{small}
\begin{verbatim}

1  JIM:   ∙hhh ⌈opps sorry Hh hyeh °hyour head°, ∙HHh Hmhmhmhmhm hehheh
2  TEA:        ⌊YE::AH! KAY >>LET's TRY it AGAIN< FIve, (.) s⌈ix? (.)
3  TEA:   ↓⌈five six se::v⌉en eight? Rock st⌈ep. (.) tri:ple, (.) tri:ple.  ⌉
4  JIM:    ⌊°five six shh°⌋                 ⌊°ep (.) tri:ple, (.) tri:ple.°]⌋
5  TEA:   G O :̲ ̲:̲ ̲O̲ :⌈ : d! L̲o̲v̲e̲l̲y̲⌈̲::.    (.)    ⌉ OKA::Y!
6  JIM:              ⌊O:hhkay:̲:̲? °Hm ↑hmhmhmhmhm°⌋
7          (1.3)
8  TEA:   LETS ROTATE PA:RTNERS!

\end{verbatim}
\medialink{https://www.dropbox.com/s/e960eu94ji7ncn3/lexical-features.mov}{Watch}

\end{small}
\end{caextract}

That should render something like this:

A later paragraph refers to the figure like so:

By contrast, Sara, Paul and Anne - marked in red in figure 
\ref{stopping-postures} - step back, split their weight and 
stop dancing together with the onset of Teacher's 
"\verb|G O :̲ ̲:̲ ̲O̲ : : d!|". Without having space to analyse 
this method, it is worth noting in closing that the regularity 
of these methods and their interactional contingencies are 
shown in the [slow-motion sections of the video](https://www.dropbox.com/s/jnpf5pnxcy4dg8m/lexical-features.mov) 
by how dancers who stop like Jim are all pulled off balance 
by dancers who stop like Paul, Sara and Anne.

It should look something like this:

A few notes on how this works:

  • The main reason for the macro is to enable cross-referencing. In the Markdown file, within each caextract I use \label{my-label} to label my examples. Then I can reference them anywhere in my Markdown file with something like “See extract \ref{my-label}”.
  • If you don’t have any media, just leave out the \medialink line.
  • You can put anything in the \caption section – your example name if you have a set naming schema for your corpus.
  • Note the neat Markdown trick in the paragraph above: I use “\verb|This comes out verbatim|” for a short inline bit of monospaced text.

Rendering your CA extracts using Pandoc

Finally, making sure you have your csl file (apa.csl), your images, your template.txt file and your margins.sty file all in the same folder with your example (I find that convenient), and making sure you have a nice monospaced font to use (CAfont is great) in place, run something like this:

pandoc --latex-engine xelatex --csl apa.csl --variable monofont=CAfont --variable mainfont=Arial --variable fontsize=12pt -H margins.sty --template template.txt --bibliography /path/to/library.bib -o README.pdf README.md

You can, of course, run this command from the terminal – swapping out the relevant variables as needed, but I use vim-pandoc’s PandocRegisterExecutor function to run this whenever I type the local leader character twice (,,) followed by pdf. See https://github.com/vim-pandoc/vim-pandoc for documentation of that kind of thing.

I’m happy to answer any questions here or on @saul.

Notes:

  1. Not all of these systems support bibliographical references with BibTeX – Markdown + Pandoc does this quite elegantly

Pandoc + Markdown for Conversation Analytic Transcripts Read More »

Getting a footpedal working with Linux

UPDATE: I have subsequently found that transcribe works beautifully well and comes with some great pedal drivers. It’s a great piece of software and well worth the modest price. UPDATE 2: Please do not follow the instructions on this blog and expect them to work. It was written in 2013 so the software is *very* out of date and I doubt I’ll able to help you if it goes wrong.

John Heritage told me to go buy a foot pedal. I picked this Infinity USB-2 pedal up from ebay for $30.

416Zo0M9vXL._SX385_.jpg

It does make a tremendous difference not to have to constantly move one’s fingers from keyboard to mouse and back, although I had mitigated this considerably by using a thinkpad external keyboard with a trackpoint. However, this set-up did have some Rachmaninoff problems – requiring hand contortion to control audio, with attendant RSI/CTS-baiting effects that often resulted in sore wrists during transcription binges.

Getting the foot pedal working in Linux (Mint 14) was a minor mission, so I thought I’d document it for anyone else doing the same:

  1. First, I installed the lovely Footpedal GNOME integration control, which sadly seems a bit dormant.
  2. After installation, the script didn’t work immediately. I edited the script following Phillip Goodfellow’s instructions.

This involved:

a finding the script: # which footpedal —> /usr/bin/footpedal
b editing that script to comment out lines 119-126:

119 # Check whether your notification agent support
120 # icon-summary-body layout.
(...)
125 # self.reusable_notification.set_timeout(1000)
126 # Doesn't do anything

  1. Finally, after I got permissions issues (the error message suggested I run sudo chmod a+r /dev/usb/hiddev0 footpedal, which didn’t seem to work) I followed Jason Barnett’s and Richard Steffan’s advice and set up a udev rule:


# /etc/udev/rules.d/footpedal.rules
#
# Set permissions for USB footpedal Infinity IN-USB-1
#
# sudo lsusb -v reports
# Bus 002 Device 002: ID 05f3:00ff PI Engineering, Inc.
# Device Descriptor:
# <...>
# idVendor 0x05f3 PI Engineering, Inc.
# idProduct 0x00ff
# bcdDevice 1.20
# iManufacturer 1 VEC
# iProduct 2 VEC USB Footpedal
#
# Rules recommended by PLUG mailing list member, Jason Barnett on
September 20, 2011
#
# After changing rules issue this command: sudo service udev restart
#
SUBSYSTEM=="usb", SYSFS{idVendor}=="05f3", MODE="0666"
SUBSYSTEM=="usb", ATTRS{idVendor}=="05f3", MODE="0666"

One sudo service udev restart later, and the footpedal is up and running! Now to get it working with CLAN under windows emulation…

Getting a footpedal working with Linux Read More »

Tools for Writing Conversation Analytic Papers


NB: There is an updated version of this post.


Problem

There are great software tools out there for CA-style transcription, my favourite is CLAN for a number of reasons. However, I can’t find any resources online about how to publish CA-style transcriptions without being forced through some eye-bleeding LaTeX diddling every time.

Of course I could just use a WYSIWYG text editor like LibreOffice – but now I’ve experienced the power of LaTeX for document preparation and publication, I really can’t see myself going back.

When doing CA it seems particularly important to have transcriptions legibly in the body of the paper and visible during the writing process, because many of the analytical observations come, or get significantly modified at the point of writing about them, double and triple checking assumptions, and cross-referencing with the CA literature while tweaking citations.

My chosen solution: Markdown + Pandoc

Markdown is my favourite lightweight markup language, a highly readable format with which you can write a visually pleasing text file, which you can then convert into almost any other format – HTML, OpenOffice, LaTeX, RTF, etc. using Pandoc. There are many similar systems, notably reStructuredText and Textile, all of which you can use to write your text file, and other conversion tools/toolsets, but in my experience, Markdown and Pandoc are the most useful combination in an academic context 1.

There are lots of great things about markdown:

  • Just edit simple text files – no weird file formats to get corrupted or mangled.
  • Less verbose and complicated-looking than LaTeX.
  • Small files are easy to share/collaborate on with others (everyone gets to use their favourite editor).
  • There are some great pandoc plugins for my favourite text editor vim.

However, the best thing is that, used along with the XeTeX typesetting engine, it solves the problem with CA transcriptions being unreadable in LaTeX/pdflatex.

For example, in my first CA-laced paper, my transcriptions looked like this in my LaTeX source:

\begin{table*}[!ht]
\hfill{}
\texttt{
  \begin{tabular}{@{}p{2mm}p{2mm}p{150mm}@{}}
 & D: &  0:h (I k-)= \\
 & A: &  =Dz  that  make any sense  to  you?  \\
 & C: &  Mn mh. I don' even know who she is.  \\
 & A: &  She's that's, the Sister Kerrida, \hspace{.3mm} who, \\
 & D: &  \hspace{76mm}\raisebox{0pt}[0pt][0pt]{ \raisebox{2.5mm}{[}}'hhh  \\
 & D: &  Oh \underline{that's} the one you to:ld me you bou:ght.= \\
 & C: &  \hspace{2mm}\raisebox{0pt}[0pt][0pt]{ \raisebox{2.5mm}{[}} Oh-- \hspace{42mm}\raisebox{0pt}[0pt][0pt]{             \raisebox{2mm}{\lceil}} \\
 & A: &  \hspace{60.2mm}\raisebox{0pt}[0pt][0pt]{ \raisebox{3.1mm}{\lfloor}}\underline{Ye:h} \\
  \end{tabular}
\hfill{}
}
\caption{ Evaluation of a new artwork from (JS:I. -1) \cite[p.78]{Pomerantz1984} .}
\label{ohprefix}
\end{table*}

which renders this:

In Markdown for my latest paper, the CA bits look like this:

(3)

STE:        U̲o̲:̲h̲ oh ugly things [he paints.] 
KAT:                            [Really?] 
        (3.0) 
STE:        (°I think s[o-])°
KAT:                   [So you wouldn't sell any?] 
STE:        U̲u̲h̲ n[o] 
KAT:              [No?] 
        (1.7)

which renders this:

ugly_things.png

There is a small amount of control sacrificed here – possibly for unicode XeTeX or font issues – I’m not sure yet – I don’t get to render the nicely stretched ceiling characters for overlap marking, or the raised full stop / bullet operator for inbreaths, but normal full stops and square brackets work reasonably well.

Overall, I think the Markdown version represents a significant improvement in legibility. I think it might be possible to do the same in LaTeX using the {verbatim} environment, but the fact that Markdown also lets me concentrate on writing without throwing errors or refusing to compile lets me spend longer on the writing than on endless text-fiddling procrastination.

When it comes to rendering, I feed my markdown file to pandoc:

$ pandoc --latex-engine xelatex --bibliography library.bib --csl default.csl -N -o  paper_title.pdf paper_title.markdown

I use a citation style language file to customise how my bibliographical references are rendered, and it pops out looking like I slaved over the LaTeX for hours.

Notes:

  1. Not all of these systems support bibliographical references with BibTeX – Markdown + Pandoc does this quite elegantly

Tools for Writing Conversation Analytic Papers Read More »